Setting Up Default Audio Device in Windows 10 and 11 (2026 Guide)
By Jon — Windows Audio Troubleshooting Expert | | 20 min read
Quick Answer — How to Set Up Your Default Audio Device
- Fastest way: Right-click the speaker icon in your taskbar → select Sound settings
- Under Output, pick your speakers, headphones, or Bluetooth device from the dropdown
- More control: Press Windows + R, type
mmsys.cpl, hit Enter - On the Playback tab, right-click your device → Set as Default Device
- For video calls: right-click your headset → Set as Default Communication Device
- Per-app routing: Settings → System → Sound → Volume mixer
- Always verify both channels work at mictest.pro/sound-test
Table of Contents
- Why Getting This Right Actually Matters
- The Three Audio Roles Windows Uses (Most People Only Know One)
- Step 1: Open Sound Settings — Two Ways
- Step 2: Pick Your Default Output Device
- Step 3: The Classic Sound Control Panel — Where the Real Power Is
- Step 4: Set Up Per-App Audio Output in Volume Mixer
- Step 5: Configure Your Default Communication Device
- Taskbar Shortcut — Switch Devices in 5 Seconds
- Special Case: Setting Up Bluetooth as Your Default Audio Device
- Device Missing from the List? Here Is Why
- Stopping Windows from Auto-Switching Your Audio
- The HDMI Problem and How to Solve It Permanently
- Which Method to Use — Quick Reference Table
- Testing Your Setup Before You Need It
- 10 Frequently Asked Questions
Why Getting Your Default Audio Device Right Actually Matters
Most people treat audio settings as a one-time thing — set it, forget it. But here is the reality: Windows is constantly reshuffling your audio setup without you realising. Every time you plug in a USB device, connect to a monitor with HDMI, or pair a new Bluetooth speaker, Windows makes a decision about which device should get your audio. And it does not always make the right call.
I have sat with enough frustrated users to know the patterns. The person who spends a morning wondering why their meeting audio keeps cutting out — it was because Windows auto-promoted a rarely-used HDMI device to default the night before. The gamer who notices a sudden drop in audio quality — their headset got switched to the lower-quality Bluetooth Hands-Free profile. These are not edge cases. They happen constantly.
But beyond fixing problems, properly setting up your default audio device unlocks genuine quality-of-life improvements:
- You hear what you paid for. A £200 USB DAC does nothing if Windows is routing audio to your monitor's tinny built-in speaker instead. Same goes for any quality headphones or speakers you have invested in.
- Calls actually sound professional. If your communication device is set correctly, Teams and Zoom will use the right output and input automatically — no fumbling with in-app settings before every meeting.
- You can run different audio to different apps simultaneously. Spotify on your desk speakers, Discord on your headset, game audio through a surround sound setup — all at the same time, once you understand the Volume mixer.
- You stop losing audio randomly. Disabling devices you do not use means Windows stops "helpfully" switching to them when they get connected.
A friend of mine works from home and uses a USB headset for calls and bookshelf speakers for music. For months she was manually adjusting audio before every Teams call. Once she set the headset as the Default Communication Device and the speakers as the Default Device, Windows handled the switching automatically. She now has not touched audio settings since. That is the goal — set it up correctly once and stop thinking about it.
The Three Audio Roles Windows Uses (Most People Only Know One)
Before touching any settings, spend two minutes understanding how Windows thinks about audio output. There are actually three separate roles a playback device can hold, and knowing this upfront makes everything else make sense.
This is where all general audio goes by default — YouTube, Spotify, Netflix, game audio, system notification sounds, everything. When you hit play on anything, audio goes here unless you or an app says otherwise. This is what most people think of when they say "default audio device."
This is specifically used by communication apps — Microsoft Teams, Zoom, Skype, Discord, and similar software. It can be set to a completely different device from your general default. Windows can also automatically reduce the volume of your general audio when a call starts, using this device assignment to know what counts as a "call." Genuinely useful once configured.
Available since Windows 10 version 1803 and fully expanded in Windows 11, this lets you assign a specific output device to a specific application. It overrides both the Default Device and the Communication Device for that particular app. The most flexible option and the one most power users rely on.
Step 1: Open Sound Settings — Two Ways That Always Work
Getting Into SettingsYou can get to Sound Settings in a handful of ways. I will give you the two that actually work reliably every time, without hunting through menus.
- Look at the bottom-right corner of your screen. Find the speaker icon in the system tray.
- Right-click directly on the speaker icon (not the network or battery icons nearby).
- Select "Sound settings" on Windows 11, or "Open Sound settings" on Windows 10.
- You are now in the Sound Settings page. The whole process takes about 3 seconds.
- Press Windows + I to open the Settings app directly.
- Click System in the left panel (Windows 11) or in the main menu (Windows 10).
- Click Sound. Done.

Step 2: Pick Your Default Output Device
Selecting Your DeviceOnce you are in Sound Settings, finding the dropdown is easy. The slightly trickier part is knowing which device name to pick — Windows uses some naming conventions that are not exactly self-explanatory.
- Look for the Output section near the top of the Sound Settings page.
- Click the dropdown labelled "Choose where to play sound" on Windows 11, or "Choose your output device" on Windows 10.
- A list of every recognised audio output device will appear. Here is what the common names actually mean:
- Speakers — Realtek(R) Audio → your built-in speakers (laptop or desktop)
- Headphones — Realtek(R) Audio → wired headphones via the 3.5mm jack
- Speakers — USB Audio Device → a USB headset or USB speaker bar
- [Your headphone model] — Bluetooth Stereo → Bluetooth headphones in high-quality mode
- [Your headphone model] — Hands-Free AG Audio → Bluetooth headphones in call mode (lower quality)
- [Monitor name] — HDMI → audio going to your monitor or TV via HDMI cable
- Click the device you want. The change takes effect immediately — no Save button, no restart.
Step 3: The Classic Sound Control Panel — Where the Real Power Is
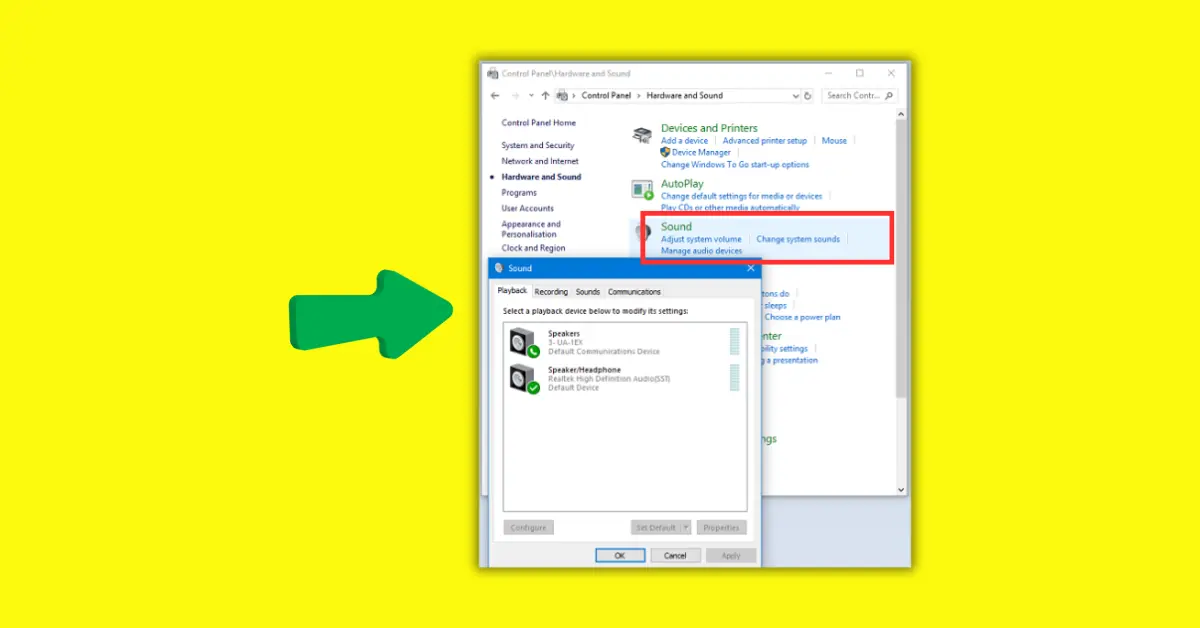
Advanced ControlThe Settings app gives you a basic dropdown. The classic Sound Control Panel — which has been in Windows since Vista and, in 2026, still has not been fully replaced by the modern UI — gives you the full picture. This is where you set Default Communication Devices separately, enable or disable individual devices, and reveal hardware that is hidden by default.
If you only ever use one audio management tool, make it this one.
- Press Windows + R. A small "Run" dialog box appears.
- Type
mmsys.cpland press Enter. The Sound Control Panel opens directly to the Playback tab — no clicking through Settings menus. - You will see a list of every audio output device Windows knows about. Devices with a green checkmark are currently active. The one with a checkmark and the word "Default" is your current default.
- To set a new default: right-click the device you want and select "Set as Default Device." The green checkmark moves to it immediately.
- To set a communication default: right-click the device and choose "Set as Default Communication Device." A small phone icon appears on the device tile.
- Click OK to save and close.
Step 4: Set Up Per-App Audio Output in the Volume Mixer
Per-App RoutingThis is the feature most Windows users have never touched, and once you know it exists, it changes how you think about audio entirely. Instead of one global default, you can tell each individual application exactly which output device to use. They all work independently and simultaneously.
Practical example: Spotify routes to your bookshelf speakers. Discord uses your headset. Your video editing software outputs through studio monitors. A browser with a YouTube tab in the background plays through the TV via HDMI. All four at once, without any of them interfering with the others.
- Go to Settings → System → Sound.
- Scroll down and click Volume mixer.
- Every application currently using audio (or that has used it recently in this session) appears here, each with its own volume slider and an Output device dropdown.
- Click the Output dropdown for any app and choose the device you want it to use. Done — no apply button needed.
- These per-app settings persist between sessions for most applications, so you set it once and it sticks.
- Go to Settings → System → Sound.
- Under "Other sound options," click App volume and device preferences.
- The same per-app controls appear. Use the Output dropdown for each app.
- Setting an app to "Default" means it follows your system-wide default. Any other choice overrides it for that specific app.
Step 5: Configure Your Default Communication Device for Calls and Meetings
Calls and MeetingsIf you use any video or voice communication software regularly — Teams, Zoom, Google Meet, Discord, Skype — this step is worth doing properly. The Default Communication Device is completely separate from your general Default Device, and setting them independently is one of the most practical audio configurations you can make on a Windows machine.
When configured correctly, your communication apps automatically route their audio to your headset while general audio (music, YouTube, game sounds) continues through your speakers. Windows also uses this setting for its "communications ducking" feature, which automatically lowers your background audio volume when a call is active — so you do not have to manually pause Spotify every time someone calls you on Teams.
- Open the Sound Control Panel: Windows + R → type
mmsys.cpl→ Enter. - On the Playback tab, right-click your headset or headphones.
- Select "Set as Default Communication Device." A small phone icon appears on the device tile.
- Right-click your speakers (or whatever you use for general audio) and confirm they are set as the regular Default Device (green checkmark).
- Click OK.
- Open your communication app — Teams, Zoom, etc. — and check its audio settings. Set the output to "Default" or "System Default". This tells the app to respect the Windows Communication Device setting.
Taskbar Shortcut — Switch Audio Devices in About 5 Seconds
Quick SwitchIf you regularly alternate between two devices — say, headphones when you need focus and speakers when you are just doing something casual — the taskbar method is worth knowing. No menus, no Settings, just two clicks.
- Click the speaker icon in the taskbar system tray (bottom-right corner).
- The volume flyout panel appears. Look for a small arrow or chevron icon to the right of the volume slider.
- Click that arrow. A list of all currently active (enabled) playback devices expands.
- Click any device in the list. Audio switches to it immediately.
- Click the speaker icon in the taskbar.
- Above the main volume slider, you will see the current device name in small text. Click that device name.
- A list of all enabled playback devices slides out.
- Click any device to switch. Instant change, no confirmation needed.
Special Case: Setting Up Bluetooth as Your Default Audio Device
Bluetooth SetupBluetooth headphones and speakers behave a little differently from wired devices, and understanding those differences saves a lot of confusion. The setup process is straightforward once you know what to expect.
- First, make sure your Bluetooth device is paired and connected. Go to Settings → Bluetooth & devices and confirm it shows as Connected.
- Open Sound Settings (right-click speaker icon → Sound settings).
- Under Output, find your Bluetooth device. As mentioned earlier, it will likely appear twice: once as [Device Name] — Headphones and once as [Device Name] — Hands-Free AG Audio.
- Choose the Headphones entry for general audio use. This uses the A2DP profile — full stereo quality.
- If you need the Bluetooth mic for a call, switch to the Hands-Free entry temporarily. Understand that audio quality will drop because both output and microphone cannot operate at full quality simultaneously over Bluetooth.
Device Missing from the List? Here Is Why (and How to Fix It)
TroubleshootingDevices vanishing from the playback list is one of the most common audio complaints. Before concluding the device is broken or the driver is corrupted, try these steps in order. I have seen all of them solve the problem at various points.
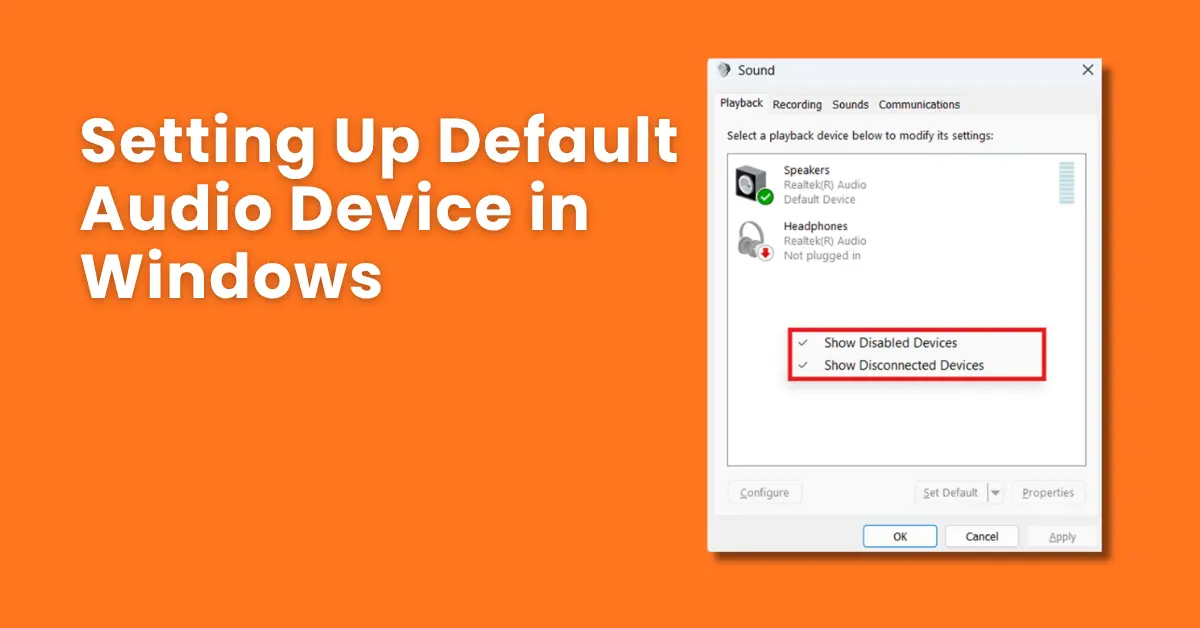
- Reveal hidden devices first. Open the Sound Control Panel (
mmsys.cpl), go to the Playback tab, right-click an empty area of the list, and enable both "Show Disabled Devices" and "Show Disconnected Devices." If your device appears but is greyed out, right-click it and select Enable. - Unplug and reconnect. For USB or 3.5mm devices, physically disconnect and reconnect the cable. Windows registers the device again on reconnection, which can unstick a device that dropped off.
- Check the jack type. Many modern laptops have a combo audio jack that handles both headphones and headsets with a microphone. A standard 3-pole headphone plug and a 4-pole headset plug may behave differently in the same port. If your device is not registering, try a different port or check whether a separate headphone and microphone port is available.
- Restart the Windows Audio service. Press Windows + R, type
services.msc, press Enter. Scroll down to Windows Audio, right-click it, and select Restart. Check the Playback tab again. - Check Device Manager. Press Windows + X and select Device Manager. Expand Sound, video and game controllers. If there is a yellow warning icon on any device, right-click it and select Update driver. An outdated Realtek or Intel High Definition Audio driver is a common reason for devices disappearing.
- Check privacy settings. On Windows 11, go to Settings → Privacy & security → Microphone and also check Settings → Privacy & security → Camera. While these are primarily for input, some audio subsystems share permission structures and restricting them can affect output visibility in certain configurations.
Stopping Windows from Auto-Switching Your Audio Device
Prevent Unwanted ChangesThis is the feature — or more accurately, the behaviour — that frustrates people the most. You set your headphones as the default. You plug in a monitor. Suddenly audio is going through the monitor speakers you did not even know were active. You plug in a USB drive that happens to have audio capability. Audio switches. It feels like Windows is working against you. It is not — it is just being overly enthusiastic about "helpfully" promoting new devices.
- Open
mmsys.cpland go to the Playback tab. - Right-click in the empty area and enable "Show Disabled Devices" and "Show Disconnected Devices" so you can see everything.
- For every device you do not want Windows to ever use as a default: right-click it and select Disable.
- Leave only the devices you actively use as Enabled.
- Click OK.
Disabled devices remain installed and functional — you can re-enable them at any time. But Windows will not auto-promote them to default when they are connected, because from Windows' perspective, they are not available for that role.
- Any HDMI or DisplayPort audio output you do not use for audio
- Stereo Mix (unless you specifically need it for recording)
- Any Bluetooth Hands-Free entry you never use for calls
- Built-in monitor speakers if you use external speakers exclusively
- Any USB audio device from a webcam or peripheral with hidden audio capability
The HDMI Audio Problem and How to Solve It Permanently
HDMI Audio FixHDMI audio taking over as the default is so common it deserves its own section. Every HDMI cable carries audio signals alongside video, and every monitor, TV, or projector that supports HDMI technically has audio capability — even the ones with terrible built-in speakers you will never use. Windows sees a new audio-capable device and, left to its own devices, switches to it.
The fix is simple and permanent:
- Press Windows + R, type
mmsys.cpl, press Enter. - On the Playback tab, look for entries with HDMI or DisplayPort in the name, or entries named after your monitor model.
- Right-click the HDMI device(s) you do not want active and select Disable.
- Click OK.
Your speakers or headphones will now stay as the default even when you connect a new monitor or plug in an HDMI cable. If you ever genuinely need to send audio through HDMI — for a presentation, or when watching something on a TV — you can temporarily re-enable that device from the same panel, use it, and disable it again when done.
Which Method to Use — Quick Reference Table
| Your Situation | Best Method | Time Needed | Win 10 | Win 11 |
|---|---|---|---|---|
| Quick one-off switch between two devices | Taskbar speaker → chevron arrow | ~5 sec | ||
| Set a permanent default audio device | Sound Settings → Output dropdown | ~30 sec | ||
| Separate call audio from general audio | mmsys.cpl → Default Communication Device | ~2 min | ||
| Different device for each app | Settings → Sound → Volume mixer | ~3 min | ||
| Stop HDMI or USB hijacking audio | mmsys.cpl → Disable unwanted devices | ~2 min | ||
| Device completely missing from list | Show Disabled Devices → Enable | ~5 min | ||
| Stop Windows auto-switching entirely | mmsys.cpl → Disable non-default devices | ~3 min |
Testing Your Audio Setup Before You Actually Need It
This might sound obvious, but a lot of people skip the test and only discover their audio setup is broken when they are about to start a meeting or presentation. Spend 60 seconds testing now — it is worth it.
- Quick Windows built-in test: In the Sound Control Panel (
mmsys.cpl), right-click your default device on the Playback tab and select Test. Windows plays a short chime through that device. You should hear it clearly from whichever speakers or headphones you just set as default. - Left and right channel test: The built-in Windows test does not distinguish between left and right channels. For a proper stereo check — especially important after setting up Bluetooth headphones — visit mictest.pro/sound-test. It plays a tone in the left channel, then the right, independently. You can immediately tell if one side is silent, too quiet, or delayed.
- App-level check: After setting per-app audio in the Volume mixer, open each application and play something to confirm it routes to the correct device. Apps that override the system default with their own saved settings (some versions of Spotify, Chrome, some games) may need their in-app audio settings updated too.

10 Frequently Asked Questions
How do I set up a default audio device in Windows 10 and 11?
Right-click the speaker icon in your taskbar and choose Sound settings. Under the Output section, use the dropdown to select your preferred device — the change takes effect immediately with no restart required. For a more permanent and precise setup, press Windows + R, type mmsys.cpl, and hit Enter. On the Playback tab, right-click your preferred device and select "Set as Default Device." A green checkmark confirms it. Click OK to save. The whole process takes under two minutes.
Why is my default audio device changing on its own in Windows?
Windows automatically promotes newly connected audio devices — HDMI monitors, USB headsets, Bluetooth speakers — to the default the moment it detects them. To stop this, open the Sound Control Panel (mmsys.cpl), go to the Playback tab, right-click each device you do not want promoted automatically, and select Disable. Disabled devices stay installed but Windows will no longer switch to them when they are plugged in. This is the most reliable long-term fix for the auto-switching problem.
What is the difference between Default Device and Default Communication Device in Windows?
The Default Device receives all general audio — music, video, games, system sounds. The Default Communication Device is used specifically by call and meeting apps like Microsoft Teams, Zoom, Discord, and Skype. Setting them to different physical devices lets you, for example, keep music playing through your desk speakers while call audio routes exclusively to your headset. Windows also uses the Communication Device setting for automatic audio ducking — it lowers your background audio volume when a call is detected.
How do I route audio from a specific app to a specific device?
On Windows 11: go to Settings → System → Sound → Volume mixer. Each app currently using audio shows its own Output dropdown — assign any device you like. On Windows 10: go to Settings → System → Sound → App volume and device preferences. The app must be open and actively producing audio to appear in the list. Per-app settings persist between sessions for most applications, so you set it once and it sticks.
My headphones are not showing up in the Playback devices list — what should I do?
Start here: open mmsys.cpl, go to the Playback tab, right-click an empty area, and enable "Show Disabled Devices" and "Show Disconnected Devices." If your headphones appear greyed out, right-click them and choose Enable. If they do not appear at all: try unplugging and replugging the cable, then check again. If still absent, restart the Windows Audio service via services.msc. For persistent issues, update your audio driver through Device Manager.
How do I quickly switch between audio output devices without going into Settings every time?
On Windows 11: click the speaker icon in the taskbar, then click the small arrow/chevron icon to the right of the volume slider. All enabled playback devices appear — click any to switch instantly. On Windows 10: click the speaker icon and tap the device name shown above the slider to expand the full list. For frequent switching between three or more devices, the free open-source tool SoundSwitch lets you assign a keyboard shortcut for even faster cycling.
Does setting up a default audio device work with Bluetooth headphones?
Yes — once your Bluetooth headphones are paired and connected, they appear in the Playback device list just like wired devices. They typically show up as two entries: Headphones (high-quality A2DP stereo profile) and Hands-Free AG Audio (lower quality, enables the mic). Always choose the Headphones entry for general audio. Switch to Hands-Free only when you specifically need the Bluetooth microphone for a call and no other mic is available.
Why does plugging in an HDMI cable change my default audio device?
HDMI carries audio signals alongside video, and Windows detects the audio capability of HDMI-connected monitors and TVs as new playback devices. When it does, it automatically promotes them to the default. The permanent fix: open mmsys.cpl, find the HDMI audio entry on the Playback tab, right-click it, and select Disable. Windows will stop switching to it when you connect the monitor, and your speakers or headphones will remain the default.
Can I set up two audio devices to play the same sound simultaneously in Windows?
Not natively with a single audio source — Windows supports only one Default Device. However, using the Volume mixer's per-app output feature, you can have different applications playing through completely different devices at the same time. For true audio mirroring — the same sound going to two devices simultaneously — you need a third-party tool like Voicemeeter Banana (free) or a virtual audio cable solution. These work well and are popular in streaming and home studio setups.
How do I test that my default audio device is set up correctly?
In the Sound Control Panel (mmsys.cpl), right-click your default device on the Playback tab and choose Test — Windows plays a chime through that device. For a more thorough stereo check, visit mictest.pro/sound-test, which plays distinct tones through the left and right channels separately. This is especially useful after switching Bluetooth headphones or making per-app Volume mixer changes, since individual channel issues can go unnoticed with a mono test tone.
Related Posts
- Right-click speaker icon → Sound settings
- Output → select your device
- Win+R → mmsys.cpl → Playback tab
- Right-click → Set as Default Device
- Volume mixer for per-app control
- Disable HDMI/USB to stop auto-switching
- Test at mictest.pro/sound-test
Verify Your Audio Is Working — Free
After setting up your default audio device, confirm both left and right channels are playing correctly. Our free sound test plays tones through each channel independently — no install required, works instantly in any browser.
Open Sound Test at MicTest.pro- Win + I → System → Sound: Sound Settings
- Win + R → mmsys.cpl: Classic Sound Control Panel
- Win + R → services.msc: Restart Windows Audio
- Win + X → Device Manager: Update audio drivers
- Taskbar speaker → arrow: Quick device switch (Win 11)
- Right-click Playback tab: Show hidden devices
- Default Device — all general audio (music, games, video)
- Communication Device — Teams, Zoom, Discord, Skype
- Per-App (Volume mixer) — override for individual apps
- A2DP (Headphones) — full quality Bluetooth audio
- Hands-Free AG — call mode, mic enabled, lower quality