How to Resetting Audio Settings in Windows 10 and 11 — Complete Guide 2026
By Jon — Windows Audio Expert | | 16 min read
Quick Answer — How to Reset Audio Settings in Windows
- Run the Playing Audio Troubleshooter first: Settings → System → Troubleshoot → Other troubleshooters
- Disable all audio enhancements in output device properties → Enhancements tab
- Reset Volume Mixer in Settings → System → Sound → Advanced → Volume mixer → Reset
- Reset audio format to 16-bit 44100 Hz in device Advanced tab → Restore Defaults
- Reinstall your audio driver via Device Manager for a full clean reset
- Turn off Spatial Sound if enabled — it often causes playback distortion
- Restart Windows Audio service via services.msc as a final step
- Verify everything is fixed with the free sound test tool
Table of Contents
- Why You Need to Reset Audio Settings in Windows
- Identify What Went Wrong First
- Step 1: Run the Playing Audio Troubleshooter
- Step 2: Disable All Audio Enhancements
- Step 3: Reset Volume Mixer and App Volume Levels
- Step 4: Reset the Audio Driver (Reinstall)
- Step 5: Restart the Windows Audio Service
- Step 6: Reset Spatial Sound and Audio Format
- Step 7: Reset Communication Device Settings
- Step 8: Full Factory Reset Using System Restore (Last Resort)
- Which Reset Method Solves What?
- Verify Your Audio After Resetting
- Frequently Asked Questions
Why You Need to Reset Audio Settings in Windows
Windows is quietly aggressive about modifying your audio configuration. A routine update can overwrite your audio driver with a generic one. An app install can silently enable audio enhancements that distort playback. A Windows 11 feature update can reset your default output device and re-enable Spatial Sound you had disabled months ago.
The result is the same whether the trigger was an update, a software install, or simply Windows "optimising" things in the background: your audio sounds different — or stops working entirely — and you have no obvious way to undo the changes.
This guide covers every meaningful audio reset available in Windows 10 and 11, ordered from the simplest and safest to the most thorough. You do not need to work through all of them — most people find the fix they need within the first three steps.
- Distorted or robotic-sounding audio — almost always caused by audio enhancements or a wrong format setting
- Volume behaves strangely or certain apps are silent — Volume Mixer has app-specific settings that override the master volume
- Output device switched after an update — Windows reset your default device during the update
- Audio worked yesterday, broken today with no change made — Windows Update changed a driver or service configuration silently
- Crackling, popping, or stuttering audio — typically an audio format mismatch or driver corruption
- No sound at all — the Windows Audio service may have failed to restart after an update
Important before you start: Every reset in this guide is non-destructive. You will not lose files, recordings, or any personal data. Audio configuration changes are fully reversible, and a driver reinstall is automatically handled by Windows on the next reboot.
Identify What Went Wrong Before You Reset
Knowing your specific symptom points you directly to the right reset. Use this quick reference:
What symptom are you experiencing?
- Distorted, muffled, or robotic sound → Audio enhancements issue (Step 2) or wrong audio format (Step 6)
- One app is silent, others work fine → Volume Mixer has that app muted (Step 3)
- No sound from any app or device → Windows Audio service crashed (Step 5) or driver issue (Step 4)
- Wrong speaker/headphone playing → Default output device was reset (Step 1, then manually set default)
- Crackling, popping, or stuttering → Driver issue (Step 4) or audio format mismatch (Step 6)
- Spatial / 3D audio sounds wrong → Spatial Sound is enabled (Step 6)
- Audio broken since a Windows Update → Full driver reset recommended (Step 4)
Step 1: Run the Playing Audio Troubleshooter
Always Start HereThe Windows built-in audio troubleshooter is underrated. It does not just "run diagnostics" — it actively resets broken audio services, re-enables disabled devices, and corrects misconfigured default outputs. It takes about 60 seconds and fixes the majority of audio problems caused by Windows Updates.
- Open Settings → System → Troubleshoot → Other troubleshooters.
- Find Playing Audio and click Run.
- When asked which device to troubleshoot, select your primary output device (speakers or headphones).
- Follow any on-screen prompts. Apply all recommended changes.
- Restart your PC if prompted.
- Open Settings → Update & Security → Troubleshoot → Additional troubleshooters.
- Click Playing Audio → then click Run the troubleshooter.
- Follow the prompts and apply any suggested fixes.
Step 2: Disable All Audio Enhancements
Fixes Distorted & Robotic AudioAudio enhancements are the single most common cause of distorted, muffled, or robotic sound after a Windows Update. Windows enables features like bass boost, virtual surround, loudness equalization, and room correction automatically — and they frequently conflict with each other or with your hardware's own processing. Disabling them all takes your audio back to a raw, clean state.
- Go to Settings → System → Sound.
- Under Output, click your active output device (e.g., Speakers or Headphones).
- Click Additional device properties — a classic dialog opens.
- Click the Enhancements tab.
- Check the box for Disable all enhancements (or Disable all sound effects).
- Click Apply → OK.
- Test your audio immediately — most distortion disappears at this step.
- Right-click the speaker icon in the taskbar → select Sounds.
- Click the Playback tab.
- Double-click your active output device.
- Click the Enhancements tab.
- Check Disable all enhancements.
- Click Apply → OK.
Step 3: Reset Volume Mixer and Per-App Volume Levels
Fixes Silent Apps or Uneven VolumeWindows stores separate volume levels for every application. If Chrome is at 20% volume in the mixer but Spotify is at 100%, the difference can feel like a bug. Worse, apps can get accidentally muted in the mixer and stay that way permanently — even when the master volume is at full. Resetting the mixer brings everything back to 100%.
- Go to Settings → System → Sound.
- Scroll down to Advanced and click Volume mixer.
- At the top right of the Volume mixer page, click the Reset button.
- All per-app volumes return to 100% and custom device assignments are cleared.
- Right-click the speaker icon in the taskbar → select Open Volume Mixer.
- Drag all application sliders back to 100 (the top of the bar).
- Make sure no application shows a muted speaker icon — click the speaker icon under any app to unmute it.
Step 4: Reset the Audio Driver — Uninstall and Reinstall
Most Thorough Software ResetReinstalling the audio driver is the closest thing to a complete software reset for your sound system. It clears driver-level configuration, removes corrupted state, and forces Windows to rebuild audio routing from scratch. This is especially effective when audio broke after a Windows 11 24H2 or Windows 10 22H2 update overwrote your OEM driver.
- Press Windows + X and select Device Manager.
- Expand Sound, video and game controllers.
- Right-click your audio device — usually Realtek High Definition Audio, Intel Smart Sound Technology, or your PC brand's audio device.
- Select Uninstall device.
- In the confirmation dialog, check "Delete the driver software for this device" if the option is available.
- Click Uninstall.
- Restart your PC. Windows automatically reinstalls a clean working driver on reboot.
- After restart, check Settings → System → Sound and confirm your output device appears correctly.

Step 5: Restart the Windows Audio Service
Fixes Total Audio FailureThe Windows Audio service (AudioSrv) and its companion Windows Audio Endpoint Builder (AudioEndpointBuilder) handle all audio routing between applications and hardware. If either crashes — which can happen after a bad update or system freeze — no application can produce any sound at all, regardless of driver or settings. Restarting them takes under 30 seconds.
- Press Windows + R, type
services.msc, and press Enter. - Scroll down and find Windows Audio.
- Right-click it and select Restart. If it shows Stopped, select Start instead.
- Find Windows Audio Endpoint Builder in the same list.
- Right-click it and select Restart.
- Close Services and test your audio.
Step 6: Reset Spatial Sound and Audio Format
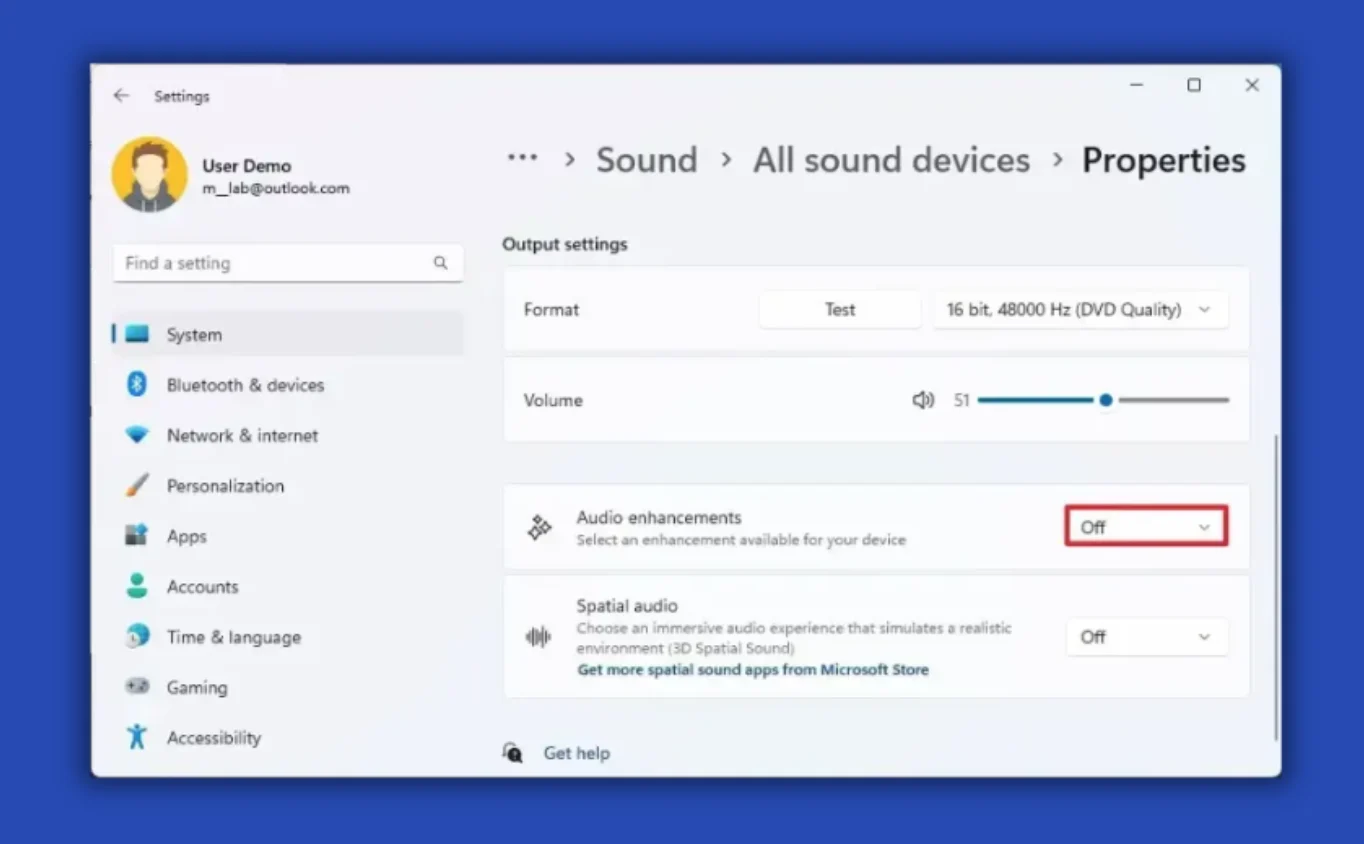
Fixes Crackling & Wrong Sound QualityTwo settings that frequently get changed without users realising are Spatial Sound (Windows Sonic, Dolby Atmos) and the audio output format. Spatial Sound can be enabled by app installs and causes audio to sound off, echoey, or spatially wrong on standard stereo headphones. An incorrect audio format setting causes crackling, popping, and stuttering.
- Go to Settings → System → Sound.
- Click your active output device under Output.
- Click Additional device properties.
- Click the Spatial sound tab.
- Set the format dropdown to Off.
- Click Apply → OK.
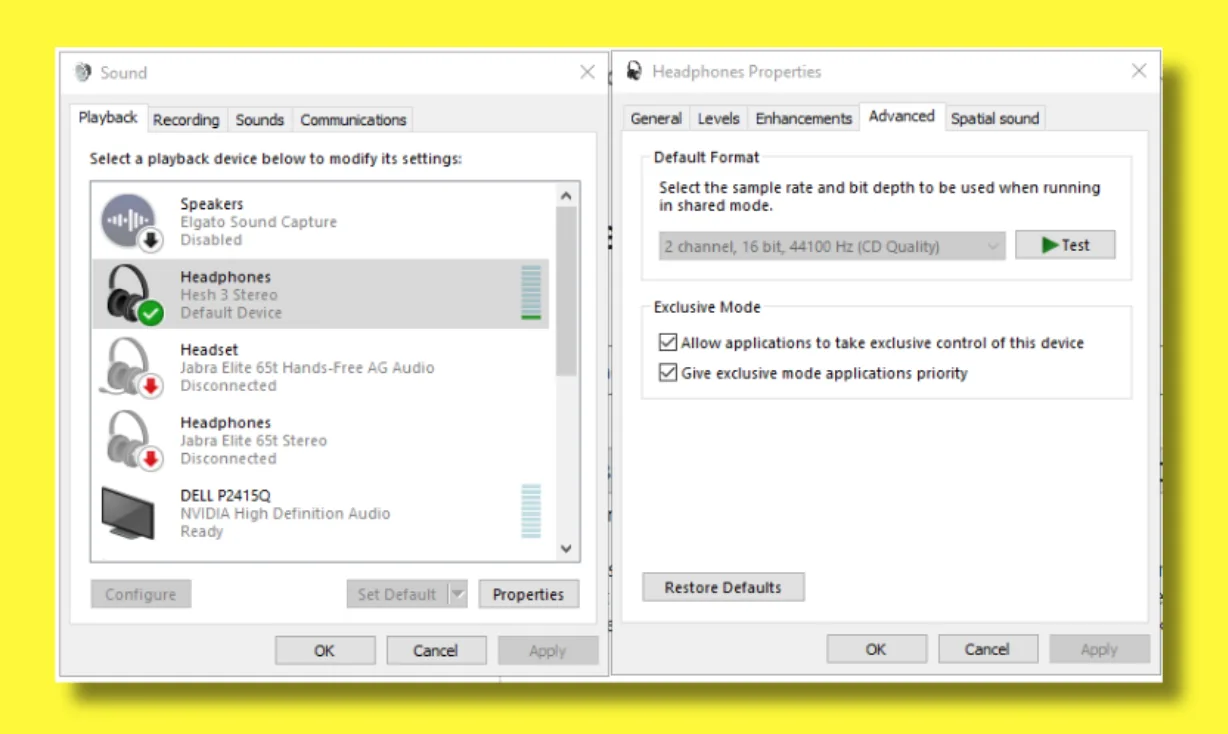
- In the same device properties dialog, click the Advanced tab.
- Under Default Format, click the dropdown and select 16 bit, 44100 Hz (CD Quality) — this is the universal safe default.
- Click Restore Defaults at the bottom of the tab to reset all Advanced settings at once.
- Click Apply → OK.
Step 7: Reset Communication Device Settings
Fixes Volume Drop During CallsWindows has a hidden "Communications" setting that automatically lowers other sounds by up to 80% whenever it detects a phone call or voice chat. If you have noticed your music or game audio suddenly becoming much quieter during calls — or sometimes just randomly — this is almost certainly the cause.
- Press Windows + R, type
mmsys.cpl, press Enter. - Click the Communications tab.
- Select "Do nothing".
- Click Apply → OK.
This prevents Windows from automatically ducking your audio volume during communication activities. Most users find the default setting (which lowers other sounds by 80%) extremely disruptive once they realise it exists.
Step 8: Full Reset Using System Restore (Last Resort)
Last Resort — Rolls Back EverythingIf your audio worked perfectly before a specific Windows Update and every other reset has failed, System Restore can roll your entire system configuration back to a point before the update — including all audio drivers and settings. This is a last resort because it also undoes any other system changes made since that restore point.
- Press Windows + R, type
rstrui, press Enter. - Click Next in the System Restore wizard.
- Select a restore point dated before your audio problems began. Look for points labelled "Windows Update" — these are created automatically before every major update.
- Click Next → Finish.
- Your PC restarts and restores the selected configuration. This takes 10–20 minutes.
Which Reset Method Solves What? Quick Reference
| Reset Method | Symptom It Fixes | Difficulty | Win 10 | Win 11 |
|---|---|---|---|---|
| Audio Troubleshooter | General audio failure, wrong output | Easy | ||
| Disable Enhancements | Distorted, robotic, muffled sound | Easy | ||
| Reset Volume Mixer | Silent apps, uneven volume levels | Easy | ||
| Reinstall Audio Driver | All audio broken, post-update failure | Medium | ||
| Restart Audio Service | No sound from any app | Easy | ||
| Reset Spatial Sound & Format | Crackling, popping, echoey audio | Easy | ||
| Communication Settings | Volume drops during calls | Easy | ||
| System Restore | Everything broken since specific update | Advanced |
Verify Your Audio After Resetting
After any audio reset, always run a proper verification — not just playing a YouTube video. You need to confirm that both audio channels are working, volume is balanced, and there is no residual distortion before assuming the problem is solved.
- Windows built-in test: Go to Settings → System → Sound → click your output device under Output → click Test. A tone plays in each channel separately.
- Free online sound test: Visit mictest.pro/sound-test — plays audio through your left and right channels independently so you can confirm both sides are working, balanced, and free from distortion. Works in all browsers, completely free, no download required.
- Volume Mixer check: Open Settings → System → Sound → Volume mixer and confirm all active applications show 100% volume and none are muted.
Audio still broken after all 8 steps? If you have reinstalled the driver, disabled enhancements, reset the service, and rolled back via System Restore, the most likely remaining cause is a hardware issue — either a failing audio chip or a damaged port. As a reliable workaround, a USB audio adapter (under £8 / $10) creates an entirely new audio device that Windows detects cleanly and bypasses the onboard hardware completely.

Frequently Asked Questions
How do I reset audio settings to default in Windows 11?
Go to Settings → System → Sound → Advanced → Volume mixer and click Reset. Then open your output device properties, go to the Enhancements tab and check Disable all enhancements. Under the Advanced tab, set the format to 16-bit, 44100 Hz (CD Quality) and click Restore Defaults. These three actions cover the majority of what a full audio reset does in Windows 11.
How do I reset audio settings in Windows 10?
Right-click the speaker icon → Sounds → Playback tab → double-click your output device → Enhancements tab → check Disable all sound effects. Then open the Advanced tab and click Restore Defaults. To reset volume levels, right-click the speaker icon → Open Volume Mixer and drag all application sliders to 100.
Will resetting audio settings delete anything permanently?
No. Every audio reset in this guide only changes configuration values — it does not delete files, recordings, or personal data. Even reinstalling an audio driver is non-destructive: Windows automatically reinstalls a working driver on the next reboot. All changes are reversible, and your personal files are completely unaffected by any audio settings reset.
Why did my audio settings change after a Windows Update?
Windows feature updates — including Windows 11 24H2 and Windows 10 22H2 — regularly overwrite OEM audio drivers with generic Microsoft versions, reset your default output device, and re-enable audio enhancements. This is one of the most frequently reported audio issues after major updates. Always check your audio driver version in Device Manager and your default output device in Sound Settings immediately after any large Windows Update.
How do I reset audio enhancements in Windows?
Open Control Panel → Sound → Playback tab → double-click your output device → click the Enhancements tab → check Disable all enhancements → click Apply. On Windows 11, reach the same dialog via Settings → System → Sound → your output device → Additional device properties → Enhancements tab. Disabling all enhancements returns audio to a clean, unprocessed state and resolves the majority of distortion issues.
How do I fix distorted or robotic sound in Windows 10 and 11?
Distorted or robotic audio in Windows has three main causes: audio enhancements are enabled, the audio format setting is incorrect, or the audio driver is corrupted. Start by disabling all enhancements in device properties (Step 2 in this guide). Then reset the audio format to 16-bit 44100 Hz under the Advanced tab. If distortion persists, reinstall the audio driver via Device Manager. These three steps resolve the overwhelming majority of distortion issues.
Does reinstalling the audio driver fix sound problems?
Yes — reinstalling the audio driver is one of the most effective resets for persistent sound problems because it clears all driver-level configuration and corrupted state. Open Device Manager, right-click your audio device under Sound, video and game controllers, select Uninstall device, check "Delete the driver software", restart your PC, and Windows reinstalls a clean driver automatically. For laptops, follow up by downloading the OEM driver from your manufacturer's support page.
What is the Windows Audio service and how do I restart it?
The Windows Audio service (AudioSrv) manages all audio output and input across the system. If it crashes, no sound plays from any application. To restart it: press Windows + R, type services.msc, find Windows Audio, right-click and select Restart. Also restart Windows Audio Endpoint Builder the same way. Set both services to Startup type Automatic in their Properties to prevent this happening again after reboots.
How do I reset the Volume Mixer in Windows 11?
Go to Settings → System → Sound → Advanced → Volume mixer. At the top right of the Volume mixer page, click the Reset button. This restores all per-app volume levels back to 100%, clears any custom audio device assignments made for specific applications, and removes mute overrides that Windows stored for individual apps.
How do I test my audio after resetting settings in Windows?
Go to Settings → System → Sound, click your output device under Output, and click Test — Windows plays a tone in each channel. For a more thorough check that verifies both left and right channels independently, visit mictest.pro/sound-test — a free online tool requiring no installation that works across all browsers and confirms both channels are producing balanced, distortion-free audio after your reset.
Related Posts
- Run Playing Audio Troubleshooter first
- Disable all audio enhancements
- Reset Volume Mixer to 100%
- Reinstall driver via Device Manager
- Shortcut: Win + R →
mmsys.cpl - Turn Spatial Sound Off
- Services: Win + R →
services.msc
Test Your Audio After Resetting — Free
Play left and right audio channels independently to confirm both sides are working correctly after your Windows audio reset. Free, no install required.
Open Sound Test at MicTest.pro- Distorted / robotic: Steps 2, 6
- Silent app: Step 3
- No sound at all: Steps 4, 5
- Crackling / popping: Steps 4, 6
- After Windows Update: Steps 1, 4
- Volume drops on calls: Step 7