Managing Audio Input Devices in Windows 10 and 11 - Complete Guide 2026
By Jon | 16 March, 2026 | 11 min read
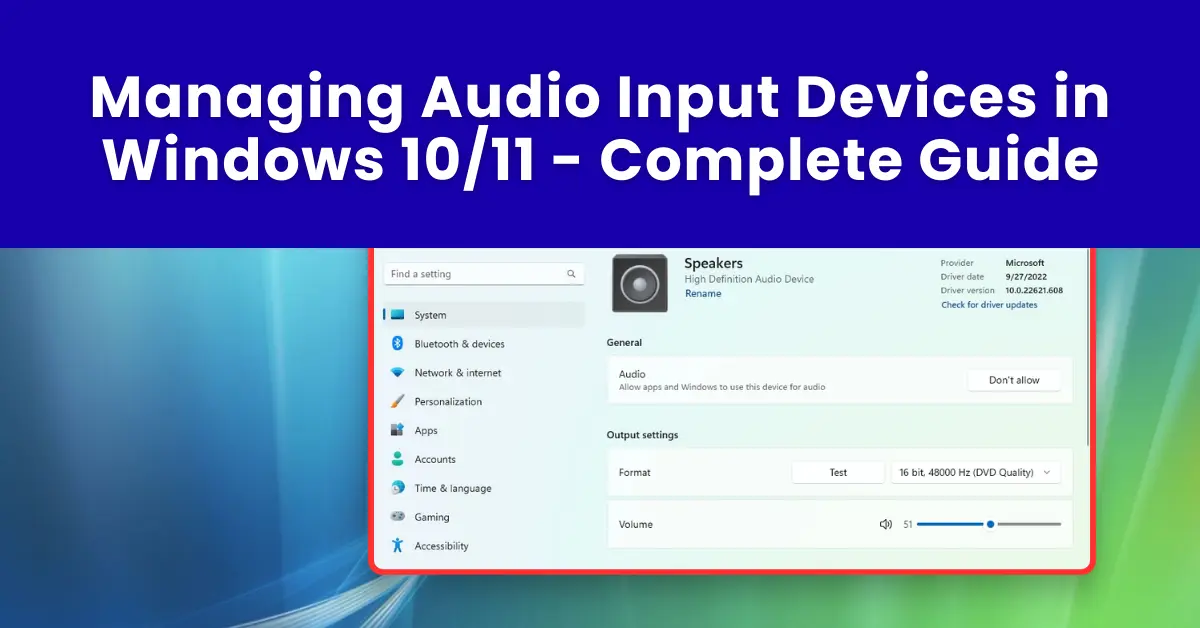
Table of Contents
- What Are Audio Input Devices?
- 1. How to View All Audio Input Devices in Windows
- 2. Set a Default Audio Input Device
- 3. Switch Between Microphones Quickly
- 4. Adjust Input Volume and Microphone Levels
- 5. Configure Per-App Audio Input Settings
- 6. Manage Microphone Privacy Permissions
- 7. Update or Reinstall Audio Input Drivers
- 8. Use the Legacy Sound Control Panel
- 9. Troubleshoot Audio Input Device Problems
- 10. Manage Bluetooth Audio Input Devices
- 11. Restart Windows Audio Services
- 12. Test Your Audio Input Device
- Frequently Asked Questions
What Are Audio Input Devices?
An audio input device is anything that captures sound and sends it to your computer — your built-in laptop microphone, a USB desk mic, a headset, or even a professional audio interface. Windows 10 and 11 support multiple input devices simultaneously, but only one acts as the default at any time.
Whether you're on a video call, recording a podcast, using voice-to-text, or gaming with teammates, knowing how to manage your audio input devices in Windows properly saves you from frustrating dropped calls, silent recordings, and apps picking up the wrong microphone. Windows has a habit of quietly switching your default microphone whenever a new device is plugged in — understanding why that happens and how to stop it is one of the most valuable things this guide covers. Every setting is explained step by step in plain language.
Quick Tip: Not sure if your microphone is actually working right now? Before diving into settings, do a fast real-time mic check at mictest.pro — no download or account needed. It works on all browsers in Windows 10 and 11.
1. How to View All Audio Input Devices in Windows
The first step in managing your audio input is knowing what devices Windows can actually see. Here's how to find the full list:
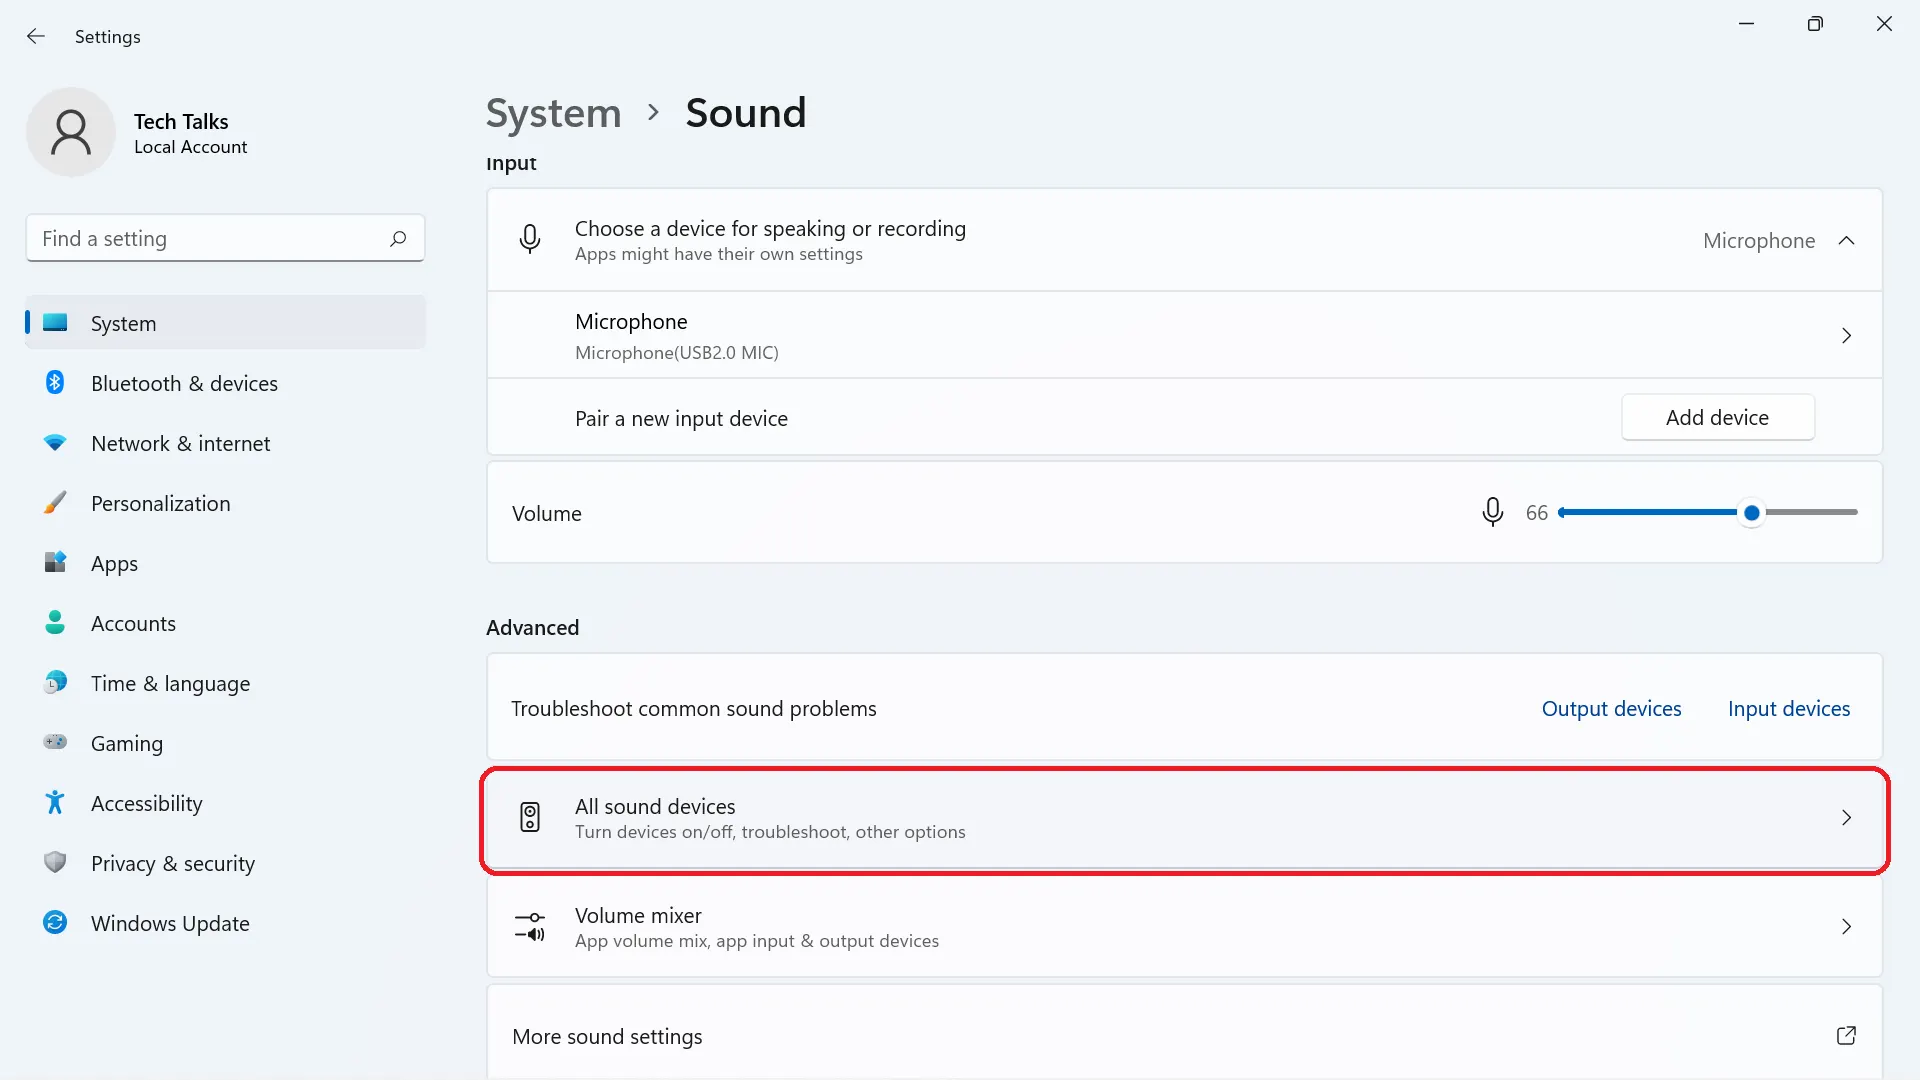
- Press Windows + I to open Settings.
- Go to System → Sound.
- Scroll down to the Input section — all connected microphones and audio input devices will be listed here.
- Open Settings → System → Sound.
- Under Input, click "Choose your input device" to see the dropdown list of all detected microphones.
If a device is connected but doesn't appear in this list, it may be disabled or missing a driver — both are covered later in this guide.

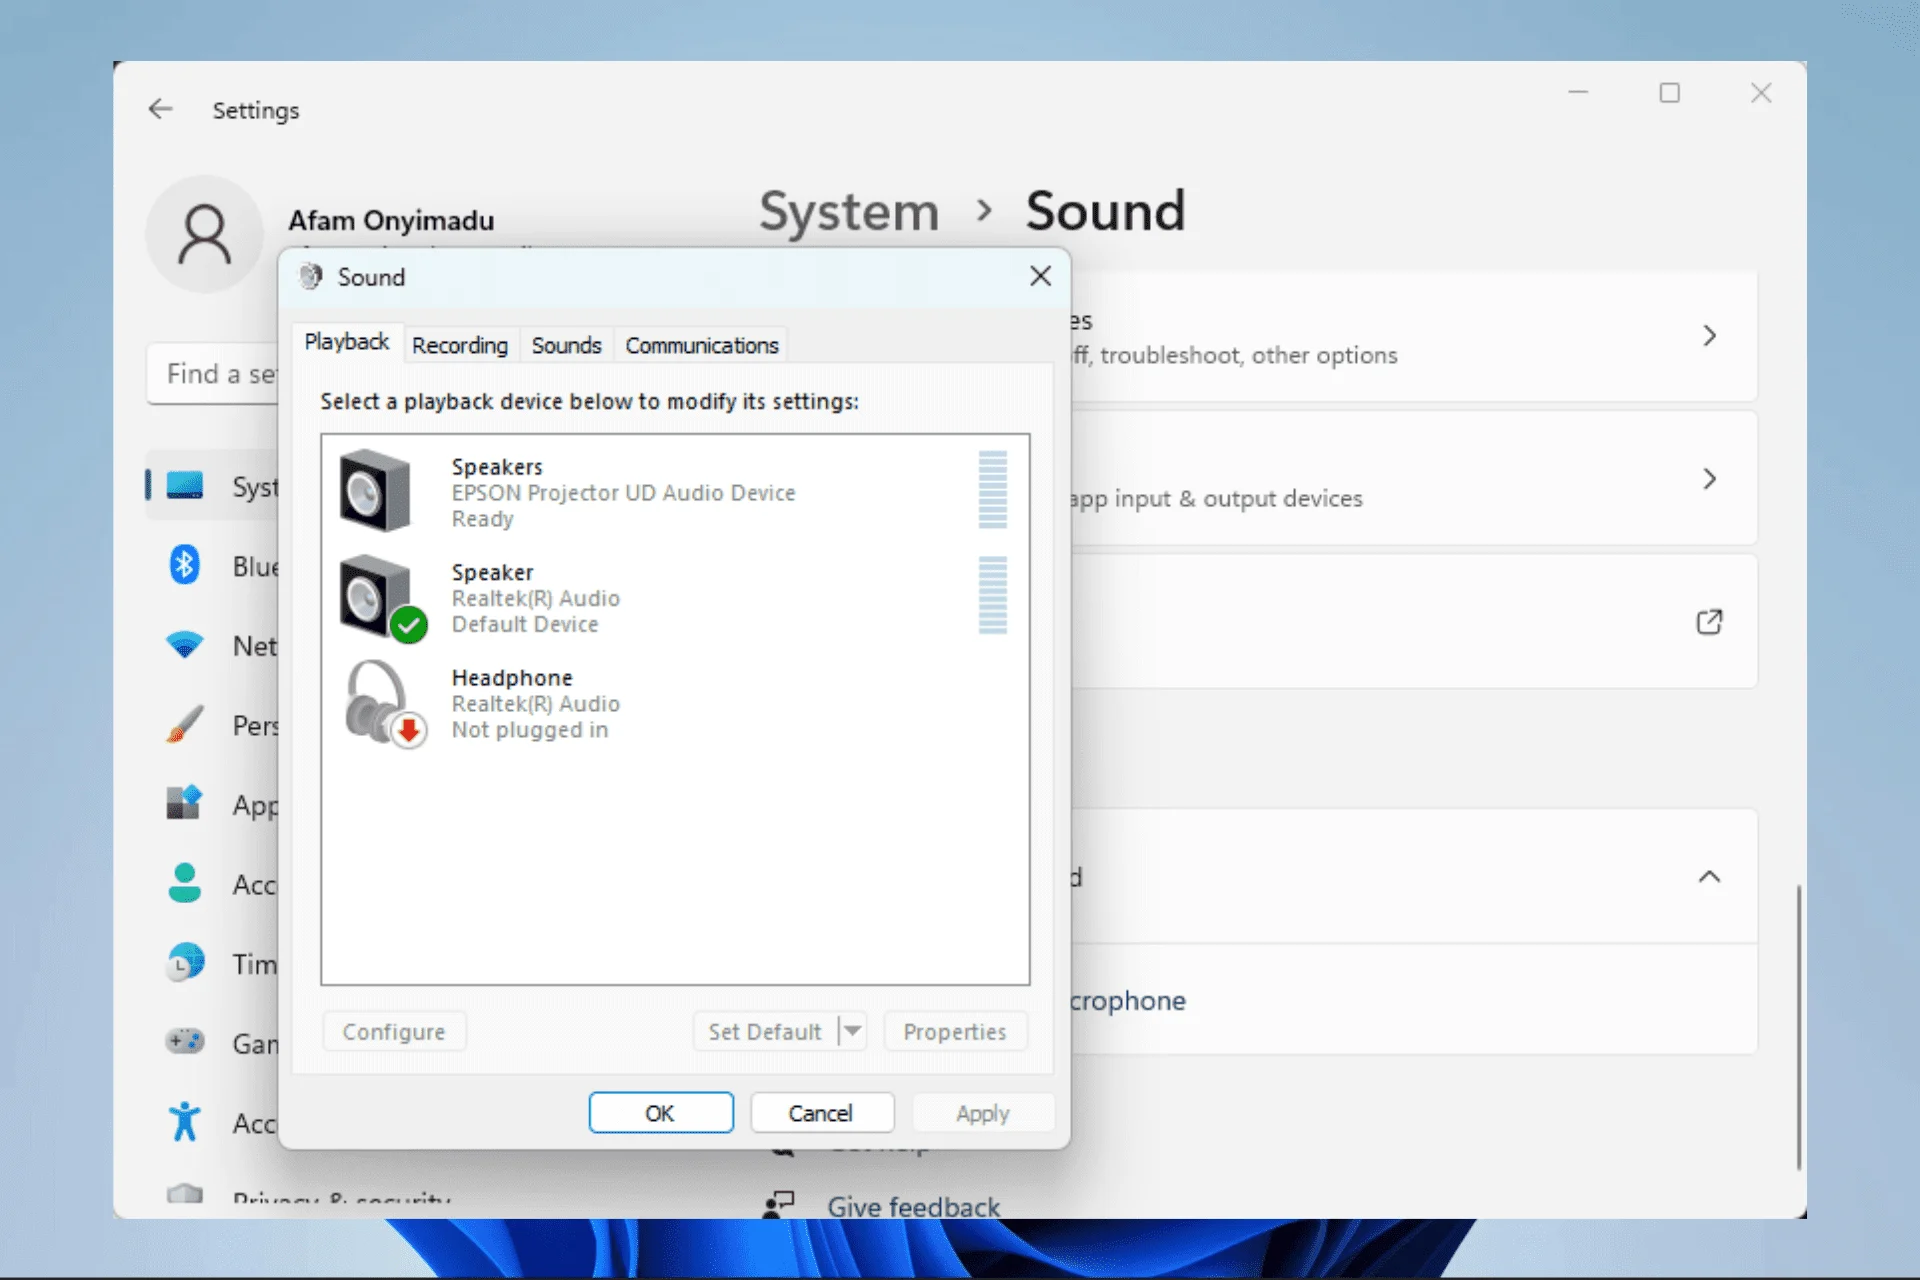
2. Set a Default Audio Input Device
Windows uses the default input device for all apps unless an app has its own audio setting. If you have multiple microphones and the wrong one keeps getting picked, setting a default fixes this permanently.
- Go to Settings → System → Sound → Input.
- Click on the microphone you want to use as default.
- Under the device options, it is automatically set when selected here. For legacy default-setting, use the Sound Control Panel (see Section 8).
- Press Windows + R, type
mmsys.cpl, and press Enter. - Click the Recording tab.
- Right-click your preferred microphone and select Set as Default Device.
- Click Apply → OK.
This is the most reliable method because the legacy panel gives full control over all recording devices, including ones that sometimes don't show in the modern Settings app.
3. Switch Between Microphones Quickly
If you regularly switch between a headset microphone and a desk mic, you don't have to dig into Settings every time. There are faster ways:
- Taskbar Quick Switch (Windows 11): Press Windows + A to open Quick Settings. Click the arrow next to the microphone icon to switch input sources instantly.
- System Tray: Click the speaker icon, then click the small arrow next to the volume bar to change input devices directly.
- Sound Settings shortcut: Right-click the speaker icon in the taskbar and select Sound settings to jump straight to the Input section.
4. Adjust Input Volume and Microphone Levels
Too quiet? Too loud? Picking up background noise? Adjusting your microphone input level in Windows can fix most of these problems without buying new hardware.
- Go to Settings → System → Sound → Input.
- Click your microphone to expand it.
- Under Input volume, drag the slider. Start around 75–80% for most microphones.
- Speak into your mic — the input level bar should move. If it stays flat, the mic is not detecting sound.
For more granular control — like setting a specific dB boost — use the legacy Sound panel:
- Open
mmsys.cpl→ Recording tab. - Double-click your microphone → go to Levels.
- You'll find the main volume slider and a Microphone Boost slider in +dB increments. Use boost carefully — too much adds noise.
5. Configure Per-App Audio Input Settings
Windows 11 introduced a refreshed Volume Mixer that lets you control audio settings on a per-app basis. While per-app output routing is well-supported, microphone assignment is typically handled inside each app's own settings.
- Right-click the speaker icon → Open Volume mixer.
- Each running app with audio will appear — drag its slider to adjust independently.
- Microsoft Teams: Settings → Devices → select microphone under the Microphone dropdown.
- Zoom: Settings → Audio → Microphone dropdown.
- Discord: User Settings → Voice & Video → Input Device.
- OBS Studio: Audio Settings → choose input source per scene.
6. Manage Microphone Privacy Permissions
One of the most overlooked reasons apps can't access your microphone is Windows privacy settings. Even if a microphone is connected and working, Windows can block apps from using it entirely — and this setting gets quietly reset after major Windows updates.
- Go to Settings → Privacy & Security → Microphone.
- Make sure Microphone access is toggled ON at the top.
- Turn on "Let apps access your microphone".
- Scroll down and individually enable access for apps like Teams, Zoom, Chrome, etc.
- Also enable "Let desktop apps access your microphone" — this covers traditional Win32 applications not listed individually.
Note: If your mic works in the browser but not in a desktop app, it's almost always the "Let desktop apps access your microphone" toggle that's off. Enabling that one toggle fixes it instantly.
7. Update or Reinstall Audio Input Drivers
Outdated, corrupt, or missing audio input drivers are one of the top causes of microphone detection failures in Windows. This is especially common after a Windows update or a fresh OS installation.
- Press Windows + X and select Device Manager.
- Expand Audio inputs and outputs.
- Right-click your microphone → select Update driver.
- Choose Search automatically for drivers. Windows will check online.
- Restart your PC after the update.
- In Device Manager, right-click your microphone → Uninstall device.
- Check the box "Attempt to remove the driver for this device" and confirm.
- Restart Windows — it will automatically reinstall the driver on boot.
Dell, HP, Lenovo, or ASUS users: Generic Windows drivers often don't fully support branded audio hardware. Visit your laptop manufacturer's support page and download the official Realtek or Waves audio driver for your specific model. This frequently resolves issues that Windows Update misses entirely.
8. Use the Legacy Sound Control Panel for Advanced Control
The modern Settings app in Windows 10 and 11 hides a lot of audio management depth. The legacy Sound Control Panel — a classic Windows tool — gives you access to features that are buried or inaccessible in the modern UI.
- Press Windows + R, type
mmsys.cpl, press Enter. - Click the Recording tab to see all audio input devices.
- Right-click on empty space → check Show Disabled Devices and Show Disconnected Devices to reveal hidden mics.
From here you can:
- Enable or disable specific input devices.
- Set a device as Default or Default Communication Device separately — useful when you want different mics for calls vs. recordings.
- Access Properties → Advanced to disable Exclusive Mode, which prevents one app from locking out the mic from all others.
- View Enhancements like noise suppression and echo cancellation built into your audio driver.
Pro Tip: Setting a separate Default Communication Device is great if you want Teams or Zoom to always use a headset mic, while your DAW or recording software uses a different USB microphone as the Default Device.
9. Troubleshoot Audio Input Device Problems
When managing audio input devices throws up unexpected errors or a mic suddenly stops working, Windows has a built-in troubleshooter that catches the most common culprits automatically.
- Go to Settings → System → Troubleshoot → Other troubleshooters.
- Find Recording Audio and click Run.
- Follow the on-screen steps — Windows will detect driver issues, disabled devices, and incorrect default settings.
If the troubleshooter doesn't fix it, here are additional checks:
- Exclusive Mode conflict: An app may be locking the mic. Disable Exclusive Mode via
mmsys.cpl→ Recording → Microphone → Properties → Advanced → uncheck "Allow applications to take exclusive control of this device". - Windows Update reset permissions: After any major Windows update, recheck your microphone privacy settings — updates sometimes reset these toggles.
- USB hub issues: Plug your USB microphone directly into a port on the computer, not through a hub, to rule out power delivery problems.
10. Manage Bluetooth Audio Input Devices
Bluetooth microphones and headsets behave differently from wired audio input devices in Windows. They use audio profiles — A2DP (high-quality stereo audio, output only) and HFP/HSP (Hands-Free Profile, lower quality but supports microphone input). Windows switches between these profiles automatically, which is a common source of frustration.
When you connect a Bluetooth headset and open a call app, Windows may switch the device to HFP mode — which makes the microphone available but reduces audio quality noticeably. Here's how to manage this properly:
- Go to Settings → Bluetooth & devices and ensure your headset is paired and connected.
- Open Settings → System → Sound → Input.
- Your Bluetooth headset should appear as a separate input device — select it as the default.
- If it doesn't appear, open
mmsys.cpl→ Recording tab → right-click → Show Disabled Devices.
- Open
mmsys.cpl→ Recording tab. - Right-click your Bluetooth headset → Properties → Advanced.
- Set the Default Format to the highest supported sample rate (usually 16 kHz for Bluetooth mics).
- In the Playback tab, set your Bluetooth headset output to Stereo (A2DP) for music, and accept the HFP switch only during calls.
If your Bluetooth microphone keeps disconnecting or shows lag, try moving closer to your PC, removing interference from other wireless devices, or updating your Bluetooth adapter driver from Device Manager under Bluetooth.
11. Restart Windows Audio Services
If your microphone suddenly stops showing up in Settings — even after checking drivers and privacy settings — the underlying Windows Audio service may have crashed or become unresponsive. This is more common than most people realise and is a quick fix.
- Press Windows + R, type
services.msc, and press Enter. - Scroll down to Windows Audio and double-click it.
- Click Stop, wait 5 seconds, then click Start.
- Also restart Windows Audio Endpoint Builder — right-click → Restart.
- Check that both services are set to Startup type: Automatic.
- Press Windows + X → select Terminal (Admin) or Command Prompt (Admin).
- Type:
net stop audiosrv && net start audiosrvand press Enter. - Your microphone and audio devices should reappear within a few seconds.
If the Windows Audio service is set to Disabled instead of Automatic, that explains why no audio devices appear at all. Right-click the service → Properties → change Startup type to Automatic and start it. This single fix resolves the "no audio devices installed" error that confuses many users after a Windows reinstall.
12. Test Your Audio Input Device
After making any changes to your audio input settings, always test your microphone before jumping into a meeting or recording session. There are three quick ways:
- Windows Voice Recorder: Search for Voice Recorder in the Start menu, hit Record, speak, and play it back to confirm the correct mic was used.
- Sound Settings built-in test: Go to Settings → System → Sound → Input → click your mic → speak and watch the input level bar. If it moves, your mic is capturing audio.
- Online microphone test: Visit mictest.pro for a real-time browser-based mic test — no download or sign-up needed. It shows a live waveform and volume level so you can confirm the correct device is active before any call or recording.
Frequently Asked Questions
How do I manage audio input devices in Windows 10 and 11?
Go to Settings → System → Sound → Input to view, select, and configure all audio input devices. You can also use the legacy Sound panel (mmsys.cpl) for deeper control including enabling hidden devices and setting communication defaults.
How do I set a default audio input device in Windows 11?
Open Settings → System → Sound → Input and select your preferred microphone. For a permanent default, open mmsys.cpl, go to the Recording tab, right-click your microphone, and choose Set as Default Device.
Can I set different microphones for different apps in Windows?
Windows doesn't natively route different microphones to different apps system-wide, but apps like Teams, Zoom, Discord, and OBS Studio each have their own audio input selectors inside their settings. Configure the microphone inside each app individually for best results.
Why is my audio input device not showing up in Windows?
The device may have missing or outdated drivers, be disabled in the legacy Sound panel, or be a Bluetooth device that's out of range or unpaired. Open mmsys.cpl → Recording tab → right-click → Show Disabled Devices to reveal hidden inputs. Also check that the Windows Audio service is running in services.msc.
How do I switch between microphones quickly in Windows 11?
Press Windows + A to open Quick Settings and use the audio input switcher. Alternatively, right-click the speaker icon in the taskbar → Sound settings → change the Input device from the dropdown at the top of the Input section.
How do I update audio input device drivers in Windows?
Open Device Manager (Windows + X → Device Manager), expand Audio inputs and outputs, right-click your microphone, and select Update driver → Search automatically. For laptops, downloading the official audio driver from your manufacturer's support site is usually more reliable.
What is the legacy Sound Control Panel and when should I use it?
The legacy Sound Control Panel (mmsys.cpl) provides deeper audio device control — setting default vs. default communication devices, enabling hidden mics, disabling Exclusive Mode, and accessing enhancement settings. Use it when the modern Settings app doesn't show all your devices or doesn't have the option you need.
How do I enable a disabled microphone in Windows?
Press Windows + R, type mmsys.cpl, open the Recording tab. Right-click in the empty area and select Show Disabled Devices. Right-click on the grayed-out microphone and choose Enable. It should now appear as an active input device.
Why does Windows automatically switch my audio input device?
Windows switches input devices when a new audio device connects, such as plugging in a USB mic or headset. To stop this, set your preferred mic as the default in the legacy Sound panel and disable Exclusive Mode so it doesn't get overridden by newly connected devices.
How can I test my audio input device is working correctly?
Use the Windows Voice Recorder app for a quick recording test. For real-time browser-based testing, visit mictest.pro — it shows a live input level meter and waveform so you can confirm your microphone is capturing sound correctly before any call or recording.
Related Posts
Not sure if your mic is working? Test it instantly online — no install needed.
Test My Microphone