How to Change Default Sound Output Device in Windows 11 and 10 — Complete 2026 Guide
By Jon — Windows Audio Expert | | 25 min read | Tested on Windows 11 24H2 & Windows 10 22H2
Quick Answer — How to Change Default Audio Output in Windows 11 & 10
- Fastest (Windows 11): Click the speaker icon in the taskbar → click the arrow (>) next to the volume slider → click your preferred device from the list
- Via Settings (Win 11 & 10): Win + I → System → Sound → Output → select device from dropdown
- Via Sound Control Panel (both OS): Win + R → type
mmsys.cpl→ Playback tab → right-click device → Set as Default Device - Route one app to a different output: Settings → System → Sound → Volume mixer → select output per-app
- For calls only: mmsys.cpl → Playback → right-click device → Set as Default Communication Device
- Device not showing up? mmsys.cpl → right-click empty area → Show Disabled Devices → Enable
- Default keeps resetting? Disable "exclusive mode" in device Properties → Advanced tab
- Verify your audio output now with the free sound test at MicTest.pro
Table of Contents
- Why Configuring the Default Playback Device Matters
- How Windows Manages Default Audio Output — The Full Picture
- Method 1: Windows Settings — Quickest Permanent Change
- Method 2: Sound Control Panel (mmsys.cpl) — Most Precise Control
- Method 3: Taskbar Audio Flyout — One-Click Switching (Windows 11)
- Method 4: Per-App Audio Output Routing via Volume Mixer
- Method 5: Default Communication Device — Separate Output for Calls
- Method 6: Switching Audio Output for HDMI / DisplayPort Devices
- Method 7: Keyboard Shortcut & Hotkey Options for Fast Switching
- Fix: Device Not Showing in Playback List
- Fix: Default Device Keeps Resetting After Restart
- Fix: Bluetooth Device Won't Become Default
- Fix: Windows 11 24H2 Changed My Default Audio Device
- Quick Reference Table — All Methods at a Glance
- Verify Your Output Device Is Working Correctly
- 10 Frequently Asked Questions
Why Configuring the Default Playback Device Matters — More Than You Think
Most people discover they need to change their default audio output the hard way: they plug in expensive headphones, hit play, and sound comes out of the laptop speakers anyway. Or they buy a Bluetooth speaker, pair it successfully, and Windows still routes audio somewhere else. This is not a Windows bug — it is by design. Windows does not automatically reassign your default output device every time something new connects, because doing so would be equally disruptive.
Understanding and controlling your default sound output device matters in more situations than most guides cover:
- Work-from-home audio separation: You want Teams calls on your headset but background music from your desk speakers — simultaneously. This requires per-app output routing, not just a single default device change.
- Home theatre setup: Plugging into a TV or AV receiver via HDMI means Windows needs to be told explicitly to use that HDMI audio output — it won't always switch automatically, even when video switches.
- Multiple monitors with built-in speakers: Every connected display with audio capability creates a separate audio device in Windows. Without configuring which one is default, audio goes to whichever the graphics driver decides.
- Gaming with a headset: Your gaming headset connects via USB or 3.5mm dongle. Your monitor has speakers. Windows 11 may default to monitor speakers after a reboot even if you used the headset yesterday.
- Privacy in shared spaces: Moving from speaker output to headphones without opening settings — knowing the fastest switching method — is genuinely useful dozens of times per week for anyone who works in open-plan environments.
- Recording and streaming: OBS, Audacity, and streaming software use the system default audio device by default. If your default points to the wrong device, your recordings have the wrong audio — or no audio at all.
How Windows Manages Default Audio Output — The Full Picture
Before changing anything, it is worth spending 60 seconds understanding how Windows actually routes audio to output devices. This knowledge makes every method below immediately intuitive rather than a memorised sequence of clicks.
Windows Audio Output Device Types
Windows assigns every audio output device to one of three roles. The Default Device handles all media playback — music, videos, games, system sounds. The Default Communication Device is used exclusively by voice applications (Teams, Skype, Discord, Zoom). The Default Console Device is used by command-line applications and is rarely configured separately. When you plug in a new device, Windows does not automatically reassign any of these roles — you do it manually, or an application with exclusive device control does it for you (often unexpectedly).
Seven methods below, from fastest to most powerful. Jump directly to the fix for your situation using the Quick Reference Table.
Method 1: Change Default Output via Windows Settings
Fastest Permanent ChangeThis is the recommended first approach for most users — it is accessible, straightforward, and makes a permanent change that survives restarts. The Windows Settings app is where Microsoft wants you to manage audio output in Windows 11, and it has been meaningfully improved over the Windows 10 version.
- Press Windows + I to open Settings.
- Click System in the left sidebar.
- Click Sound.
- Under the Output section at the top of the page, you will see your current default device and a volume slider.
- Click the dropdown labeled "Choose where to play sound" (it shows your current device name).
- A list of all available audio output devices appears. Click the device you want to use as your new default.
- The change is immediate — no Apply button needed. The selected device is now your system default audio output.
- Test by playing any audio. Sound should come from the newly selected device.
- Press Windows + I to open Settings.
- Go to System → Sound.
- Under Output, find the dropdown labeled "Choose your output device."
- Click the dropdown and select your preferred audio output device from the list.
- The change takes effect immediately. Play audio to verify the correct device is active.
- Note: Windows 10's Settings interface for audio is more limited than Windows 11's. For advanced control (setting Default Communication Device, enabling/disabling devices), use Method 2 (mmsys.cpl).
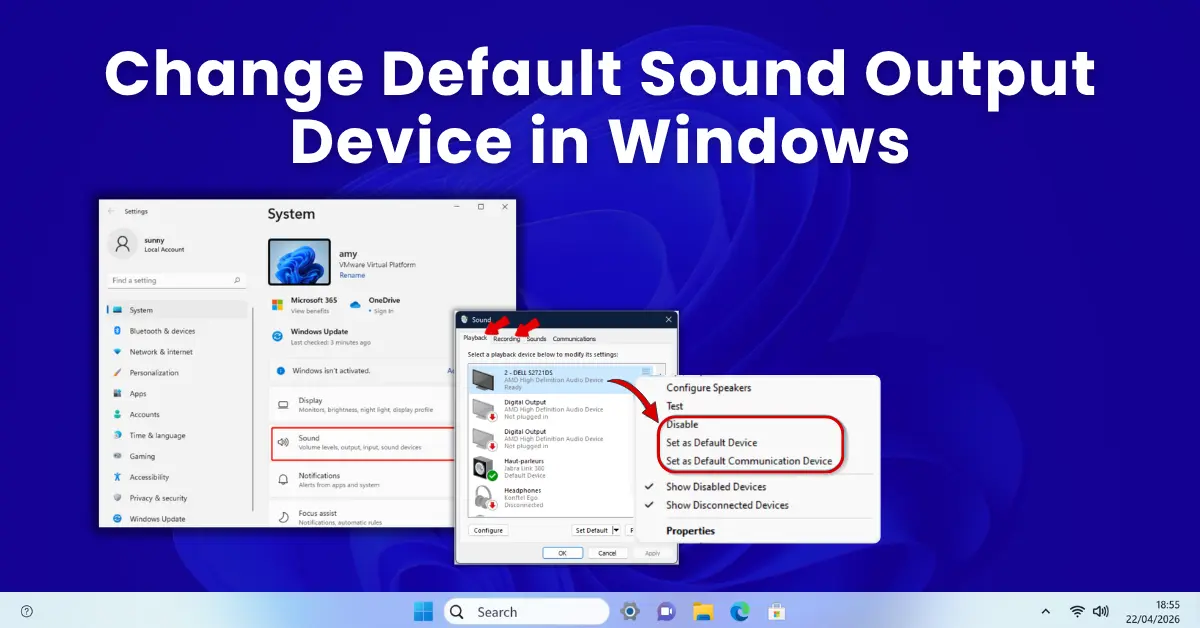
Method 2: Sound Control Panel (mmsys.cpl) — Most Precise Control
Full Control — Both OSThe Sound Control Panel — accessed via the Run command mmsys.cpl — is the most powerful audio device management interface in Windows. Unlike the Settings app, it shows every audio device Windows knows about, including disabled and disconnected ones. It also lets you set the Default Communication Device separately, access device-level properties, configure enhancements, and manage the audio stack in ways the modern Settings UI does not expose.
This method works identically on both Windows 11 and Windows 10, making it the universal approach.

- Press Windows + R to open the Run dialog.
- Type
mmsys.cpland press Enter (or click OK). - The Sound Control Panel opens. Click the Playback tab if it is not already selected.
- You will see all audio output devices Windows knows about. The current default has a green checkmark icon.
- Right-click the device you want to make the new default.
- In the context menu, select "Set as Default Device."
- The green checkmark moves to your selected device immediately.
- Click Apply, then OK.
- To also set it as the Default Communication Device: right-click the same device again → "Set as Default Communication Device."
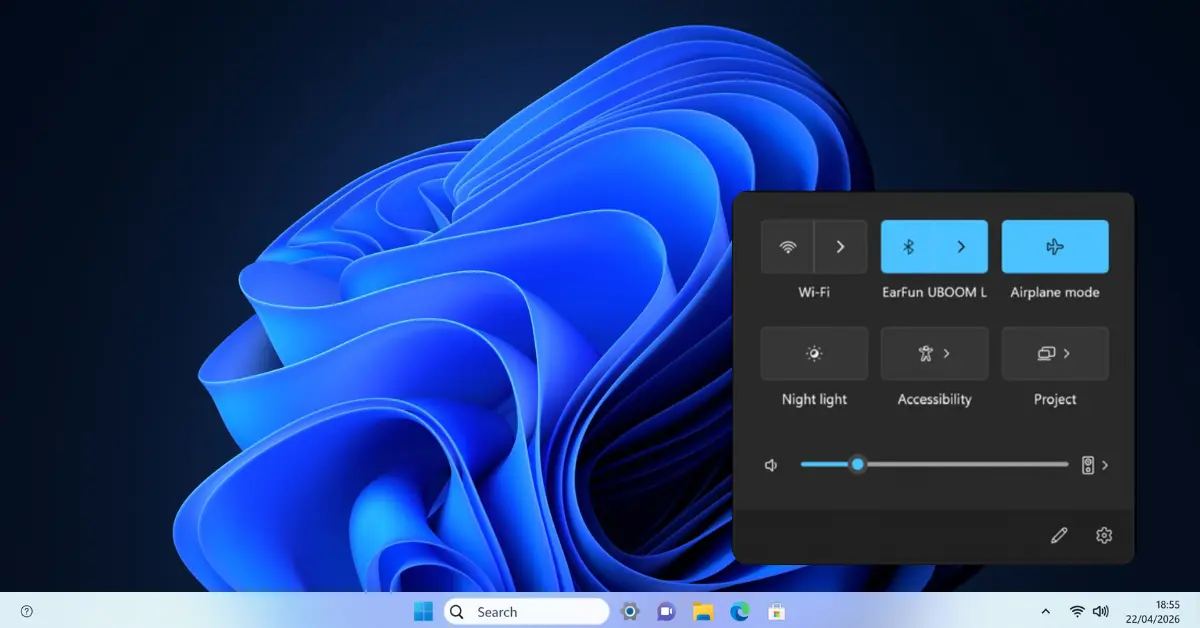
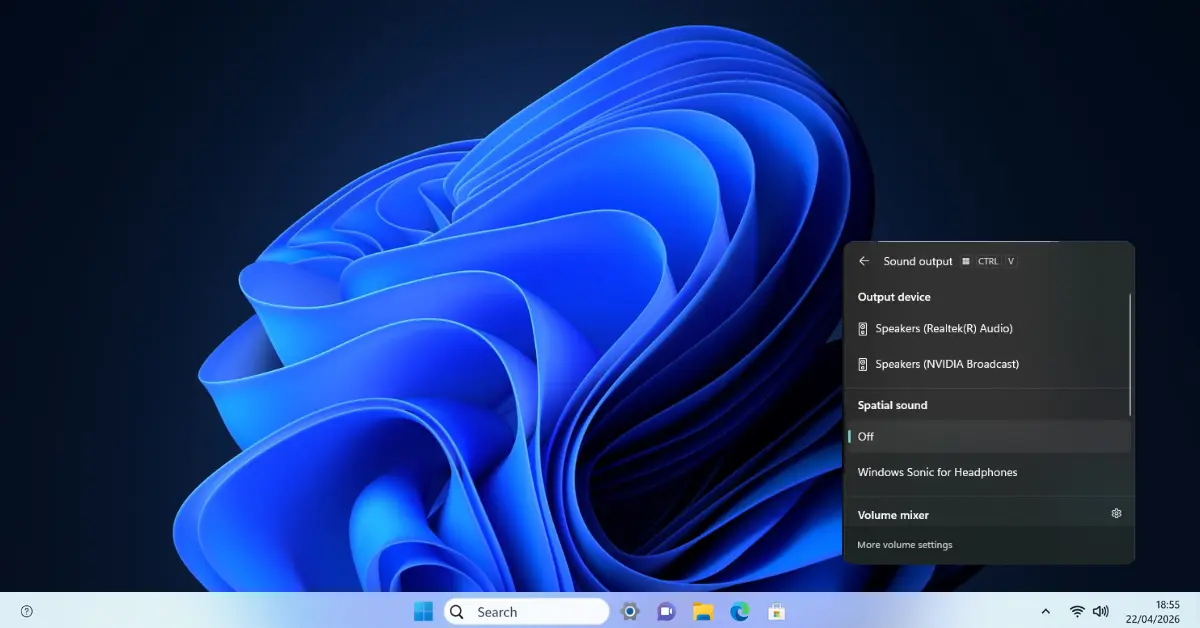
Method 3: Taskbar Audio Flyout — One-Click Switching (Windows 11)
Fastest Switch — Windows 11This is the method most Windows 11 users should memorise — it is genuinely one of the best improvements Microsoft made to audio management. The redesigned taskbar audio flyout in Windows 11 includes a built-in device switcher that lets you change your active output device in a single click, without opening any settings panel at all.
- Look at the taskbar system tray (bottom right of the screen). Click the speaker icon (🔊).
- The audio flyout opens, showing your current volume slider and the name of the active device below it.
- Click the small arrow (>) on the right side of the volume slider row.
- A list of all available audio output devices slides out. Each device is shown with its name and a speaker icon.
- Click any device in the list to instantly switch audio output to that device.
- A checkmark appears next to the newly active device. The flyout closes automatically.
- All audio — currently playing and new audio — immediately routes to the selected device.
Method 4: Per-App Audio Output Routing via Volume Mixer
App-Specific RoutingThis is the most powerful audio output feature most Windows users do not know exists. Instead of choosing a single default output device for all audio, you can route individual applications to completely different output devices — simultaneously. Spotify to your speakers, Teams to your headset, game audio to your HDMI monitor — all at the same time, with no third-party software.
This feature is exclusive to Windows 11's redesigned Volume Mixer (it does not exist in Windows 10's Volume Mixer).
- Go to Settings → System → Sound.
- Scroll down to the Advanced section and click Volume mixer.
- The Volume Mixer page loads. At the top is the system output device with a master volume slider.
- Below that, each application currently producing audio appears with its own row.
- Each app row shows a volume slider and — crucially — an Output device dropdown.
- Click the Output device dropdown for any app to see the full list of available output devices.
- Select the device you want that specific app to use. The change takes effect immediately.
- This setting persists per-app — next time you open Spotify or Chrome, it will continue to use the output device you assigned.
- To reset an app back to system default: click its Output dropdown → select Default (the top option in the list).
Method 5: Default Communication Device — Separate Output for Calls
Call Audio SeparationThis is one of the most overlooked features in Windows audio management, and it solves a common problem: you want your headset to handle calls but your speakers to handle everything else. Windows has a built-in mechanism for exactly this — the Default Communication Device — and it works completely independently from your Default Device setting.
- Press Windows + R → type
mmsys.cpl→ press Enter. - Click the Playback tab.
- Identify the device you want for calls (typically a headset). Right-click it.
- In the context menu, select "Set as Default Communication Device."
- A different icon appears next to this device (a small phone/checkmark, distinct from the regular checkmark).
- Your regular Default Device (speakers) keeps its green checkmark. Both icons can coexist on different devices simultaneously.
- Click Apply → OK.
- Test: open Teams, Discord, or Zoom — call audio should route through your headset. Open Spotify — music should come through your speakers.
Method 6: Switching Audio Output for HDMI and DisplayPort Devices
HDMI / DisplayPort AudioHDMI and DisplayPort connections carry audio alongside video — but Windows does not always activate this automatically. When you connect a TV, monitor, or AV receiver that supports audio over HDMI, Windows creates a separate audio output device for that connection. Setting it as your default requires knowing where to find it, because the naming is often non-obvious.
- Connect your display, TV, or receiver via HDMI or DisplayPort cable. Ensure the cable supports audio (most modern cables do, but some older or cheap cables carry only video).
- Press Windows + R → type
mmsys.cpl→ Enter. - In the Playback tab, look for your HDMI device. It will typically be named one of:
- [Monitor/TV name] (NVIDIA High Definition Audio)
- [Monitor/TV name] (AMD HD Audio)
- Digital Audio (HDMI) (Intel Display Audio)
- If you do not see it: right-click empty space in the list → enable "Show Disabled Devices" and "Show Disconnected Devices." If the HDMI device appears greyed out, right-click it → Enable.
- Right-click the HDMI device → "Set as Default Device." Click Apply → OK.
- Play audio to test. If no sound comes from the TV/monitor, check its own input selection — ensure it is on the HDMI source your PC is connected to, not AV or another input.
Method 7: Keyboard Shortcuts and Hotkey Options for Fast Device Switching
Power User ShortcutsWindows 11 and Windows 10 do not include a built-in global hotkey to switch audio output devices. However, there are several practical options — from the taskbar shortcut to third-party tools — that let power users switch devices without touching the mouse or opening any settings window.
- Fastest (Windows 11): Press Win + A to open Quick Settings → look for the audio output selector in the panel (available in some Windows 11 builds). Or use Win + K to open the Cast/Connect panel which sometimes surfaces audio devices.
- Via Run dialog: Press Win + R → type
mmsys.cpl→ Enter → Tab to the device list → use arrow keys to select → press Alt + D to set as default. Keyboard-navigable entirely without a mouse. - Settings shortcut: Win + I → type "sound" in search → Enter → navigate to Output dropdown with Tab and arrow keys.
- Download SoundSwitch from its official GitHub or website. It is free, open source, and well-maintained.
- Install it and configure which audio devices to include in the switching cycle.
- Assign a hotkey (default is Ctrl + Alt + F11 for playback, Ctrl + Alt + F12 for recording).
- Press your hotkey to instantly cycle through your audio devices — no mouse, no settings, no delay.
- Works on both Windows 10 and Windows 11. Shows a small OSD notification confirming the switch.
Fix: Device Not Showing in Playback List
Hidden Device FixOne of the most common support questions: "I plugged in my headphones / connected my Bluetooth speaker / plugged into HDMI and it's not showing up anywhere." Windows hides audio devices that are disabled or that it considers disconnected. Here is the complete troubleshooting sequence.
- Press Win + R → type
mmsys.cpl→ Enter. - In the Playback tab, right-click on any empty area in the device list (not on a device — on the blank space).
- Check "Show Disabled Devices" — click it. Then check "Show Disconnected Devices" — click it.
- Do additional devices appear now, shown in grey/greyed-out style? If yes: right-click the device you want → Enable.
- After enabling, right-click again → "Set as Default Device."
- Still not showing at all? Check the physical connection — reseat the 3.5mm jack, reconnect the USB cable, ensure HDMI is plugged in on both ends. Then press Win + X → Device Manager → look for "Sound, video and game controllers" — is your device listed with a warning icon? Right-click → Update driver or Enable device.
- For Bluetooth: If the device paired but audio is not showing, go to Settings → Bluetooth & devices → click your device → select Connect if disconnected. Then check mmsys.cpl for the device.
services.msc → find Windows Audio → right-click → Restart.
Fix: Default Device Keeps Resetting After Restart
Persistent Default FixYou set your headphones as the default. You restart your PC. Windows reverts to the speakers. You set it again. Same thing happens tomorrow. This is one of the most frustrating audio issues in Windows — and it has three distinct causes, each with a specific fix.
- Open
mmsys.cpl→ Playback tab → right-click your intended default device → Properties. - Go to the Advanced tab.
- Under Exclusive Mode, uncheck both:
- "Allow applications to take exclusive control of this device"
- "Give exclusive mode applications priority"
- Click Apply → OK.
- Search for Realtek HD Audio Manager, Dolby Access, DTS Sound Unbound, or your headset's companion app.
- Open each and check for any "default device" or "startup device" setting it enforces.
- Alternatively, use Task Manager → Startup tab to disable audio software from launching at startup, then test if the default persists.
- Open Device Manager → Sound, video and game controllers → right-click your audio device → Update driver → Browse my computer → Let me pick → select "High Definition Audio Device" (the generic Microsoft driver).
- Test if the default persists. If it does, the OEM driver was overriding it. Reinstall the correct OEM driver afterward for best audio quality, but this confirms the source of the problem.
Fix: Bluetooth Device Won't Become Default or Sounds Wrong
Bluetooth Audio FixBluetooth audio devices have additional complexity compared to wired outputs. When a Bluetooth headset or speaker connects to Windows, it creates multiple audio devices in the Playback list — and choosing the wrong one gives you poor audio quality or no audio at all.
- Pair your Bluetooth device in Settings → Bluetooth & devices → Add device.
- After pairing, open
mmsys.cpl→ Playback tab. Your Bluetooth device may appear twice:- "[Device name] Headphones" — this is the A2DP profile (stereo, high quality). Use this for music and general audio.
- "[Device name] Hands-Free AG Audio" — this is the HFP profile (mono, lower quality, enables the microphone). Only select this if you need the microphone to work simultaneously.
- Right-click the Headphones (A2DP) device → Set as Default Device.
- If only one device appears and audio quality is poor (sounds tinny or telephone-quality), Windows is using the HFP profile. Disconnect and reconnect the Bluetooth device — sometimes this forces Windows to select A2DP. Alternatively, disable the HFP device in mmsys.cpl to force Windows to use only the A2DP device.
- If the Bluetooth device disconnects and Windows reverts to speakers: this is normal. When a Bluetooth device is out of range or powered off, Windows falls back to the last wired device. Reconfigure using the taskbar flyout (Method 3) each session.
Fix: Windows 11 24H2 Changed My Default Audio Device
Windows 11 24H2Windows 11 24H2 (released late 2025) introduced significant changes to the Windows audio stack. Some of these changes caused default audio devices to reset after the upgrade, or caused audio to route to unexpected devices. Here is what changed and how to restore your intended configuration.
- OEM driver replacement: 24H2 replaced many Realtek, Intel Smart Sound Technology, and other OEM audio drivers with generic Microsoft-signed versions. These generic drivers may default to a different output than your previous setup. Fix: go to your PC manufacturer's support page and download the latest audio driver for your specific model. Install it manually (choose "Override" if prompted). Then reconfigure your default device in mmsys.cpl.
- Taskbar audio flyout now shows more devices: 24H2 improved the taskbar audio device switcher. You may now see devices you didn't before — this is not a problem, but may explain why the "wrong" device was selected if Windows auto-picked something new after the update.
- Audio session routing changes: Some users found that per-app audio routing (set in Volume Mixer before upgrading) was reset to Default by 24H2. Re-apply your per-app output assignments in Settings → System → Sound → Volume mixer after the update.
- Verify your default after every feature update: As a rule, open mmsys.cpl after any Windows feature update and confirm the green checkmark is on your intended device. Feature updates can reset audio configuration silently.
Quick Reference Table — All Methods at a Glance
| Situation | Best Method | Works On | Speed | Permanent? |
|---|---|---|---|---|
| Switch audio quickly (daily use) | Method 3 — Taskbar Flyout | Windows 11 only | 30 sec | ✅ Yes |
| Set permanent default device | Method 1 — Settings | Win 10 & 11 | 1 min | ✅ Yes |
| Full control, set comm device too | Method 2 — mmsys.cpl | Win 10 & 11 | 1 min | ✅ Yes |
| Route one app to different output | Method 4 — Volume Mixer | Windows 11 only | 2 min | ✅ Per-app |
| Separate audio output for calls | Method 5 — Comm Device | Win 10 & 11 | 1 min | ✅ Yes |
| Set HDMI/DisplayPort as output | Method 6 — HDMI Audio | Win 10 & 11 | 2 min | ✅ Yes* |
| Switch with keyboard, no mouse | Method 7 — Hotkeys/SoundSwitch | Win 10 & 11 | <1 sec | ✅ Yes |
| Device not in playback list | Fix — Show Hidden Devices | Win 10 & 11 | 3 min | ✅ Yes |
| Default resets after reboot | Fix — Exclusive Mode / Driver | Win 10 & 11 | 5 min | ✅ Yes |
| Bluetooth audio quality poor | Fix — Select A2DP Profile | Win 10 & 11 | 2 min | Varies |
* HDMI audio device assignment may not persist if GPU driver recreates the device on each connection event.
Long-Term Best Practices for Default Audio Device Management
- After any Windows feature update: Open mmsys.cpl and verify the green checkmark is still on your intended device. Takes 15 seconds and prevents a week of confusion.
- Name your devices for clarity: In mmsys.cpl → right-click a device → Properties → change the device name to something meaningful like "Desk Speakers" or "Gaming Headset USB." Makes the taskbar flyout and Settings much easier to navigate.
- Disable devices you never use: In mmsys.cpl, right-click audio outputs you never use → Disable. This reduces the list in the taskbar flyout and prevents Windows from accidentally defaulting to them.
- For Bluetooth users: Expect the default to revert to a wired device when Bluetooth disconnects. Use Method 3 (taskbar flyout) for quick session switching — it takes one click.
- For HDMI audio: If your GPU driver frequently recreates the HDMI audio device, consider creating a Windows startup script or using a tool like NirCmd to set the default device automatically on login.
- Test after every change: Use the built-in test tone in mmsys.cpl (right-click device → Test) or the free MicTest.pro Sound Test to confirm audio is routing correctly before closing any settings window.
Verify Your Output Device Is Working Correctly
After changing your default audio output device, always do a quick audio verification. Do not assume the change worked — confirm it by playing audio specifically designed to test left/right routing and device responsiveness.
- Open
mmsys.cpl→ Playback tab. - Click your newly set default device to highlight it.
- Click the Configure button at the bottom, then proceed through the speaker setup test — or simply right-click the device → Test.
- Windows plays a chime through the device. You should hear it from your intended output — headphones, speakers, HDMI monitor, or Bluetooth device.
- If no sound: the device is set as default in Windows but something else is wrong — check connections, check device power, check device volume (some speakers have independent hardware volume controls).
Free Online Audio Output Test — Recommended
For a thorough audio output test including left/right channel separation, frequency range, and real-time audio level visualization, use MicTest.pro's free Sound Test:
- Dedicated left-channel and right-channel test tones — instantly confirms stereo routing
- Frequency sweep to check your device's full audio range
- Real-time audio visualization in browser — no download, no account needed
- Works in Chrome, Edge, Firefox, and Safari on any OS

10 Frequently Asked Questions
Real questions from Windows users about changing and configuring default sound output devices — with detailed, tested answers.
How do I change the default sound output device in Windows 11?
The fastest method in Windows 11 is using the taskbar audio flyout: click the speaker icon (🔊) in the taskbar system tray, then click the small arrow (>) on the right side of the volume slider. A list of all available audio devices appears — click any device to instantly switch your audio output to it. For a permanent settings-level change, go to Settings → System → Sound → under Output, click the "Choose where to play sound" dropdown and select your preferred device. Both methods are immediate and permanent.
How do I configure the default playback device in Windows 10?
In Windows 10, press Win+R, type mmsys.cpl, and press Enter to open the Sound Control Panel. Click the Playback tab to see all connected audio output devices. The current default has a green checkmark. Right-click any other device and select "Set as Default Device" to make it the new default. Click Apply and OK. The change takes effect immediately. You can also go to Settings → System → Sound → Output → "Choose your output device" dropdown for a quicker but less feature-complete option.
What is the difference between Default Device and Default Communication Device in Windows?
Windows has two separate default audio output roles. The Default Device handles all general audio playback — music, videos, games, system sounds, and applications that do not specifically request communication mode. The Default Communication Device is used exclusively by voice communication applications like Microsoft Teams, Skype, Discord, and Zoom when they use Windows audio routing. You can assign different physical hardware to each role. For example, your desk speakers can be the Default Device for music while your USB headset is the Default Communication Device for calls — both work simultaneously without any manual switching.
Why is my new audio device not appearing in the list of playback devices?
Windows hides disabled or disconnected audio devices by default. Open mmsys.cpl (Win+R → mmsys.cpl), go to the Playback tab, right-click on any empty area in the device list (not on a device), and check both "Show Disabled Devices" and "Show Disconnected Devices." If your device appears greyed out, right-click it and select Enable. Also verify the physical connection — reseat USB cables, 3.5mm jacks, or check that HDMI carries audio. For USB audio devices, try a different USB port. For Bluetooth, ensure the device is paired and connected in Settings → Bluetooth & devices before checking mmsys.cpl.
How do I route different apps to different audio outputs in Windows 11?
Go to Settings → System → Sound → scroll down and click Volume mixer. Each application currently producing audio has its own row with a volume slider and an Output device dropdown. Click the dropdown next to any app to select a specific audio device for that app. For example, you can set Spotify to output through your desk speakers while Microsoft Teams outputs through your USB headset — simultaneously, without any third-party software. This setting is remembered per-app and persists between sessions. This per-app routing feature is available only in Windows 11, not Windows 10.
Why does my default audio device keep reverting to speakers after every restart?
Three causes are most common. First, an application is using exclusive audio mode and claiming the default device on startup — fix this by opening mmsys.cpl → Playback → right-click your device → Properties → Advanced tab → uncheck "Allow applications to take exclusive control of this device." Second, third-party audio software like Realtek HD Audio Manager or a headset companion app is enforcing a specific default at startup — find it in Task Manager → Startup tab and check its settings. Third, an OEM audio driver with built-in device policy is overriding your setting — updating or reinstalling the audio driver from the manufacturer's website usually resolves this.
How do I set HDMI as the default audio output in Windows 11?
Connect your monitor, TV, or AV receiver via HDMI. Open mmsys.cpl. In the Playback tab, look for a device named after your display or GPU — typically something like "Dell Monitor (NVIDIA High Definition Audio)" or "Digital Audio (HDMI) (AMD HD Audio)." Right-click it and select Set as Default Device. If the HDMI device is not listed, right-click empty space → Show Disabled Devices → right-click the HDMI device → Enable. If still not visible, the HDMI cable may be carrying only video (common with older or cheap cables), or the GPU driver needs updating. After setting HDMI as default, right-click it and select Test to confirm audio is routing through the TV or monitor speakers.
Is there a keyboard shortcut to switch audio output devices in Windows 11?
Windows 11 and Windows 10 do not include a built-in hotkey to switch audio output devices. However, several workarounds exist. In Windows 11, the fastest keyboard-accessible path is Win + I (Settings) → type "sound" → Enter → Tab to Output dropdown. For true hotkey switching, the free open-source tool SoundSwitch lets you configure a custom keyboard shortcut (default Ctrl + Alt + F11) to cycle through your audio output devices instantly with an on-screen notification. It works on both Windows 10 and Windows 11, requires no subscription, and is widely used by users with multiple audio devices.
Why does Bluetooth audio sound bad after I set it as the default device?
Poor audio quality from Bluetooth devices after setting them as default almost always means Windows selected the HFP/HSP (Hands-Free) profile instead of the A2DP (Headphones/Stereo) profile. Open mmsys.cpl and look at the Playback tab — your Bluetooth device may appear twice. The entry named "[Device name] Headphones" or "[Device name] Stereo" uses the A2DP profile and provides high-quality audio. The entry named "[Device name] Hands-Free AG Audio" uses the lower-quality HFP profile designed for calls with microphone. Right-click the Headphones (A2DP) entry and set it as Default Device for music. If only one entry appears and quality is poor, disconnect the Bluetooth device and reconnect — sometimes this prompts Windows to offer the A2DP profile.
Does Windows 11 24H2 affect how the default audio device works?
Yes. Windows 11 24H2 made notable changes to audio device management. It replaced many OEM audio drivers (Realtek, Intel SST) with generic Microsoft versions, which can change which device Windows defaults to and may strip per-app audio routing settings. The taskbar audio flyout was improved to show more devices and respond faster, but this also means Windows may surface devices users had not previously seen. After upgrading to 24H2, open mmsys.cpl and verify the green checkmark is on your intended output device. Re-apply any per-app routing in Settings → System → Sound → Volume mixer. If audio behavior changed significantly after the update, reinstall your audio driver from your PC manufacturer's support website — not through Windows Update — to restore the calibrated OEM configuration.
Test Your Audio Output
Free left/right channel test + frequency sweep. Confirm your default device is working correctly. No download needed.
Open Free Sound TestFind Your Fix by Symptom
- 🔊 Change active speaker → Method 1 or 3
- 🎧 Set headphones as default → Method 2
- 📺 HDMI to TV/monitor → Method 6
- 📞 Separate output for calls → Method 5
- 🎵 Per-app routing → Method 4
- ⌨️ Keyboard switch → Method 7
- 🚫 Device missing → Fix: Not Showing
- 🔄 Resets on reboot → Fix: Reset
- 📡 Bluetooth issues → Fix: Bluetooth
Key Shortcuts
- Win + R →
mmsys.cpl - Win + I → System → Sound
- Click 🔊 → arrow > (Win 11 only)
- Right-click 🔊 → Sound Settings
- mmsys.cpl → right-click → Set Default