How to Change Audio Balance Levels on Windows 11 and 10 — Complete 2026 Guide to Adjusting Volume Balance Settings
By Jon — Windows Audio Expert | | 22 min read | Tested on Windows 11 24H2 & Windows 10 22H2
Quick Answer — How to Adjust Audio Balance on Windows 11 & 10
- Fastest method (both OS): Win + R → type
mmsys.cpl→ Enter → Playback tab → right-click your device → Properties → Levels tab → click Balance → adjust L and R sliders - Via Settings (Windows 11): Settings → System → Sound → click your output device → scroll to find Balance sliders
- For accessibility / hearing impairment: Settings → Accessibility → Audio → enable Mono audio → use the balance slider to direct sound to one ear
- Reset to center: Set both L and R sliders to 100 in the Balance dialog inside mmsys.cpl
- Audio only in one ear/speaker? Check mmsys.cpl Balance first — one slider is almost certainly at 0
- Balance keeps resetting? Disable Realtek/Dolby audio profiles in their companion apps, or remove them from startup
- Different balance per device? Yes — Windows saves balance per device. Set it separately for speakers and headphones.
- Verify left/right audio balance now with the free stereo sound test at MicTest.pro
Table of Contents
- Why Audio Balance Matters — and Why It Goes Wrong
- How Windows Stores and Applies Audio Balance Settings
- Method 1: Sound Control Panel (mmsys.cpl) — The Most Reliable Way
- Method 2: Windows 11 Settings App — Device Properties Balance
- Method 3: Accessibility Audio Balance — For Hearing Impairment & Single-Ear Use
- Method 4: Adjust Balance for HDMI, USB & Specific Output Devices
- Method 5: Third-Party Equalizer for Advanced Per-Channel Balance
- Method 6: Realtek, Dolby & OEM Audio Software Balance Controls
- Fix: Audio Playing in Only One Ear or Speaker
- Fix: Balance Keeps Resetting After Every Restart
- Fix: Windows 11 24H2 Reset My Audio Balance
- Fix: Headphone Balance Differs from Speaker Balance
- Quick Reference — All Balance Methods Compared
- Test Your Audio Balance Is Correct
- 10 Frequently Asked Questions
Why Audio Balance Matters — and Why It Goes Wrong
Audio balance — the relative volume between your left and right audio channels — is one of those settings that most people never think about until something goes wrong. When left and right are perfectly matched, sound feels centred, natural, and immersive. When they're off, even by 10–15%, the experience immediately feels wrong. Music sounds lopsided. Dialogue comes from the wrong direction in films. Gaming audio positioning becomes unreliable — which matters more than people realise in competitive gaming where directional audio is a genuine advantage.
Here is what actually causes audio balance to go wrong on Windows, because understanding the cause determines the right fix:
- Accidental balance slider movement: The balance setting inside Windows device properties has no undo. A single misclick while navigating the Levels tab moves the L or R slider without any confirmation — and most users never find the Balance button again to correct it.
- OEM audio software profiles: Realtek HD Audio Manager, Dolby Atmos for headphones, DTS Sound Unbound, and gaming headset companion apps all have their own balance or "spatial audio" settings that layer on top of Windows balance — and they often conflict.
- Windows feature updates: Windows 11 24H2 silently changed audio drivers for many systems. Some users found their balance settings reset after the update because the new driver loaded a fresh default profile.
- Accessibility settings interference: Windows 11 has a dedicated Mono Audio accessibility feature with its own balance slider. If Mono Audio was toggled on accidentally — easy to do in the Accessibility settings panel — it overrides your speaker/headphone balance and can make one side completely silent.
- Physical hardware starting to fail: A 3.5mm cable beginning to fail at the connector often causes intermittent single-channel audio that looks like a balance problem but is actually mechanical. If software fixes don't work, try a different cable first before assuming a driver issue.
- Hearing compensation: Many users intentionally set asymmetric balance to compensate for hearing differences between ears — a completely legitimate and well-supported use case. Windows handles this through both the Levels balance slider and the Accessibility Mono Audio balance.
How Windows Stores and Applies Audio Balance Settings
Before adjusting anything, it helps enormously to understand where Windows actually stores balance data. Unlike volume — which is visible and accessible in the taskbar — balance is buried inside the device properties of each individual audio output. This is by design: different devices often need different balance calibrations, and storing balance per-device means your settings persist correctly as you switch between speakers, headphones, and HDMI outputs.
Understanding the Windows Audio Balance Slider
The L and R values in the Balance dialog both default to 100. Reducing one side reduces that channel's volume proportionally — it does not boost the other side.
Where Windows Stores Balance — Per Device
Six methods below — from the universal mmsys.cpl approach to accessibility tools and advanced per-channel equalizers.
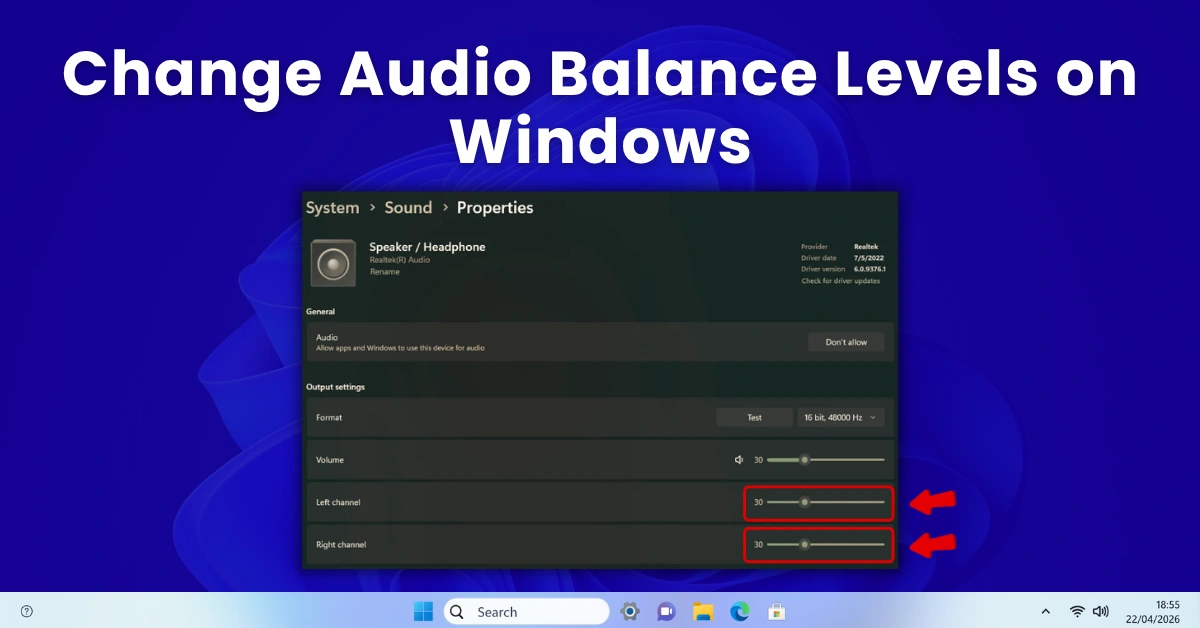
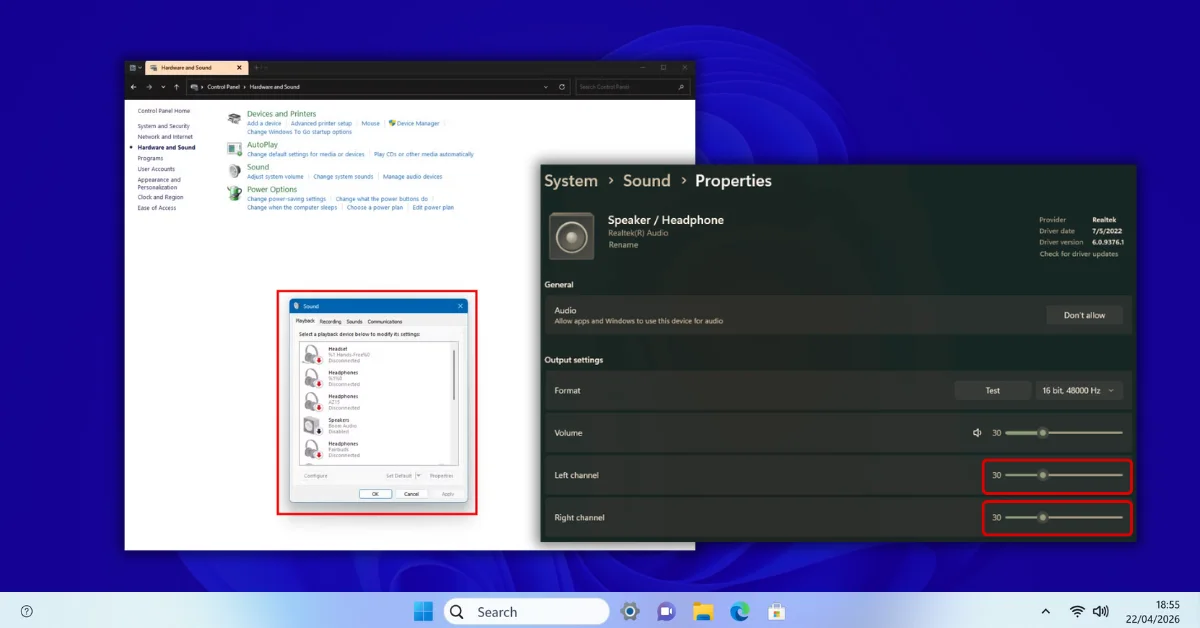
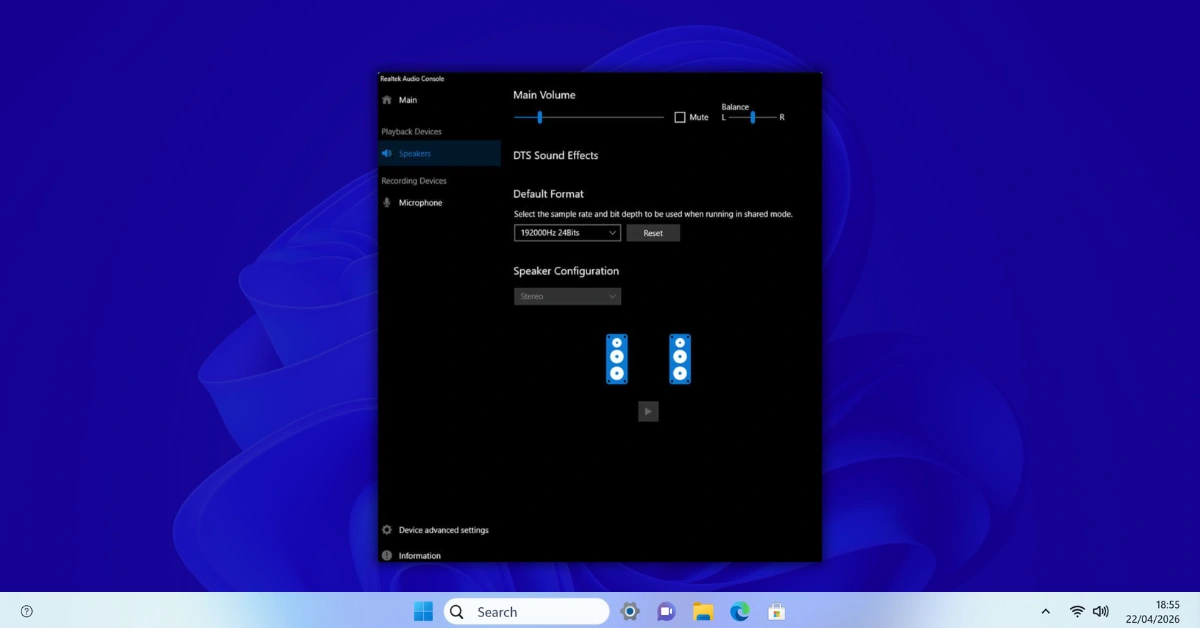
Method 1: Sound Control Panel (mmsys.cpl) — The Most Reliable Way
Works on Windows 10 & 11The Sound Control Panel — opened with the Run command mmsys.cpl — is the definitive location for adjusting audio balance in Windows. Unlike the Settings app, it exposes the full balance control for every audio device individually. It is identical in both Windows 10 and Windows 11, making it the universal approach regardless of which version you use.
The Balance button is inside a dialog nested two levels deep in device properties — which is why so many users never find it. Once you know the path, it takes about 20 seconds to reach and adjust.
- Press Windows + R to open the Run dialog.
- Type
mmsys.cpland press Enter. - The Sound Control Panel opens. Click the Playback tab.
- Find your active audio output device — it has a green checkmark. Right-click it and select Properties.
- In the Properties window, click the Levels tab.
- You will see a volume slider for your device. To the right of it is a small Balance button — click it.
- The Balance dialog opens with two sliders: L (left channel) and R (right channel). Both default to 100.
- Drag either slider left or right, or click the slider and type a number directly. Lower value = quieter on that side.
- To centre balance: set both L and R to 100. To bias left: keep L at 100, reduce R. To bias right: keep R at 100, reduce L.
- Click OK to close the Balance dialog, then click Apply and OK in the Properties window.
- Play audio to test — use the left/right channel test at MicTest.pro/sound-test to verify.
- Press Windows + R, type
mmsys.cpl, and press Enter. - Click the Playback tab. Right-click your active speaker or headphone device → Properties.
- Select the Levels tab in the Properties window.
- Click the Balance button to the right of the main volume slider.
- The Balance dialog shows L and R sliders, both defaulting to 100. Adjust as needed — lower a value to quieten that channel.
- Click OK, then Apply, then OK.
- The balance change is immediate. Open any media file or use the MicTest.pro sound test to confirm left and right channels are playing at your intended levels.
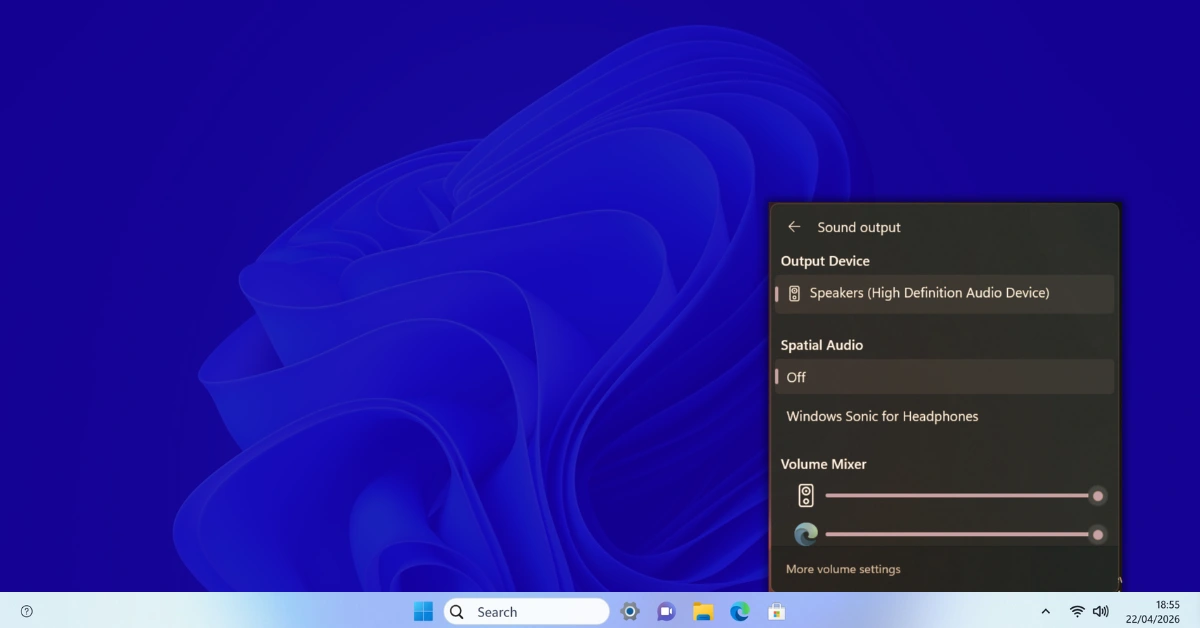
Method 2: Windows 11 Settings App — Device Properties Balance
Windows 11 OnlyWindows 11 added more audio controls to the Settings app compared to Windows 10, including access to individual device properties where balance can be adjusted. While the mmsys.cpl method remains more reliable and works on both OS versions, the Settings path is more discoverable for users who prefer the modern interface.
- Press Windows + I to open Settings.
- Go to System → Sound.
- Under Output, click the name of your active audio device (not the dropdown — click the device name itself or the arrow next to it).
- This opens the individual device properties page inside Settings.
- Scroll down to find the Volume section. Below the main volume slider, some Windows 11 builds show a Balance slider or separate left/right volume controls.
- Drag the balance control left or right to adjust the stereo balance for this device.
- The change applies immediately — no Apply button needed in the Settings app.
- If your build of Windows 11 does not show a balance control here, use Method 1 (mmsys.cpl) instead — it is present on every version of Windows 10 and 11.
Method 3: Accessibility Audio Balance — For Hearing Impairment & Single-Ear Use
Accessibility — Both OSThis is the most underused and most useful audio balance feature in Windows. If you have hearing loss in one ear, use headphones with a single earbud, or need to direct all audio to one side for any reason, Windows has a dedicated Accessibility feature that handles this far more elegantly than the standard balance slider.
The Mono Audio accessibility setting combines both left and right audio channels into a single mixed channel, then lets you pan that channel to one side. This means you never miss content that was mixed exclusively into one channel — a common issue with standard stereo balance where simply turning down one side makes you miss audio that was only ever in that channel.
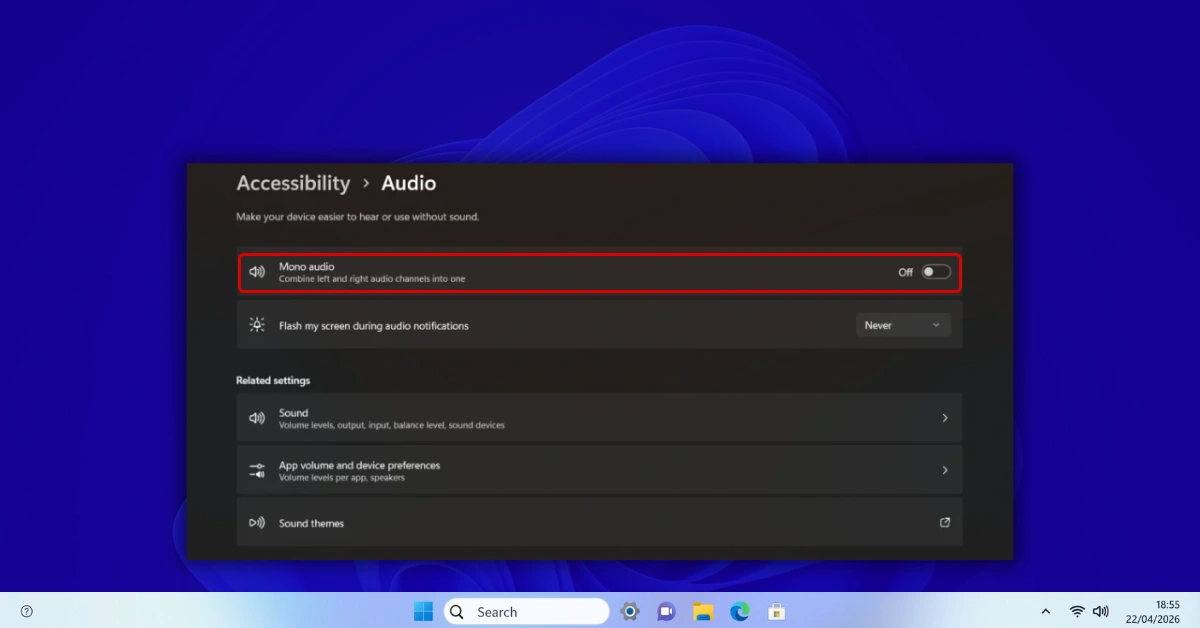
- Press Windows + I to open Settings.
- Windows 11: Go to Accessibility → Audio.
Windows 10: Go to Ease of Access → Audio. - Find the Mono audio toggle and turn it On.
- A balance slider appears below the toggle (in Windows 11 24H2 and later, this is clearly labeled as a left/right balance control).
- Drag the slider:
- All the way left = all audio plays through left ear/speaker only
- Centre = audio plays equally through both sides (as a mono mix)
- All the way right = all audio plays through right ear/speaker only
- The Mono audio toggle can be assigned a keyboard shortcut: press Windows + Ctrl + M to toggle Mono audio on and off instantly (Windows 11 only, may require enabling in keyboard shortcut settings).
- Note: when Mono Audio is enabled, it overrides all device-level balance settings. Disable it when not needed to restore your standard stereo balance.
Method 4: Adjust Balance for HDMI, USB & Specific Output Devices
Per-Device BalanceBecause Windows stores balance per device, you can set completely different balance values for your HDMI TV output, your USB DAC, your built-in speakers, and your headphones — and they all maintain their own settings independently. This is the correct approach when, for example, your TV's built-in speakers have a physical imbalance, or your headphone cable is slightly degraded on one side and needs software compensation.
- Press Win + R → type
mmsys.cpl→ Enter. - In the Playback tab, find the specific device you want to adjust. It does not have to be your current default — you can adjust balance on any listed device, including non-default ones.
- Right-click the device → Properties → Levels tab → Balance.
- Adjust L and R sliders for this specific device. Click OK → Apply → OK.
- Switching to this device (via taskbar or Settings) automatically applies its saved balance — no need to readjust each time.
- For Bluetooth: Note that Bluetooth headsets appear as two devices (A2DP Headphones and Hands-Free). Adjust balance on the Headphones (A2DP) device for music listening. The Hands-Free profile may not support stereo balance at all (it is mono by nature).
- For HDMI: If your TV or AV receiver has its own audio processing, the HDMI audio balance in Windows compounds with the TV's own balance setting. Adjust one at a time — set Windows HDMI balance to centre first, then adjust the TV if needed, to avoid confusion.
Method 5: Third-Party Equalizer for Advanced Per-Channel Balance
Advanced ControlWindows's built-in balance slider is functional but basic — it simply reduces the volume of one channel. For users who need more precise control, frequency-specific balance correction, or per-application balance, a third-party audio equalizer gives significantly more power. The best free option for Windows is Equalizer APO combined with the Peace GUI frontend.
- Download Equalizer APO from its official SourceForge page (free, open source). Run the installer and select your audio device to apply it to. Restart when prompted.
- Download Peace Equalizer (the GUI for Equalizer APO) from its official page. Install after Equalizer APO is in place.
- Open Peace. In the interface, you will see individual equalizer bands for both left (L) and right (R) channels displayed separately.
- To adjust overall channel balance: use the Pre-amplification (pre-amp) slider — there is one for the L channel and one for the R channel at the top of the interface. Reduce the pre-amp on the louder channel by a few dB to bring it to balance.
- For frequency-specific balance correction (e.g., your left speaker is too boomy but the right is fine): use the band-specific sliders to cut or boost particular frequencies on the problem channel only.
- Save your profile in Peace for instant recall. You can create multiple profiles for different use cases (headphone listening, gaming, hearing compensation) and switch with a click.
- Equalizer APO works at the Windows audio driver level — it applies to all audio from that device, system-wide, and adds virtually no CPU overhead.
Method 6: Realtek, Dolby & OEM Audio Software Balance Controls
OEM SoftwareIf your PC came with dedicated audio software — Realtek HD Audio Manager, Dolby Atmos, DTS Sound Unbound, Nahimic, or a gaming headset companion app — these programs have their own balance and audio profile settings that sit on top of Windows's built-in balance. Understanding these is essential, because a conflict between OEM software balance and Windows built-in balance is the single most common cause of persistent audio imbalance that "fixes itself and then comes back."
- Realtek HD Audio Manager: Search for "Realtek" in the Start menu. Open Realtek HD Audio Manager. Look for left/right channel sliders or a balance knob. A lock icon may link L and R sliders together — click it to unlink and adjust independently. Any imbalance here overrides Windows balance on Realtek-powered systems.
- Dolby Access / Dolby Atmos: Open the Dolby app from the Start menu. Go to Sound Customization → look for spatial audio settings that can affect stereo image and perceived balance. Disabling spatial processing sometimes resolves apparent imbalance that is actually caused by head-related transfer function processing.
- Nahimic (HP, ASUS, MSI): Find Nahimic in the Start menu or system tray. Check for any "stereo enhancement" or "surround" feature that alters L/R channel levels — disable these first before adjusting Windows balance.
- Gaming headset apps (SteelSeries Engine, Corsair iCUE, Razer Synapse, HyperX NGENUITY): Each has its own EQ and level controls. Check the EQ section for any per-channel level offset and set them equal. Also check for "7.1 surround simulation" which can significantly alter stereo balance perception.
- Recommended approach for imbalance troubleshooting: Temporarily close or disable all OEM audio software, reset Windows balance to centre (L=100, R=100) in mmsys.cpl, and test audio. If it sounds balanced, re-enable OEM software one at a time to identify which is causing the problem.
Fix: Audio Playing in Only One Ear or Speaker
Single Channel FixHearing audio from only one side — one speaker or one earbud — is the most urgent and common audio balance problem Windows users experience. The cause is almost always software before it is hardware. Here is the complete diagnostic sequence, starting with the most common software causes before hardware.
- Check Windows Accessibility Mono Audio first: Settings → Accessibility (or Ease of Access in Win 10) → Audio → check if Mono Audio is toggled On with the balance slider pushed all the way to one side. If yes — this is your problem. Either disable Mono Audio or centre the balance slider.
- Check mmsys.cpl Balance: Win+R → mmsys.cpl → Playback → right-click your device → Properties → Levels → Balance. Is one slider (L or R) at 0 or near 0? Set both to 100 and click OK → Apply → OK.
- Check OEM audio software: Open Realtek HD Audio Manager (or equivalent) and look for any imbalanced channel sliders. Reset them to equal values.
- Test the audio source itself: Some audio files, YouTube videos, and streams are intentionally mono or have content only in one channel. Test with a known stereo file (use the left/right channel test at MicTest.pro) to confirm it is a Windows issue rather than the content.
- Test the hardware in isolation: Plug headphones into a phone or another device. Both sides working? Then it is definitely a Windows software issue. Only left or right working on another device too? The headphone cable or earpiece is physically failing — a software fix will not help.
- Try a different cable or port: A worn 3.5mm cable often fails first in one channel. Try a different pair of headphones or a different 3.5mm port on your PC (front panel vs rear panel use different audio paths on desktops).
- Restart the Windows Audio service: Win+R →
services.msc→ find Windows Audio → right-click → Restart. This reloads the audio stack and sometimes resolves channel-level glitches without a full reboot.
Fix: Balance Keeps Resetting After Every Restart
Persistent Balance FixSetting the balance, saving it, restarting, and finding it is reset is one of the most frustrating audio issues in Windows. It has specific causes — and specific fixes. The most important thing to know: this is almost always caused by software overriding your setting, not by Windows failing to save it.
- Disable OEM audio startup programs: Press Ctrl + Shift + Esc to open Task Manager → Startup tab. Look for Realtek HD Audio Manager, Dolby Access, DTS Sound Unbound, Nahimic, or any headset app. Right-click → Disable. Restart and test if balance persists. Re-enable items one by one to identify the culprit.
- Disable exclusive mode in device properties: mmsys.cpl → Playback → right-click device → Properties → Advanced tab → uncheck "Allow applications to take exclusive control of this device." Exclusive mode allows applications to temporarily override all audio settings — including balance — and some apps do not restore the original settings when they release control.
- Check for audio service or driver resets: Some OEM audio drivers re-apply a factory default audio profile on every Windows boot. Fix: go to Device Manager → Sound, video and game controllers → right-click your audio device → Update driver → Browse my computer → Let me pick → select "High Definition Audio Device" (generic Microsoft driver). Test if balance persists. If it does, reinstall the OEM driver — but the test confirms the driver was resetting your balance.
- Check Windows audio policies (enterprise systems): On work-managed PCs, Group Policy can enforce specific audio settings. Check with your IT department if balance resets but no consumer software appears responsible.
Fix: Windows 11 24H2 Reset My Audio Balance
Windows 11 24H2Windows 11 24H2 changed the audio driver stack for many systems and introduced changes to how audio device properties are stored. A number of users found their carefully calibrated balance settings were reset to centre (L=100, R=100) after the update. Here is what to do.
- Immediately after upgrading to 24H2: Open mmsys.cpl and check the balance on your key devices. 24H2 may have reset them all to 100/100. Re-apply your balance settings via the Balance button in Levels → Properties.
- If the new driver is causing balance instability: 24H2 replaced many Realtek drivers with generic Microsoft audio drivers. The generic driver does not include Realtek's startup-profile behaviour, so balance settings may actually be more stable post-24H2 than before — but you need to re-set them once after the update.
- Re-install OEM audio driver if needed: If the 24H2 generic driver caused audio quality issues (less bass, no spatial audio, missing EQ), download the latest audio driver from your PC manufacturer's support page and reinstall it. After reinstalling, set your balance in both the OEM software and mmsys.cpl to prevent the software-wins-hardware conflict described above.
- Re-apply per-app Volume Mixer settings: 24H2 may have reset per-app audio routing. Revisit Settings → System → Sound → Volume mixer to confirm your per-app output assignments are still correct.
Fix: Headphone Balance Differs from Speaker Balance
Headphone-SpecificThis is not actually a bug — it is Windows working correctly. Headphones and speakers are separate audio devices in Windows and each has its own independent balance setting. When users plug in headphones after adjusting speaker balance (or vice versa), the balance feels different because each device starts from its own stored value.
- Open mmsys.cpl. In the Playback tab, you will typically see your speakers (Realtek or similar) and your headphones listed as separate devices.
- Right-click Speakers → Properties → Levels → Balance → set your preferred speaker balance → OK → Apply → OK.
- Right-click Headphones → Properties → Levels → Balance → set your preferred headphone balance (may be different if headphones have a physical imbalance or different compensation needs) → OK → Apply → OK.
- Both settings are now saved. Plug in headphones → Windows switches to headphone output with headphone balance. Unplug → Windows returns to speaker output with speaker balance. Each device "remembers" its own value.
- For USB headsets: USB audio devices appear as entirely separate audio devices with their own properties. Follow the same steps — find the USB headset in the Playback tab and set its balance independently.
Quick Reference — All Balance Methods Compared
| Situation | Best Method | Works On | Speed | Permanent? |
|---|---|---|---|---|
| General left/right balance adjustment | Method 1 — mmsys.cpl Balance | Win 10 & 11 | 1 min | ✅ Yes |
| Balance via modern Settings UI | Method 2 — Settings App | Windows 11 | 1 min | ✅ Yes |
| Single-ear / hearing impairment | Method 3 — Accessibility Mono | Win 10 & 11 | 30 sec | ✅ Yes |
| Per-device balance (HDMI, USB, BT) | Method 4 — Per-Device mmsys.cpl | Win 10 & 11 | 2 min | ✅ Per-device |
| Frequency-specific balance correction | Method 5 — Equalizer APO + Peace | Win 10 & 11 | 10 min setup | ✅ Yes |
| OEM audio software balance conflict | Method 6 — Realtek/Dolby controls | Win 10 & 11 | 5 min | ✅ Yes |
| Audio only from one ear/speaker | Fix — Check Accessibility + Balance | Win 10 & 11 | 2 min | ✅ Yes |
| Balance resets after restart | Fix — Disable OEM startup / Exclusive Mode | Win 10 & 11 | 5 min | ✅ Yes |
| 24H2 reset my balance settings | Fix — Re-apply + reinstall driver | Windows 11 | 5 min | ✅ Yes |
| Headphone vs speaker balance mismatch | Fix — Set balance per device in mmsys.cpl | Win 10 & 11 | 2 min | ✅ Per-device |
Long-Term Best Practices for Audio Balance Management
- Note your balance values somewhere: Windows shows no "current balance" indicator outside of the Balance dialog itself. Write down your L and R values (e.g., L=100, R=78) so you can re-apply them quickly after any Windows update or driver reinstall.
- Check balance after every Windows feature update: 24H2 proved that feature updates can silently reset audio device properties. A 20-second check in mmsys.cpl after any major update prevents days of unexplained audio weirdness.
- Choose your balance tool and stick to it: Using both mmsys.cpl balance AND OEM audio software balance is the most common cause of persistent imbalance problems. Pick one system — ideally mmsys.cpl for simplicity — and set the OEM software to flat/neutral.
- Use the MicTest.pro sound test after any change: Left/right channel testing takes 30 seconds and immediately confirms whether your balance setting achieved the intended result.
- For accessibility users — document your Mono Audio setting: Windows 11 occasionally resets accessibility settings during feature updates. Keep a note of your Mono Audio state and balance slider position so it can be re-applied in seconds.
Test Your Audio Balance Is Correct After Adjusting
Every balance change should be followed by a quick verification. Do not assume the numbers you entered are producing the audio experience you intended — perceptual loudness differs from measured decibel levels, and the best confirmation is an actual listening test with known left/right channel content.
- Open mmsys.cpl → Playback tab → right-click your device → Test.
- Windows plays a chime alternating between left and right channels. You should hear the left chime clearly in the left channel and the right chime in the right — with the relative loudness between them matching your intended balance.
- If one side is significantly quieter than expected, return to the Balance dialog and adjust.
Free Stereo Balance Test — Most Accurate Option
For a thorough left/right channel balance test with real audio content, use MicTest.pro's free Sound Test:
- Dedicated left-channel only and right-channel only test tones — instantly shows if one side is louder
- Full stereo test to confirm both channels play simultaneously at correct balance
- Frequency sweep to verify your device handles the full audio range
- Real-time visual level meter — see as well as hear the balance difference
- No download, no account, no plugins — works in Chrome, Edge, Firefox, Safari

10 Frequently Asked Questions About Audio Balance on Windows
Tested answers to the most common questions about adjusting volume balance settings in Windows 11 and Windows 10.
How do I change the audio balance on Windows 11?
The fastest and most reliable way to change audio balance in Windows 11 is via the Sound Control Panel: press Win+R, type mmsys.cpl, and press Enter. In the Playback tab, right-click your active audio device and select Properties. Click the Levels tab, then click the Balance button. Two sliders appear — L for the left channel and R for the right channel. Lower one to reduce that side's volume relative to the other. Set both to 100 for perfect centre balance. Click OK, then Apply, then OK. The change is immediate. You can also access balance through Settings → System → Sound → click your device → look for balance controls in device properties (availability varies by Windows 11 build).
How do I adjust volume balance settings in Windows 10?
In Windows 10, press Win+R, type mmsys.cpl, and press Enter. In the Sound Control Panel's Playback tab, right-click your active audio output device and select Properties. Go to the Levels tab and click the Balance button. You will see L (left) and R (right) sliders, both defaulting to 100. Reduce one side to shift the balance — for example, L=100 and R=70 makes the right channel 30% quieter, shifting the perceived centre to the left. Click OK and Apply to save. The Settings app in Windows 10 (Settings → System → Sound) does not include a balance control — you must use mmsys.cpl for balance adjustment on Windows 10.
Why is audio only coming from one speaker or one ear in Windows?
If audio plays from only one side in Windows, check these in order. First, go to Settings → Accessibility → Audio and verify that Mono audio is not enabled with the balance slider pushed to one extreme — this is the most common cause. Second, open mmsys.cpl → Playback → right-click your device → Properties → Levels → Balance and confirm both L and R sliders are above 0. One slider set to 0 silences that channel completely. Third, check any OEM audio software (Realtek, Dolby, gaming headset apps) for imbalanced channel settings. Fourth, test the hardware on another device — if the imbalance follows the hardware (headphones sound fine on a phone), the issue is in Windows. If the hardware sounds unbalanced everywhere, it is physically damaged.
How do I reset audio balance to centre (equal left and right) on Windows?
To reset audio balance to perfect centre in Windows: open mmsys.cpl (Win+R → mmsys.cpl), Playback tab → right-click your active device → Properties → Levels tab → click Balance. Set both the L slider and the R slider to 100. Click OK, then Apply, then OK. Centre balance means equal volume on both sides — both sliders at 100, not both at 50. Also check Settings → Accessibility → Audio: if Mono audio is enabled, either disable it or centre the balance slider beneath the toggle. If using OEM audio software, reset any per-channel level adjustments in that software as well.
Can I set different audio balance for headphones and speakers separately in Windows?
Yes, and this is how Windows is designed to work. In mmsys.cpl, every audio output device — speakers, headphones, USB audio, HDMI — has its own independent balance setting stored separately. Right-click your speakers → Properties → Levels → Balance and set the speaker balance. Then right-click your headphones → Properties → Levels → Balance and set a completely different value. Neither setting affects the other. When you switch to headphones (by plugging them in or selecting them as default), Windows automatically applies the headphone balance. Switch back to speakers and the speaker balance applies. This is particularly useful for users who need hearing compensation with headphones but prefer different settings for their room speakers.
Is there a keyboard shortcut to adjust audio balance in Windows 11 or 10?
Windows 11 and 10 do not include a native keyboard shortcut to adjust audio balance directly. However, the Accessibility Mono Audio feature in Windows 11 can be toggled with Win+Ctrl+M (when enabled in accessibility keyboard shortcuts). For reaching the balance dialog quickly without a mouse, the fastest keyboard path is: Win+R → type mmsys.cpl → Enter → Tab to the device list → arrow keys to select your device → Alt+R to open Properties → Tab to the Levels tab → Tab to the Balance button → Enter to open the Balance dialog → Tab between L and R sliders → arrow keys or type values to adjust. This full path is keyboard-navigable without touching the mouse. Third-party tools like Equalizer APO with Peace can also be assigned hotkeys for balance preset switching.
How do I adjust audio balance for accessibility — I can only hear from one ear?
Windows has a built-in accessibility feature specifically designed for single-ear or asymmetric hearing. In Windows 11, go to Settings → Accessibility → Audio and toggle on Mono audio. A balance slider appears — drag it toward the ear you can hear in. In Windows 10, the same feature is at Settings → Ease of Access → Audio → Mono audio. The critical advantage of Mono Audio over the standard balance slider is that it first combines both left and right channels into a single mixed signal, then redirects it. This means you hear all audio — even content mixed exclusively into one stereo channel — from your functioning side. Using the standard balance slider alone can make you miss audio content that only exists in the channel you are turning down.
Why does my audio balance keep resetting to default after a restart in Windows?
Audio balance resetting on restart is almost always caused by software, not a Windows save failure. The three most common causes: First, OEM audio software (Realtek HD Audio Manager, Dolby Atmos, DTS Sound Unbound, headset companion apps) applies its own audio profile on startup, overriding your Windows balance setting — find and disable these in Task Manager → Startup tab, or change their startup audio profile to flat/neutral. Second, a device with exclusive mode enabled allows applications to override its audio properties without restoring them — fix this in mmsys.cpl → device Properties → Advanced tab → uncheck exclusive mode permissions. Third, an OEM audio driver applies a factory default profile on each boot — test by temporarily switching to the generic Microsoft "High Definition Audio Device" driver to confirm the OEM driver is responsible.
How do I adjust the audio balance for a specific app in Windows 11?
Windows 11's built-in Volume Mixer (Settings → System → Sound → Volume mixer) controls per-app volume levels but does not provide per-app left/right balance sliders. Per-app balance control requires third-party software. The best free option is Equalizer APO combined with the Peace GUI frontend — this allows frequency-specific and channel-specific adjustments applied at the driver level, which can be scoped to individual applications. For most users, the system-wide balance setting in mmsys.cpl is sufficient. Per-app balance is most useful in professional audio production contexts where different sources need different stereo positioning, rather than typical everyday listening scenarios.
Does adjusting audio balance in Windows affect the microphone or recording input?
No. The audio balance controls in the Playback tab of mmsys.cpl exclusively affect audio output — what you hear through speakers or headphones. Microphone and recording input levels are managed entirely separately in the Recording tab of mmsys.cpl. If you need to adjust left/right microphone input balance (for example, if your stereo microphone captures more from one side), right-click your recording device in the Recording tab → Properties → Levels → Balance and adjust there independently. Changing output balance has absolutely no effect on microphone capture levels, sensitivity, or the balance of what your microphone records.
Fastest Fix for Imbalance
Win+R → type mmsys.cpl → Enter → Playback → right-click device → Properties → Levels → Balance → set L=100, R=100
Takes under 60 seconds on any version of Windows 10 or 11.
Test Your Audio Balance
Free left/right stereo channel test. Confirm your balance adjustment worked. Visual level meter included. No download needed.
Open Free Stereo TestFind Your Fix by Symptom
- 🔊 Sound feels off-centre → Method 1
- 👂 One ear is silent → Fix: One Ear
- ♿ Hearing impairment → Method 3
- 📺 HDMI sounds imbalanced → Method 4
- 🎧 Headphone balance wrong → Fix: Headphones
- 🔄 Balance resets on boot → Fix: Reset
- 🎛️ Need EQ-level control → Method 5
- 🖥️ Realtek/Dolby conflict → Method 6
- 🪟 After 24H2 update → Fix: 24H2
Key Shortcuts for Balance
- Win + R →
mmsys.cpl→ Enter - Right-click device → Properties
- Levels tab → Balance button
- L = Left channel, R = Right
- Both = 100 → centred balance
- Win + I → Accessibility → Audio