How to Adjust Volume for Apps in Windows 10 and 11?
By Jon — Windows Audio Expert | | 7 min read
Quick Answer
- Fastest way: Right-click speaker icon → Open Volume Mixer → drag per-app slider
- Persistent settings: Settings → System → Sound → App volume and device preferences
- Windows 11 Settings path: Settings → System → Sound → Volume Mixer
- Route audio to different device per app: Settings → Sound → App volume and device preferences → Output dropdown
- Best free tool: EarTrumpet — advanced per-app volume with persistent memory
Table of Contents
- Why You'd Want to Control Volume Per App
- Method 1: Volume Mixer — Quickest Way (Windows 10 & 11)
- Method 2: App Volume and Device Preferences (Persistent Settings)
- Method 3: Windows 11 Settings Volume Mixer
- Method 4: Route Different Apps to Different Audio Devices
- Method 5: EarTrumpet — Best Free Third-Party Tool
- Real-World Scenarios and Recommended Settings
- Which Method Should You Use?
- Common Problems and Fixes
- Test Your Audio After Adjusting
- Frequently Asked Questions
Why You'd Want to Control Volume Per App in Windows
Picture this: you are playing a game with friends. The game's soundtrack is cranked up the way it should be. But every time someone talks in Discord, you have to physically reach for the volume knob or frantically drag the system slider — and then the next explosion in the game nearly blows your ears out because you forgot to turn it back up.
There is a much better way. Windows lets you set a completely independent volume level for every single app — so your game stays at 80%, Discord sits at 40%, Spotify plays quietly in the background at 25%, and a notification sound does not scare you out of your chair. All at the same time, without touching any other app.
This is called per-app volume control, and it has been in Windows since Windows Vista — yet the vast majority of users never discover it. This guide walks through five different ways to use it, from the classic Volume Mixer to a smarter third-party tool that adds features Microsoft never bothered to build.
Important note: Per-app volume control only works for apps that use the Windows audio session (WASAPI). Most mainstream apps — browsers, games, media players, communication tools — fully support it. Legacy or low-level audio apps that bypass Windows audio may not appear in Volume Mixer.
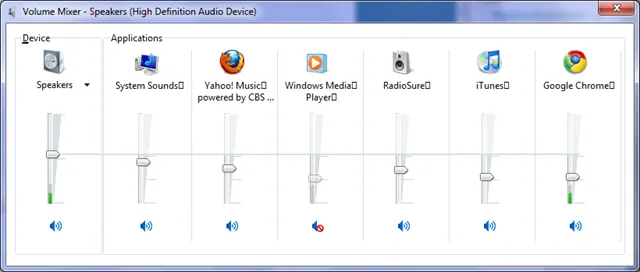
Method 1: Volume Mixer — The Quickest Way
Recommended — Windows 10 & 11Volume Mixer is built into every version of Windows 10 and 11. It is a floating panel that shows a vertical slider for every app currently producing sound. You can raise, lower, or mute any app independently in seconds — no settings menus, no digging through panels.
- Look at the bottom-right corner of your taskbar for the speaker icon.
- Right-click the speaker icon and select "Open Volume Mixer".
- The Volume Mixer panel will open. You will see a Device (master) slider on the left plus individual sliders for each app currently playing audio — such as Chrome, Spotify, a game, or a video player.
- Drag any app's slider up to increase its volume or down to decrease it.
- To mute a specific app, click the small speaker icon directly below its slider.
- Close the panel when done — all settings apply immediately.
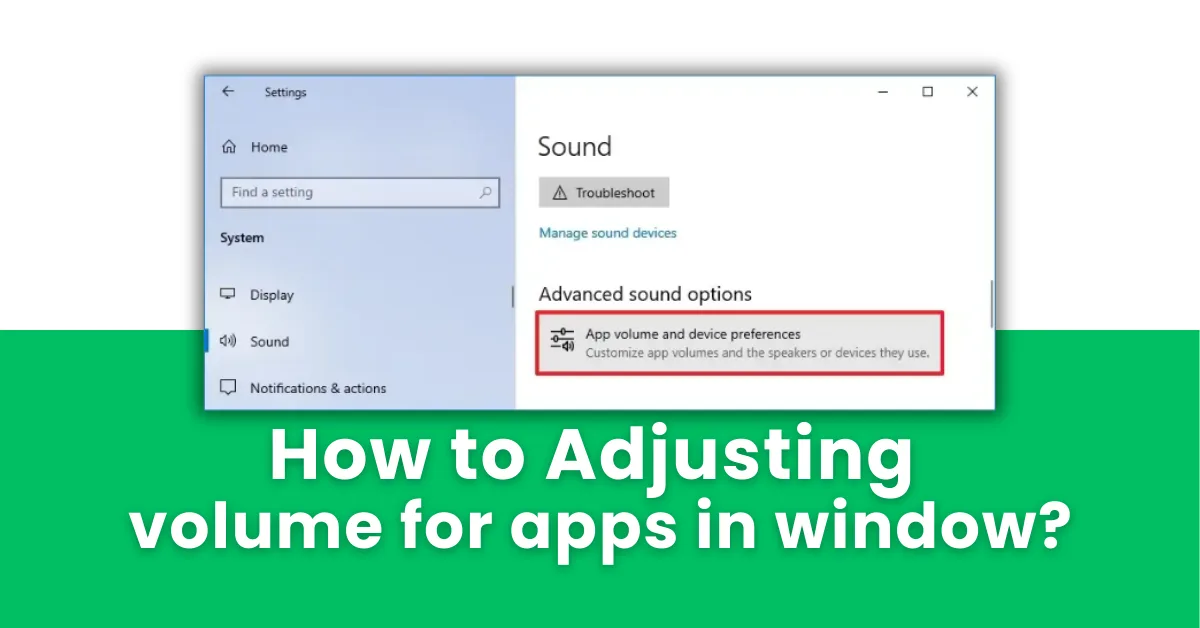
Method 2: App Volume and Device Preferences (Persistent Settings)
Persistent Per-App VolumeThe Volume Mixer is great for quick adjustments, but settings made there can reset when you close and reopen an app. For volume levels that stick every time you launch an app, use App volume and device preferences — a less-known panel in Windows Sound Settings that remembers your choices permanently.
- Press Windows + I to open Settings.
- Go to System → Sound.
- Scroll down to the Advanced sound options section.
- Click "App volume and device preferences".
- You will see a list of all apps that have recently used audio on your system — even apps not currently open.
- Drag the Volume slider next to any app to set your desired level.
- This setting is saved and will apply every time that app plays audio.
- Press Windows + I to open Settings.
- Go to System → Sound.
- Scroll down and click "App volume and device preferences".
- Locate the app you want to control and adjust its Volume slider.
- Use the Output and Input dropdowns to assign a specific audio device to that app.
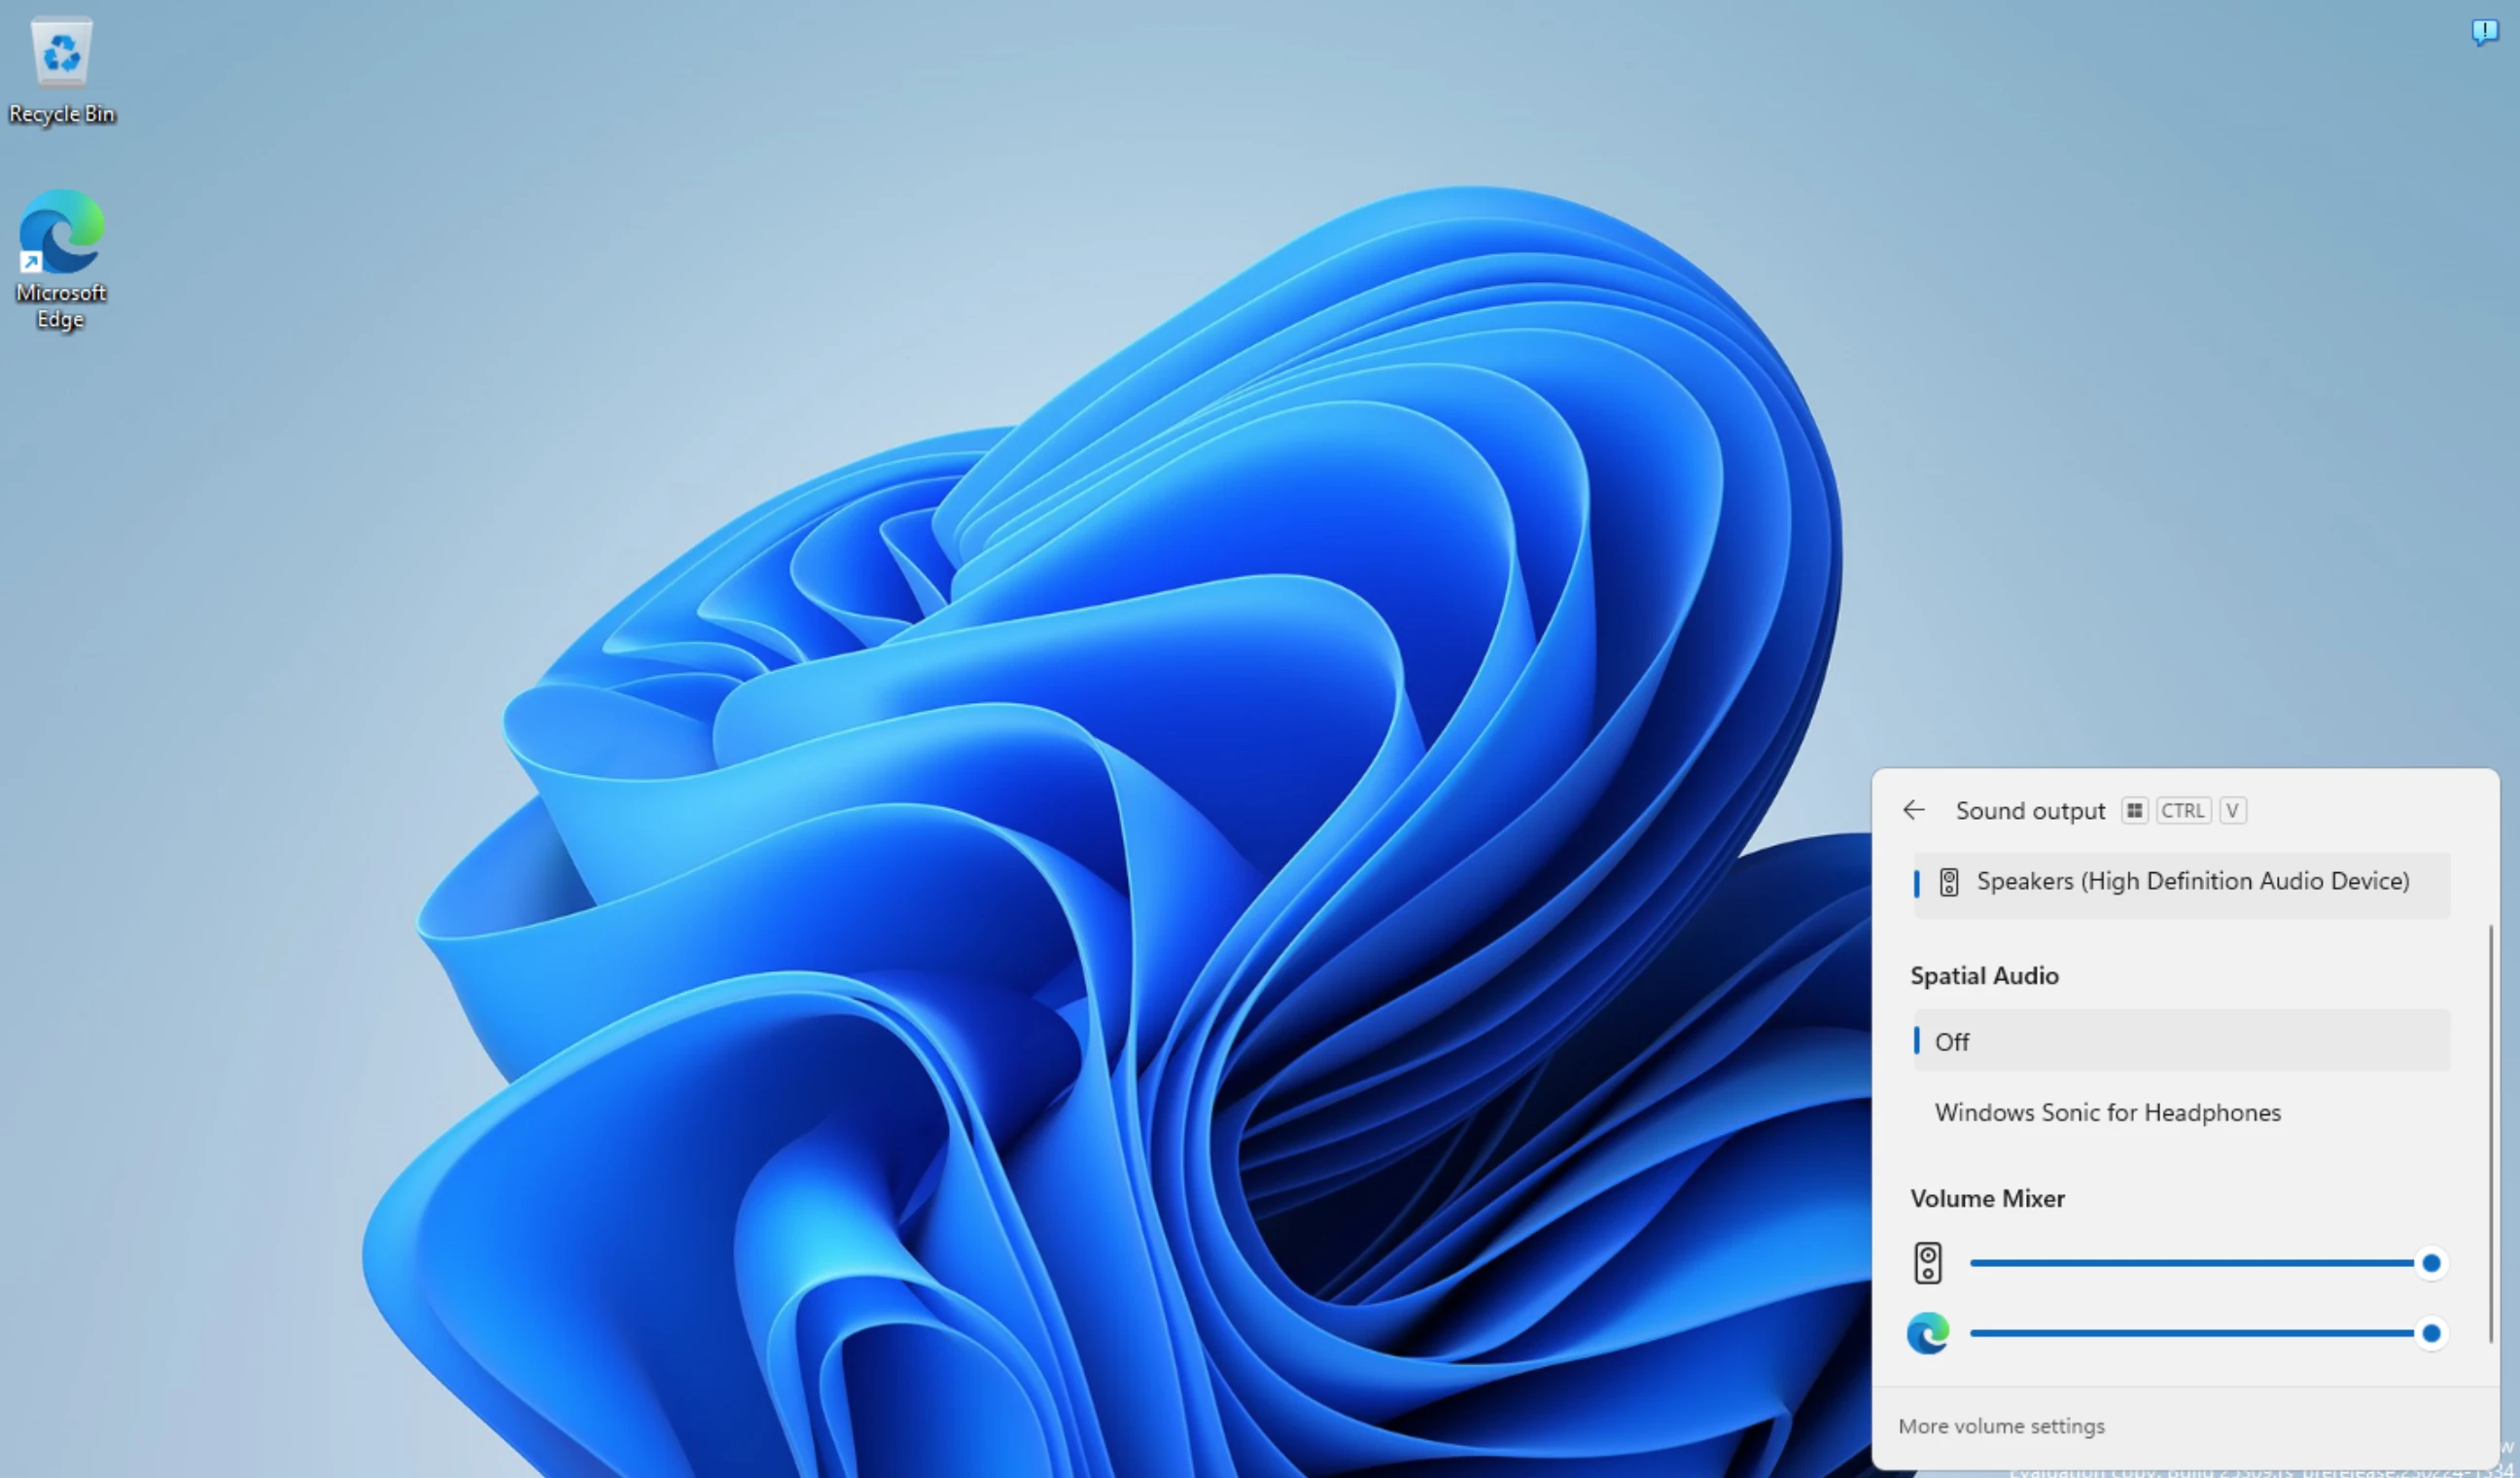
Method 3: Windows 11 Settings Volume Mixer
Windows 11 OnlyWindows 11 introduced a redesigned Volume Mixer directly inside the Settings app — a cleaner, more modern interface compared to the classic floating panel. It combines per-app volume sliders with device assignment in one place.
- Press Windows + I → System → Sound.
- Scroll down and click "Volume Mixer" (listed under Advanced).
- At the top you will see the master System volume and output device selector.
- Below it, all active apps are listed with individual volume sliders.
- Adjust each app's slider independently. A Reset button at the bottom restores all app volumes to default if needed.
Method 4: Route Different Apps to Different Audio Devices
Multi-Device Audio RoutingOne of the most powerful — and completely underused — features in Windows is the ability to send different apps to completely different audio devices. For example: your game audio goes to your speakers, but a Discord call goes directly into your headset. No third-party software needed.
- Press Windows + I → System → Sound.
- Click "App volume and device preferences".
- Find the app you want to reroute — for example, Discord, Teams, or Chrome.
- Click the Output dropdown next to that app and select a different audio output device.
- Repeat for the Input dropdown if you want the app to use a specific microphone as well.
- The app will immediately start sending audio to the selected device without affecting any other app.
Method 5: EarTrumpet — Best Free Third-Party Volume Manager
Third-Party — FreeIf you want more control than Windows provides out of the box — including persistent volume memory, a cleaner interface, and keyboard shortcut support — EarTrumpet is the tool most Windows power users rely on. It is free, open-source, and available directly from the Microsoft Store.
- Open the Microsoft Store (search "Microsoft Store" in the Start menu).
- Search for "EarTrumpet" and install it — it is free with no ads.
- Once installed, EarTrumpet replaces the default speaker icon in your taskbar with its own icon.
- Single-click the EarTrumpet icon to open a clean flyout with per-app volume sliders.
- Each app appears with its icon, name, and a slider. Drag to adjust. Right-click an app to move it to a different audio device.
- EarTrumpet remembers your settings — volumes do not reset when you restart apps.
Real-World Scenarios and What to Do in Each
Here are the most common situations where per-app volume control solves a real frustration — and exactly which method to use in each case.
You want game audio loud, but your teammates' voices in Discord, TeamSpeak, or Xbox Game Bar at a lower, comfortable level. Use Method 1 (Volume Mixer) — open it during a session, lower your voice chat app's slider to around 40–50% and keep your game at 80–100%.
You are on a video call but want Spotify quietly in the background. Use Method 2 (App volume and device preferences) — set Spotify to 20–30% permanently. It will always launch at that level without you touching anything.
You have both speakers and a USB headset connected. You want Teams calls in your headset but videos and music through your room speakers simultaneously. Use Method 4 (device routing) — assign Teams to your headset output and leave all other apps on speakers.
Browser notifications or Windows system sounds are jarring compared to your music. Use Method 1 or Method 5 (EarTrumpet) — locate "Windows Explorer" or your browser in the mixer and pull that slider way down.
Which Method Should You Use?
| Method | Best For | Settings Persist? | Win 10 | Win 11 |
|---|---|---|---|---|
| Volume Mixer (taskbar) | Quick in-session adjustment | Partial | ||
| App Volume & Device Prefs | Permanent per-app levels | Yes | ||
| Settings Volume Mixer | Clean UI for live control | Partial | ||
| Device Routing | Headset + speakers simultaneously | Yes | ||
| EarTrumpet (free tool) | Full persistent control + multi-device | Yes |
Common Problems and Their Fixes
App not showing in Volume Mixer
Volume Mixer only lists apps that are currently producing audio. Open the app, start playing audio within it, then open Volume Mixer — it will appear. Apps that are open but silent will not be listed until they start outputting sound.
App volume resets to 100% every time it opens
Some apps — particularly games using DirectSound or apps with built-in audio engines — override Windows volume settings on launch. Two solutions: use App volume and device preferences (Method 2) instead of Volume Mixer since those settings have higher priority, or switch to EarTrumpet (Method 5) which has better handling of volume memory for stubborn apps.
Cannot hear a specific app even at 100%
Check whether the app has its own internal volume control. Games, media players, and video apps often have a separate in-app volume slider that is independent of Windows. Set both the in-app volume and the Windows Volume Mixer slider to 100%, then use the Windows level to reduce it to your preferred listening level.
Volume Mixer missing from the right-click speaker menu
On Windows 11, some builds moved Volume Mixer out of the right-click context menu. If you do not see it, go directly to Settings → System → Sound → Volume Mixer instead. You can also pin it to the taskbar for faster access via a custom shortcut to sndvol.exe.
All app volumes reset after a Windows Update
Windows feature updates can reset audio session settings. After any major update, reopen App volume and device preferences and confirm your per-app levels are still set correctly. For the most update-resistant setup, use EarTrumpet — it stores settings in its own configuration file that is unaffected by Windows audio driver resets.
Test Your Audio After Adjusting App Volumes
Once you have configured per-app volumes, confirm the setup is working correctly before your next important session.
- Windows built-in test: Go to Settings → System → Sound → select your output device → click Test. This plays a tone through your current default output device to confirm audio is routing correctly.
- Per-channel test: Visit sound test — it plays audio through your left and right channels separately so you can confirm both channels are working at the correct balance. Useful after any audio reconfiguration to rule out channel imbalance introduced during setup. Free, browser-based, no installation needed.
- Live app test: Open all your configured apps simultaneously, play audio in each, and confirm the relative volumes match your intended levels. Adjust any stragglers using Volume Mixer for fine-tuning.
Good habit to build: Every time Windows updates, spend 60 seconds opening App volume and device preferences to confirm your per-app levels are intact. Updates can silently reset audio driver settings, and catching it right after an update is far less frustrating than noticing it in the middle of a call or gaming session.

Frequently Asked Questions
How do I adjust the volume for a specific app in Windows 10?
Right-click the speaker icon in your taskbar and select Open Volume Mixer. A panel opens with a separate vertical slider for every app currently playing audio. Drag the slider for your target app up or down — this does not affect any other app or the overall system volume.
How do I change the volume for individual apps in Windows 11?
Go to Settings → System → Sound and scroll down to click "App volume and device preferences". Every app that has used audio recently will be listed with its own volume slider. Adjust the slider for the specific app you want to change. These settings persist across app restarts.
Where is the Volume Mixer in Windows 11?
Right-click the speaker icon in the taskbar (bottom-right corner) and select Open Volume Mixer. In Windows 11, you can also go to Settings → System → Sound → Volume Mixer for the redesigned version inside the Settings app. Both show per-app volume sliders for all active audio sessions.
Can I set a default volume for an app so it always opens at the same level?
Yes. Go to Settings → System → Sound → App volume and device preferences. Set the desired volume for any listed app. Windows remembers this value and applies it whenever that app plays audio — even after you restart the app or reboot Windows. For even more reliable persistence, use EarTrumpet from the Microsoft Store.
Why does my app volume reset to 100% every time I reopen it?
Some apps override the Windows volume setting when they launch. Use Settings → System → Sound → App volume and device preferences instead of the floating Volume Mixer — that location has higher persistence priority. If the problem continues, install EarTrumpet (free, Microsoft Store) which handles volume memory for stubborn apps more reliably.
How do I mute one app while keeping others at full volume?
Open Volume Mixer by right-clicking the speaker icon and selecting Open Volume Mixer. Click the small speaker icon directly below the slider of the app you want to mute. That app's audio will be completely silenced while all other apps continue playing at their current levels.
Why is the app not showing in Volume Mixer?
Volume Mixer only shows apps that are currently producing audio output. If an app is open but not actively playing sound at that moment, it will not appear. Start playing audio in the app first — a video, song, or audio message — then open Volume Mixer and the app's slider will appear automatically.
Can I use different audio output devices for different apps in Windows?
Yes. Go to Settings → System → Sound → App volume and device preferences. Next to each app you will see both a volume slider and an Output dropdown menu. Click the dropdown for any app and select a different speaker, headphone, or audio device. That app will immediately route its audio to the selected device while all other apps continue using the system default.
Does adjusting app volume in Volume Mixer affect the microphone?
No. Volume Mixer controls only audio output — what you hear from apps. Microphone input is completely separate, controlled under the Input section in Sound Settings. Changing an app's playback volume has zero effect on microphone sensitivity, recording levels, or what others hear from you.
What is the best free tool to control per-app volume in Windows?
EarTrumpet is the most widely recommended free tool for per-app volume control in Windows 10 and 11. Install it free from the Microsoft Store. It replaces the default speaker icon with a smarter mixer that supports persistent volume levels, per-app output device switching, a cleaner and faster interface, and better handling of apps that reset their volume on launch.
Related Posts
- Right-click speaker → Open Volume Mixer
- App must be playing audio to appear in mixer
- Use Settings for persistent per-app volume
- Route apps to different audio devices
- EarTrumpet = best free advanced option
- Updates may reset your volume settings
Test Your App Audio Output
After adjusting app volumes, confirm both channels are working correctly with this free browser-based test. No install required.
Open Sound Test at MicTest.pro5 Methods at a Glance
- Volume Mixer — quickest, live control
- App Volume & Device Prefs — persistent
- Settings Volume Mixer — Windows 11 only
- Device Routing — headset + speakers
- EarTrumpet — best free tool
- Win + I → System → Sound
- Right-click speaker → Volume Mixer
- Win + R →
sndvol→ Volume Mixer direct - Taskbar speaker scroll = master volume