Adjusting Volume Balance Settings in Windows 11 and 10 — Complete 2026 Guide
By Jon — Windows Audio Expert | | 20 min read | Tested on Windows 11 24H2 & Windows 10 22H2
Quick Answer — How to Fix Audio Balance in Windows 11 & 10
- Fix uneven L/R balance: Press
Win+R→ typemmsys.cpl→ Playback tab → right-click your device → Properties → Levels → Balance button → set L and R to equal values - Control volume per app: Right-click speaker icon → Open Volume Mixer → adjust each app's slider independently
- Stop Windows lowering volume during calls:
mmsys.cpl→ Communications tab → select Do nothing - Fix balance after a Windows update: Disable audio enhancements (mmsys.cpl → Playback → Properties → Enhancements → Disable all)
- Single-ear users: Settings → Accessibility → Audio → enable Mono audio
- Reset everything: Playback Properties → Advanced tab → Restore Defaults
- Test your audio output now with the free sound test at MicTest.pro
Table of Contents
- Why Audio Balance Gets Off in Windows — Real Causes in 2026
- Understanding Windows' Three Volume Balance Systems
- Fix 1: Adjust Left/Right Channel Balance via Sound Control Panel
- Fix 2: Use Volume Mixer for Per-App Volume Control
- Fix 3: Fix Communication Audio Ducking (Volume Auto-Lowering)
- Fix 4: Enable Mono Audio for Hearing Accessibility
- Fix 5: Configure or Disable Spatial Sound
- Fix 6: Adjust Volume for Specific Output Devices
- Fix 7: Disable Audio Enhancements Affecting Balance
- Fix 8: Fix Bluetooth Headphone Volume & Balance Issues
- Fix 9: Manage Third-Party Audio Software (Realtek, Dolby, DTS)
- Fix 10: Reset All Audio Settings to Default
- Keep Your Audio Balance Stable Long-Term
- Quick Reference Table
- Test Your Audio Balance
- 10 Frequently Asked Questions
Why Audio Balance Gets Off in Windows — Real Causes in 2026
Audio balance problems in Windows are far more common than most guides acknowledge — and the cause is rarely the hardware itself. In my experience troubleshooting audio across hundreds of Windows machines, the same set of culprits comes up repeatedly. Here is an honest breakdown of what is actually happening when your sound feels uneven, lopsided, or behaving unexpectedly.
- Uneven L/R balance slider: The most direct cause. Windows stores a left and right channel volume value for every audio output device. If they are not equal, one side will always be louder. This value sometimes gets changed by third-party software, driver updates, or even accessibility shortcuts on some laptops.
- Audio enhancements distorting stereo output: Loudness equalisation, bass boost, room correction, and spatial audio algorithms all process the left and right channels differently. Even when designed to improve sound, these can skew perceived balance significantly on certain headphone or speaker hardware.
- Windows 11 24H2 replacing OEM audio drivers: Feature updates install a generic Microsoft audio driver that strips out EQ and balance presets your PC manufacturer applied. The generic driver's default settings are not calibrated for your specific speakers — balance and frequency response may shift noticeably after the update.
- Communication ducking reducing all other audio: When Windows detects a voice call or communication application, it can automatically reduce the volume of all other audio by up to 80%. This feels like sudden, unexplained volume imbalance between apps — one app's audio drops while another seems very loud.
- Per-app Volume Mixer settings from a previous session: The Volume Mixer remembers per-app levels between sessions. If a previous user or session set a specific app to 10% and another to 100%, you will always hear uneven volume between those apps until you manually re-balance the mixer.
- Spatial Sound (Windows Sonic / Dolby Atmos) altering stereo field: Spatial audio processes the stereo signal and creates a virtual surround sound effect. If the algorithm is calibrated for headphones but you are using speakers — or vice versa — the soundstage can feel heavily biased toward one side.
- Bluetooth profile switching: Bluetooth headsets use different audio profiles for music vs calls. Each profile has completely independent volume tracking. Switching between them can make it seem like the volume has shifted dramatically between ears or between apps.
- Physical cable or hardware degradation: If all software settings are correct and the imbalance persists across different applications, the cable, headphone driver, or speaker may genuinely be the source. A simple left-right swap test (if possible) or testing on another device confirms hardware vs software origin.
Understanding Windows' Three Volume Balance Systems
Before jumping into fixes, it is worth understanding that Windows actually manages audio volume and balance at three completely separate layers. Each layer can be independently misconfigured — and many users fix one layer only to find the problem persists because another layer is still wrong.
Windows Audio: Three Separate Balance Layers
Work through the fixes that match your symptom. Use the Quick Reference Table below to jump directly to the right fix.
Fix 1: Adjust Left/Right Channel Balance via Sound Control Panel
Primary Balance FixThis is the direct fix for the single most common audio balance complaint: "sound is louder in my left ear/speaker than my right" or vice versa. The Windows Sound Control Panel stores a dedicated left and right volume level for every audio output device on your PC. These values are independent of the master volume slider and are not visible in the modern Settings app — you have to go through the classic Control Panel to access them.
- Press Windows + R. In the Run dialog, type
mmsys.cpland press Enter. - The Sound Control Panel opens. Click the Playback tab.
- Your active audio output device (speakers, headphones, HDMI audio) will show a green checkmark. Right-click it and select Properties.
- In the Properties window, click the Levels tab.
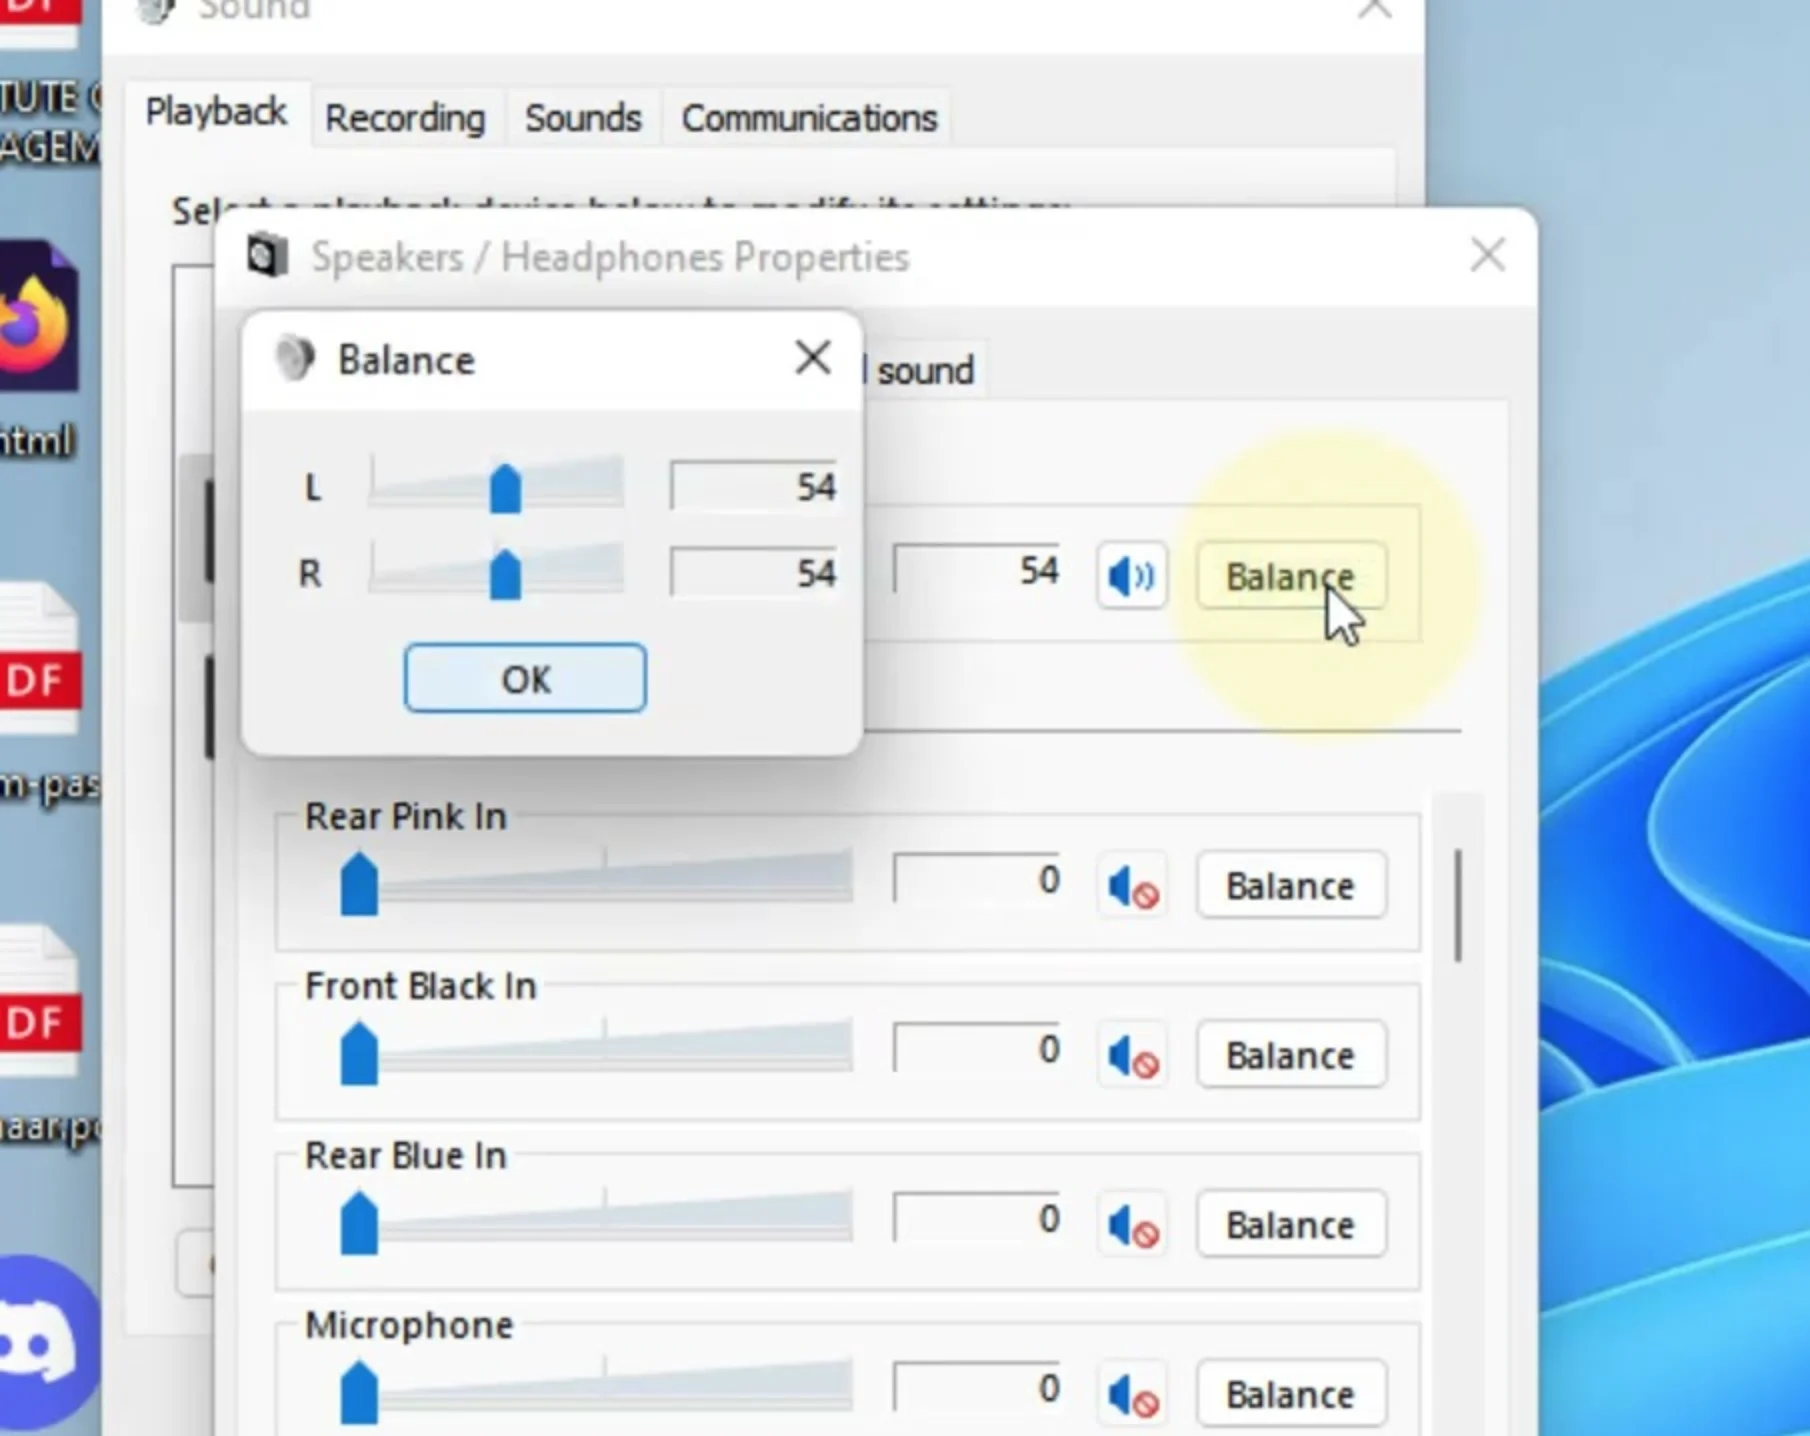
- Next to the main volume slider, click the Balance button.
- The Balance dialog shows two fields: L (left channel) and R (right channel).
- For perfectly centered audio: set both L and R to 100. Click OK.
- If you want to intentionally shift balance (e.g., to compensate for hearing difference): lower the louder side. Example: L=80, R=100 shifts audio slightly right.
- Click Apply then OK. The change takes effect immediately.
- Press Windows + R → type
mmsys.cpl→ press Enter. - Click the Playback tab.
- Right-click your active audio device → Properties.
- Go to the Levels tab → click Balance.
- Set L and R to equal values (both 100 for centered). Click OK → Apply → OK.
- Test immediately — if the imbalance is fixed, you are done. If not, proceed to Fix 7 to check enhancements.
Fix 2: Use Volume Mixer for Per-App Volume Control
App-Specific VolumeThe Volume Mixer is one of the most powerful and most underused audio tools in Windows. It gives you a completely independent volume slider for every application that is currently producing sound — meaning you can have Spotify at 40%, a YouTube video in the browser at 80%, and your video call at 100%, all simultaneously, without touching the master volume at all.
This is the fix for the complaint: "one app is always too loud compared to everything else" or "my notification sounds blast over my music."
- Method 1 (fastest): Right-click the speaker icon in the taskbar → select Open volume mixer.
- Method 2: Go to Settings → System → Sound → scroll down to the Advanced section → click Volume mixer.
- Method 3: Press Windows + I → type "volume mixer" in the search box → click the result.
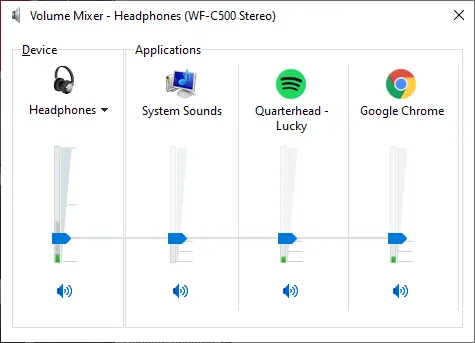
- The Volume Mixer page shows Output device (master), System sounds, and a slider for every app currently producing audio.
- Drag any app's slider up or down. Changes take effect immediately.
- To reset a specific app to 100%: right-click its slider → Set to default. Or drag all sliders to the top.
- Note: Apps only appear in the mixer while they are producing audio. Open the app and play something before adjusting its mixer level.
- Right-click the speaker icon in the taskbar → Open Volume Mixer.
- The classic Volume Mixer shows vertical sliders for each active app.
- Adjust any slider to set that app's individual volume level.
- To reset everything: click the speaker icon at the top of the mixer → drag to 100 — this resets the master; individual apps must be reset manually.
Fix 3: Fix Communication Audio Ducking (Volume Auto-Lowering)
Stops Volume Auto-ChangesThis is the hidden culprit behind one of the most frustrating Windows audio experiences: you are listening to music, you join a Teams call or Discord server, and suddenly your music drops to a whisper. You did not touch the volume. Windows did it automatically.
This feature is called Communication Audio Ducking. Windows monitors for applications marked as communication devices and automatically reduces the volume of all other audio when it detects active communication. By default, it reduces other audio to 20% of its normal level — which is an 80% volume reduction that feels extreme and unexpected.
This affects more apps than you think
Communication ducking is triggered by: Microsoft Teams, Skype, Discord, Zoom, Google Meet in Chrome, Windows Phone Link, Cortana voice recognition, and some game voice chat systems. Even apps you would not normally consider "communication apps" can trigger it if they register as such with Windows audio.
- Press Windows + R → type
mmsys.cpl→ press Enter. - Click the Communications tab at the top of the Sound Control Panel.
- You will see four options. Currently it is likely set to "Reduce the volume of other sounds by 80%".
- Select "Do nothing".
- Click Apply, then OK.
- Test by joining a call or starting a voice chat — all other audio should now maintain its volume level.
Fix 4: Enable Mono Audio for Accessibility and Single-Ear Use
Accessibility FeatureMono Audio is a Windows accessibility feature that solves a specific but important problem: when you are only using one ear — due to hearing loss, a broken headphone driver, or simply wearing one earbud — stereo audio means you are missing half the content. Sounds panned to the right channel are lost if you only have the left earbud in.
Enabling Mono Audio combines the left and right channels into a single identical signal played equally through both channels. You hear everything, in both ears, at the same volume — regardless of how the audio was originally mixed.
- Press Windows + I to open Settings.
- Click Accessibility in the left sidebar.
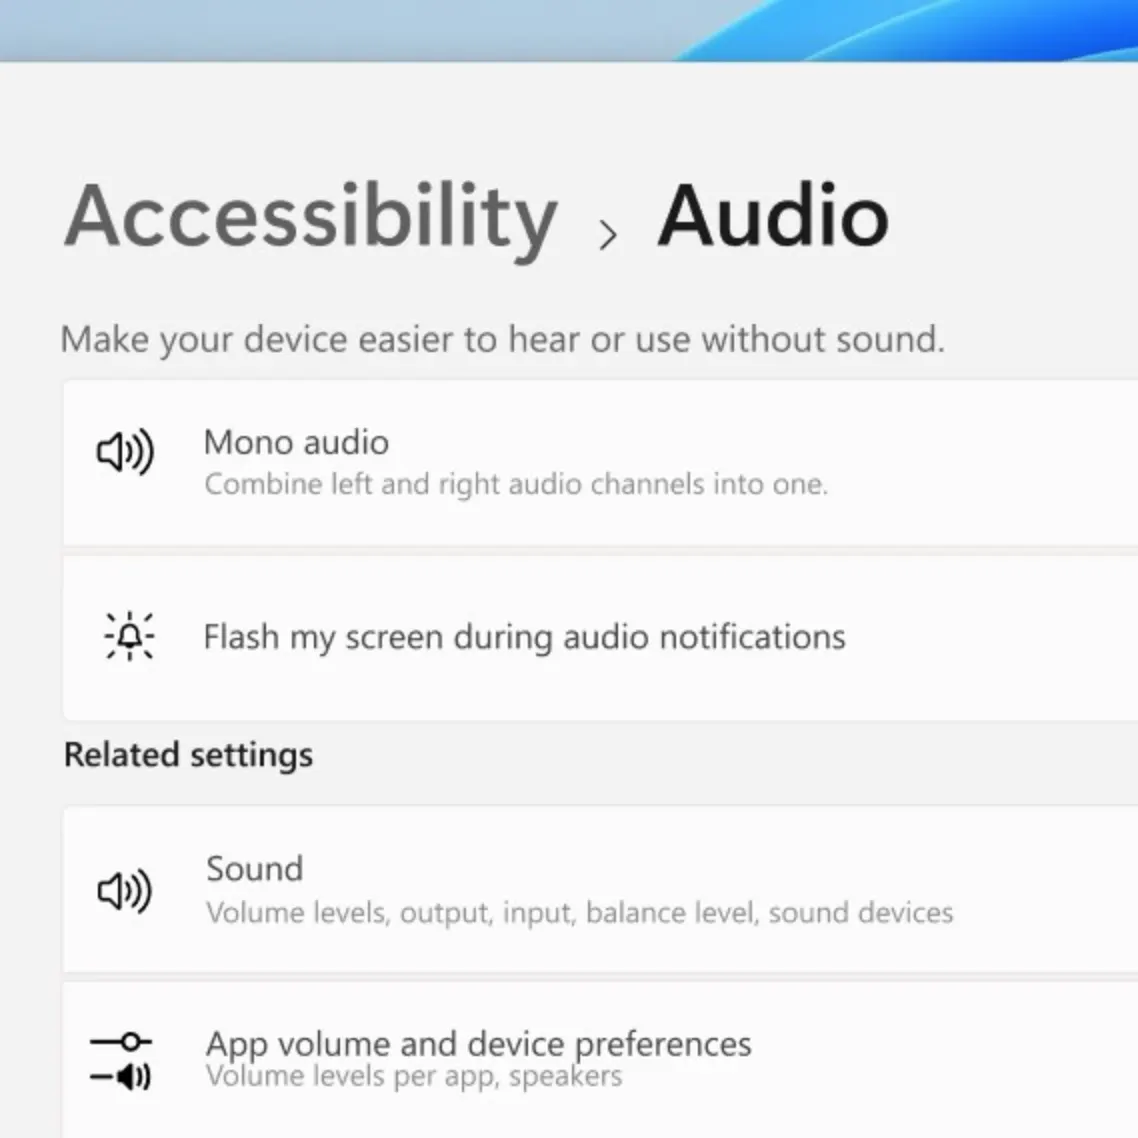
- Scroll down and click Audio.
- Toggle Mono audio to On.
- The change is instant — you will immediately hear both channels equally in both ears.
- Go to Settings → Ease of Access → Audio.
- Under "Make your device easier to hear," find Turn on mono audio.
- Toggle the switch to On.
- The effect is immediate for all system audio.
Fix 5: Configure or Disable Spatial Sound
Spatial Audio ConfigWindows 11 and Windows 10 both include built-in spatial audio processing — Windows Sonic for Headphones. Some PCs with premium audio hardware also have Dolby Atmos or DTS:X Ultra pre-installed. These technologies are designed to create a virtual surround sound experience from stereo speakers or headphones, but they can significantly alter perceived audio balance if configured incorrectly or used with incompatible hardware.
The most common spatial audio balance problem: Windows Sonic is enabled for headphones, but you are listening through speakers (or vice versa). The algorithm calibrated for headphone listening places virtual sound sources in unexpected positions when played through physical speakers.
- Right-click the speaker icon in the taskbar.
- Select Spatial sound → you will see the current setting (Windows Sonic, Dolby Atmos, or Off).
- To disable: click Off.
- Alternative path: Go to Settings → System → Sound → click your output device → scroll to Spatial audio dropdown → select Off to disable.
- Or via
mmsys.cpl: right-click your playback device → Properties → Spatial sound tab → select Off from the dropdown → Apply. - Test whether balance improves after disabling spatial audio. If it does, spatial processing was the cause.
- If you want to keep spatial audio: for headphones, use Windows Sonic for Headphones. For speakers, try Off or your hardware's native surround mode.
Fix 6: Adjust Volume for Specific Output Devices
Per-Device VolumeWindows 11 allows you to set different master volume levels for each audio output device independently. This means your headphones can be at 60% while your monitors/speakers are at 40% — and switching between them won't suddenly blast or barely play audio. This is especially useful for users who frequently switch between headphones and speakers, or who have multiple monitors with built-in audio.
- Go to Settings → System → Sound.
- Under the Output section, you will see your current default device with a volume slider.
- To view and adjust another device's volume: click More sound settings or All sound devices (depending on your Windows 11 version).
- Click any listed output device to expand it. A volume slider appears — adjust it for that specific device.
- This volume is remembered per-device. Switching outputs preserves each device's last-set level.
- Right-click the speaker icon → Open Sound Settings.
- The main volume slider controls the current default device.
- To change default device and adjust its volume: click the dropdown under Output → select a different device → the slider now controls that device.
- Each device's volume is tracked independently once you have set it while that device was active.
Fix 7: Disable Audio Enhancements Affecting Balance
Enhancement ConflictsWindows applies a suite of audio processing effects to your output device — loudness equalisation, bass boost, room correction, virtual surround, and more. These are designed to improve sound quality on average hardware, but they process left and right channels with different EQ curves, which can introduce or amplify a perceived balance difference that isn't in the original audio.
This became a more significant issue after Windows 11 24H2, which changed how enhancements are applied at the system level. If your balance issue appeared or worsened after a Windows update, this fix is where to look first.
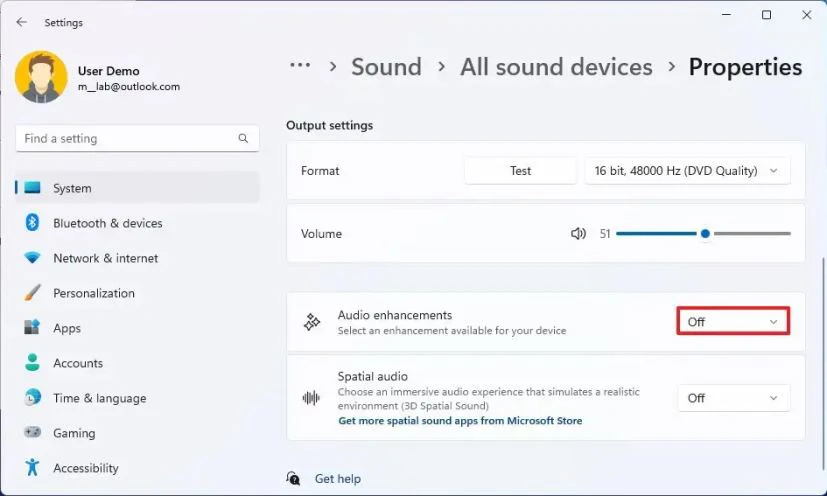
- Press Windows + R → type
mmsys.cpl→ Enter. - Go to the Playback tab.
- Right-click your active audio device → Properties.
- Click the Enhancements tab. (On some drivers, this tab may be called Effects or the settings may appear in the Advanced tab.)
- Check "Disable all enhancements" or "Disable all sound effects".
- Click Apply → OK.
- Test balance immediately. If it improves significantly, one of the enhancements was causing the skew.
- To identify which enhancement specifically: re-enable the Enhancements tab and then tick each effect individually, testing balance after each. The one that reintroduces the imbalance is the culprit.
Fix 8: Fix Bluetooth Headphone Volume and Balance Issues
Bluetooth AudioBluetooth audio balance problems in Windows have their own unique characteristics because Bluetooth headsets operate differently from wired audio. Understanding the two-profile system is essential before trying to fix anything.
When a Bluetooth headset connects to Windows, it creates two separate audio devices: the A2DP (Headphones) profile for high-quality stereo listening — and the HFP/HSP (Hands-Free) profile for calls with microphone access. These profiles are tracked independently by Windows, including their volume levels. Switching between them (often triggered automatically by a call or voice app) can create dramatic-seeming volume shifts that are not actually a balance problem but a profile switch.
- Check which Bluetooth profile is active: Go to Settings → System → Sound → Output. Look at your Bluetooth device's name — it may appear as both "[Headphone name] Headphones" (A2DP) and "[Headphone name] Hands-Free AG Audio" (HFP). Make sure you have the right one selected for your use case.
- Set volume for each profile: Switch to A2DP profile → set volume to your preferred level. Then switch to HFP → adjust that separately. Windows remembers per-profile volumes.
- Fix imbalance after re-pairing: Go to Settings → Bluetooth & devices → find your headset → click ··· → Remove device. Power cycle the headset → re-pair from scratch. After re-pairing, check the device balance in mmsys.cpl → Playback → right-click the Bluetooth device → Properties → Levels → Balance.
- Check Bluetooth headphone companion app: Many premium headphones (Sony, Bose, Jabra, Sennheiser) have Windows companion apps that include their own EQ and balance controls. These override Windows balance settings. Open the app and check its balance/EQ settings.
Fix 9: Manage Third-Party Audio Software (Realtek, Dolby, DTS)
Audio Software LayerThis is the fix that most guides skip — and it explains why balance keeps resetting even after you correct it in Windows. On most consumer laptops and some desktops, your audio hardware comes with its own software: Realtek HD Audio Manager, Dolby Access, DTS Sound Unbound, Nahimic, Bang & Olufsen Audio Control, or a manufacturer-branded audio suite.
These applications run at startup and maintain their own separate EQ profiles, balance settings, and enhancement presets — which are applied after Windows' own audio settings. If Dolby Access has a preset that boosts the left channel, it will override any balance correction you make in mmsys.cpl.
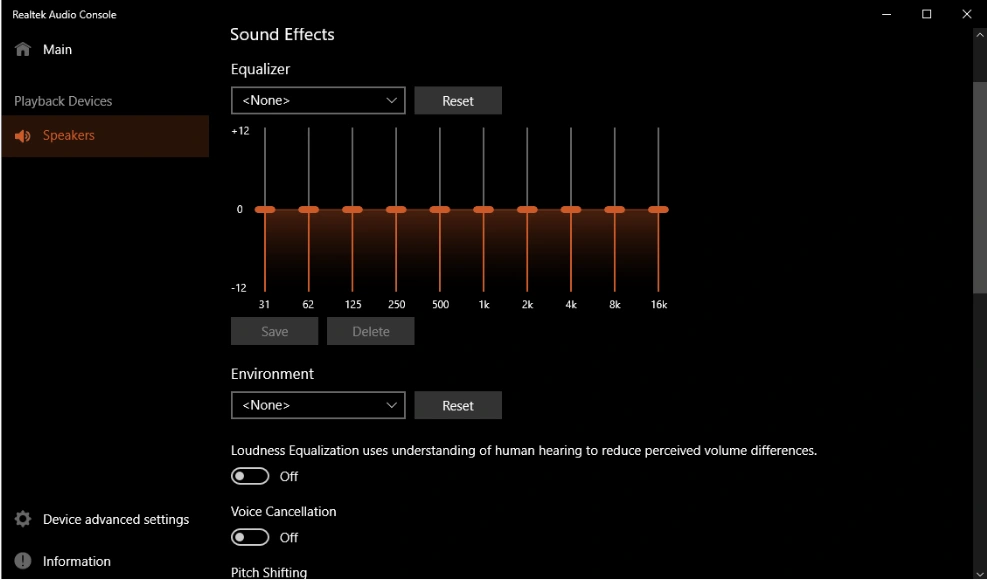
- Press Windows + S and search for: Realtek, Dolby Access, DTS Sound, Nahimic, or your PC brand name + "audio."
- If found, open the application and look for: EQ or Equalizer settings, Balance or stereo width controls, Preset names (Movie, Music, Gaming, etc.), and Enhancement toggles.
- Check if any preset is applying unequal gain to left and right channels. Switch to a "Flat" or "Neutral" preset if available.
- If the software has its own balance slider, make sure it is centered.
- If you cannot find the setting causing the imbalance, try disabling or uninstalling the third-party audio software temporarily to test if Windows' native balance settings then hold correctly.
Fix 10: Reset All Windows Audio Settings to Default
Nuclear Option — Clean SlateIf you have worked through multiple fixes and the audio balance is still off — or if the system has accumulated months of conflicting settings from different software, updates, and experiments — the fastest path forward is often a clean reset of all audio settings. This clears every custom configuration Windows has stored for your audio devices and returns them to factory defaults.
- Press Windows + R → type
mmsys.cpl→ Enter. - Go to the Playback tab. Right-click each audio device one by one and select Properties.
- In Properties:
- Go to the Advanced tab → click Restore Defaults.
- Go to the Enhancements tab → click Restore Defaults.
- Go to the Spatial sound tab → select Off.
- Go to the Levels tab → click Balance → set both L and R to 100.
- Click Apply → OK for each device.
- Go to the Communications tab → select Do nothing → Apply.
- Open Volume Mixer (right-click speaker icon → Open Volume Mixer) → drag all app sliders to 100%.
- If using third-party audio software (Fix 9): reset to its default profile as well.
- Restart the PC.
- After restart, set your preferred balance level using Fix 1, then re-configure only the settings you actually want — starting from a known clean state.
Keep Your Audio Balance Stable Long-Term
Long-Term Audio Balance Stability Checklist
- After every major Windows update: Open mmsys.cpl → check L/R balance in Playback → Properties → Levels → Balance. Takes 30 seconds and catches the most common post-update audio shift.
- Check enhancements after 24H2 or future feature updates: Windows updates can silently re-enable enhancements. Verify the Enhancements tab setting after each feature update.
- Keep third-party audio software updated: Outdated Dolby or Realtek software conflicting with new Windows audio APIs is a common source of recurring balance problems.
- For headphones: Check the Balance slider (mmsys.cpl → Properties → Levels → Balance) whenever you re-pair or reinstall drivers — it can reset to unequal values.
- Use Windows' built-in Loudness Equalisation carefully: It is useful for consistent perceived volume, but it can subtly affect stereo balance on some hardware. If you notice balance creeping off again, disable this first.
- Test regularly: Use MicTest.pro's sound test to do a quick left/right speaker check and frequency test after any Windows update. Catching a shift early is much easier than diagnosing it after weeks of use.
Quick Reference — Which Fix for Which Problem
| Symptom | Best Fix | Device Type | Difficulty | Time |
|---|---|---|---|---|
| Left ear louder than right (or vice versa) | Fix 1 — L/R Balance Slider | All | Easy | 1 min |
| One app way louder than all others | Fix 2 — Volume Mixer | All | Easy | 1 min |
| Music drops quiet when joining a call | Fix 3 — Communication Ducking | All | Easy | 1 min |
| Missing audio with one broken headphone driver | Fix 4 — Mono Audio | Headphones | Easy | 1 min |
| Spatial sound making stereo feel lopsided | Fix 5 — Spatial Sound Off | Headphones/Speakers | Easy | 1 min |
| Headphones and speakers at wrong volumes | Fix 6 — Per-Device Volume | Multi-device | Easy | 2 min |
| Balance broke after Windows 11 24H2 update | Fix 7 — Disable Enhancements | All | Easy | 2 min |
| Bluetooth headphones volume uneven or changing | Fix 8 — Bluetooth Re-pair | Bluetooth | Medium | 5 min |
| Balance keeps resetting after reboot | Fix 9 — Third-Party Audio Software | All | Medium | 5 min |
| Multiple conflicting issues, nothing seems to work | Fix 10 — Full Reset | All | Easy | 5 min |
Test Your Audio Balance After Fixing
After applying any fix, verify the result immediately with a dedicated left/right balance test — not just by listening to music, which often doesn't reveal subtle imbalance clearly.
- Go to Settings → System → Sound.
- Click your output device to expand it.
- Click Test — Windows plays a tone through the left speaker/earbud, then the right. Each should sound equally loud. If one side is noticeably louder, the balance is still off.
Free Online Audio Balance Test — Recommended
For a thorough left/right channel test with visual feedback and frequency checking, visit MicTest.pro's Sound Test. It plays test tones through each channel independently, shows you a real-time visual of what is being output, and is much more revealing than the basic Windows test tone:
- Dedicated left and right channel test tones
- Frequency sweep test to check if specific ranges are affected
- Works in Chrome, Edge, Firefox, and Safari
- Free — no download, no account needed

10 Frequently Asked Questions
Real questions from Windows users about volume balance settings — with detailed, tested answers.
How do I adjust left and right audio balance in Windows 11?
Press Win+R, type mmsys.cpl, and press Enter to open the Sound Control Panel. Click the Playback tab, right-click your active audio device (the one with the green checkmark), and select Properties. In the Properties window, go to the Levels tab and click the Balance button. You will see two fields: L for the left channel and R for the right channel. Set both to 100 for perfectly centered audio, or adjust one side lower to compensate for an imbalance. Click OK, then Apply to save the change immediately.
Why is sound louder in one ear than the other in Windows?
The most common causes of uneven left/right audio in Windows are: an uneven L/R balance setting in the audio device Properties (fixable via mmsys.cpl → Playback → Properties → Levels → Balance), audio enhancements such as an equalizer preset or loudness equalisation distorting one channel more than the other, a third-party audio app like Realtek HD Audio Manager or Dolby Access applying its own settings on top of Windows, or Spatial Sound being enabled and misconfigured for your hardware type. Check the balance slider first — it is the single most common cause and takes under 60 seconds to fix.
How do I open the Volume Mixer in Windows 11?
There are three ways to open the Volume Mixer in Windows 11. The fastest: right-click the speaker icon in the taskbar and select Open volume mixer. Alternatively, go to Settings → System → Sound, scroll down, and click Volume mixer. Or press Windows + I, type "volume mixer" in the search box, and click the result. The Volume Mixer shows a separate volume slider for every application currently playing audio, plus the master volume and system sounds. You can adjust each app independently without affecting others.
How do I stop Windows from automatically lowering my volume during calls?
This is Windows' communication audio ducking feature. To disable it: press Win+R, type mmsys.cpl, and press Enter. Click the Communications tab at the top of the Sound panel. You will see options for how Windows handles audio during calls — select Do nothing, then click Apply. With this setting, Windows will no longer automatically reduce background music or other audio when it detects an active voice communication application like Teams, Discord, or Zoom. The change takes effect immediately without a restart.
How do I set different volume levels for different apps in Windows 11?
Right-click the speaker icon in the taskbar and select Open volume mixer. Every application currently producing audio appears with its own volume slider. Drag any slider up or down to set that app's individual volume independently of all other apps and the master volume. The Volume Mixer in Windows 11 (found in Settings → System → Sound → Volume mixer) also lets you assign different apps to different output devices — so you can, for example, have your browser play through headphones while notification sounds play through speakers.
What is Mono Audio in Windows 11 and when should I use it?
Mono Audio is an accessibility setting found in Settings → Accessibility → Audio that combines both the left and right stereo channels into a single identical signal, played equally through both ears. Use it when: you have hearing loss in one ear and do not want to miss sounds panned to the other channel; one side of your headphones is physically broken; you are using a single earbud. Leave it off for normal stereo listening — when enabled, music loses left/right separation and gaming loses directional audio cues, which are features most users with normal stereo hearing want to preserve.
Can audio enhancements in Windows 11 cause volume imbalance between speakers?
Yes. Audio enhancements like loudness equalisation, bass boost, and room correction process the left and right channels using different algorithms, which can create an unequal perceived volume between channels. This is particularly common after Windows 11 24H2, which changed how enhancements are applied system-wide. To check: open mmsys.cpl, go to Playback, right-click your device, select Properties, go to the Enhancements tab, and enable Disable all enhancements. Click Apply and test. If the balance improves immediately, one of the enhancements was causing the issue.
How do I reset all Windows audio settings back to default?
Open mmsys.cpl (Win+R → mmsys.cpl). In the Playback tab, right-click your active audio device → Properties. Go to the Advanced tab → click Restore Defaults. Then go to the Enhancements tab → Restore Defaults. Go to the Spatial sound tab → set to Off. In the Levels tab → click Balance → set L and R both to 100. Click Apply → OK. Then go to the Communications tab → select Do nothing → Apply. Finally, open the Volume Mixer and drag all app sliders to 100%. Restart the PC. Your audio settings are now at clean defaults, ready for you to reconfigure only what you actually need.
Why does my Bluetooth headphone volume keep changing or feel uneven in Windows 11?
Bluetooth headsets create two separate audio devices in Windows: the A2DP (Headphones) profile for high-quality music and the HFP (Hands-Free) profile for calls with microphone. When Windows switches between these profiles — often triggered automatically when you start a voice call — the volume level changes dramatically because each profile tracks volume independently. To fix: set your preferred volume while each profile is active so Windows remembers it. If the imbalance persists, remove the Bluetooth device from Settings → Bluetooth and devices and re-pair from scratch, which resets Bluetooth audio session data.
Does Windows 11 24H2 affect audio balance settings?
Yes, Windows 11 24H2 affects audio balance in two main ways. First, it replaces many OEM audio drivers (Realtek, Intel Smart Sound Technology) with generic Microsoft versions that use different default EQ and balance settings — which can cause the perceived balance to shift after the update. Second, 24H2 changed how audio enhancements are applied at the system level, which can cause enhancement-related balance issues on hardware that worked fine before. After upgrading to 24H2, the recommended steps are: reinstall your manufacturer's audio driver, check mmsys.cpl → Playback → Properties → Enhancements and disable all enhancements, and verify the L/R balance slider is set to equal values for each output device.
Test Your Speaker Balance
Free left/right audio balance test with visual feedback. No download needed. Works in all browsers.
Open Free Sound Test- One ear louder: Fix 1 (Balance)
- App too loud/quiet: Fix 2 (Mixer)
- Music drops in calls: Fix 3 (Ducking)
- One broken earbud: Fix 4 (Mono)
- Spatial sound issue: Fix 5
- After Windows 24H2: Fix 7
- Bluetooth issue: Fix 8
- Balance keeps resetting: Fix 9
- Nothing works: Fix 10 (Reset)
Quick Windows Shortcuts
- Win + R →
mmsys.cpl= Sound Panel - Win + I → System → Sound
- Right-click 🔊 → Open volume mixer
- Win + I → Accessibility → Audio
- Right-click 🔊 → Spatial sound